.png)

Toggling Settings in the Flowcart Shopify Plugin
The Settings menu in the Flowcart Shopify Plugin allows you to toggle specific features on or off, ensuring that your automated flows and manual support tools align perfectly with your current business operations.
This flexibility ensures that as your business scales, your communication tools can be adjusted instantly to meet new demands.
How to Access Settings
To access tickets in the Flowcart Shopify Plugin:
- Log in to the Flowcart Whatsapp Chat+AI+CRM dashboard
- In the main navigation menu, find Settings
.png)
The settings panel provides two primary actions to establish WhatsApp presence and ensure data integrity:
- Enable WhatsApp Widget: Click Enable Widget to place activate the WhatsApp chat button on the storefront
Once enabled, the widget will appear on the merchant’s website.
.png)
- Sync Shopify Customers: Use the Sync Customers button to import and update your Shopify customer list within the plugin.
This ensures that all user data, including contact information and order history, remains consistent and up to date across platforms.
.png)
Tracking Performance with Analytics in the Flowcart Shopify Plugin
The Analytics feature in the Flowcart Shopify Plugin provides merchants with a comprehensive overview of their store's performance and customer engagement. It enables data-driven decision-making by tracking key metrics and conversion trends directly within the plugin.
How to Access Analytics
To access tickets in the Flowcart Shopify Plugin:
- Log in to the Flowcart Whatsapp Chat+AI+CRM dashboard
- In the main navigation menu, find Analytics
.png)
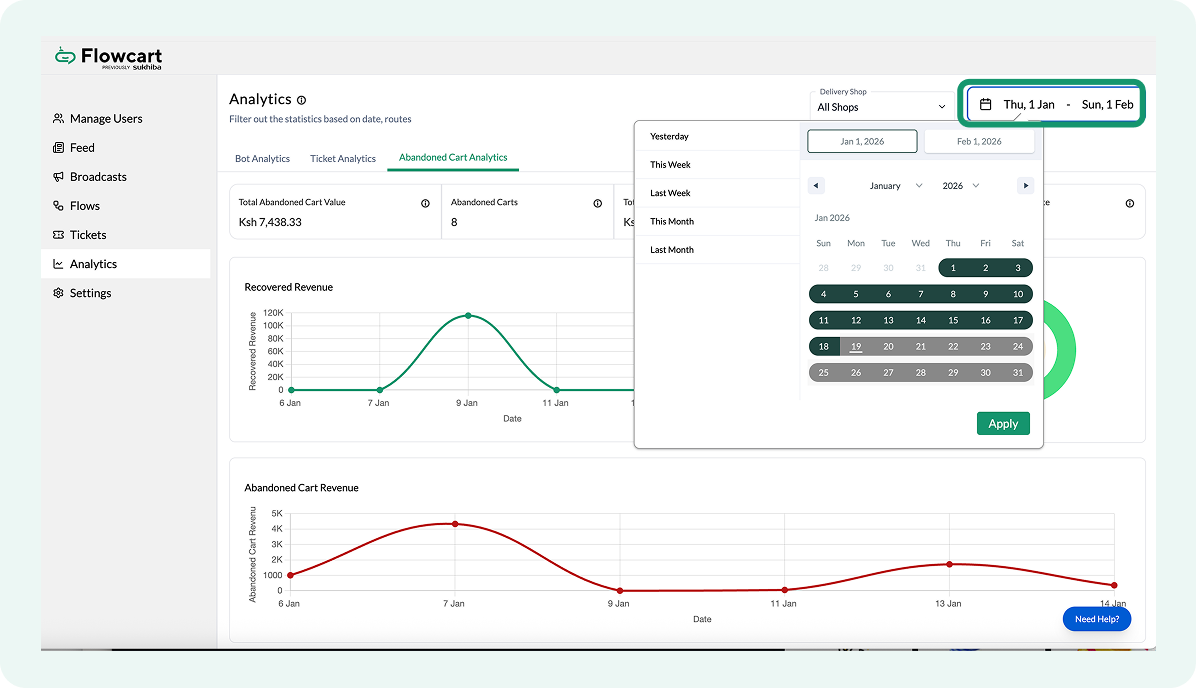
- Use the calendar icon to adjust the date range and analyze performance across different time periods
.png)
Understanding Your Data
The Analytics dashboard categorizes information into three primary areas to help you monitor system integrity and growth:
1. Bot Analytics
Bot Analytics tracks the total number of AI-driven conversations. In other words, it measures how much conversation has happened using the AI functionality in your system.
.png)
2. Ticket Analytics
Ticket Analytics tracks the efficiency and volume of your customer support operations. It measures key performance indicators, such as the total number of tickets created and resolution times, to ensure your team resolves customer issues effectively.
.png)
3. Abandoned Cart Analytics
Abandoned Cart Analytics monitors the recovery of lost sales opportunities. Put simply, it tracks how many customers leave items in their carts without checking out and measures the success rate of automated WhatsApp nudges in bringing them back to complete their purchase.
.png)

While the dashboard provides essential oversight, advanced tracking or specific performance monitoring often requires technical alignment.
If you need to customize your analytics to monitor a different metric or have questions about your current data, our team is here to help. You can reach out to the Flowcart Support Team directly using the Need Help option available in the plugin.
Managing Tickets in the Flowcart Shopify Plugin
The Tickets feature in the Flowcart Shopify Plugin allows merchants to manage and resolve customer queries or issues efficiently. It enables seamless ticket creation, tracking, and resolution directly within the plugin.
How to Access Tickets
To access tickets in the Flowcart Shopify Plugin:
- Log in to the Flowcart Whatsapp Chat+AI+CRM dashboard
- In the main navigation menu, find Tickets
.png)
- Open a specific user profile by clicking on their name. For example, this is a ticket created by Shreyansh:
.png)
- Track when the tickets were created and updated from these ticket windows
- Update the Ticket Status by using the drop-down menu on the top-right corner
.png)
- Open chat by toggling the button in the ticket window to speak with the customer in real-time
.png)
- Use Quick Note to add additional information in regards to customer’s request when speaking with them in real-time
.png)
- Review the customer’s payment details and timelines right in the ticket window
.png)
- Click on the Edit button to make any necessary changes
.png)
- Add Comments for co-workers or co-assignees to let them know the update on tickets
.png)
- Once done, Save Comment and log the updates
If you have questions about assigning specific team roles to tickets or need assistance tailoring your support automation to your business goals, our team is here to help. Contact the Flowcart Support team today!
Simplify the Path to Purchase with Shopify Lite Checkout
Retail is moving away from traditional, multi-step website flows and toward Conversational Commerce. Modern customers no longer want to be redirected to a separate browser tab to complete a purchase; they want to buy exactly where they are already talking.
This shift is backed by a powerful global trend: spending via conversational commerce channels is reaching $290 billion. Shopify Lite Checkout captures that moment by providing a direct, high-speed path to payment. It keeps them right where they are, leading to fewer abandoned carts and more completed sales.
Use this guide to activate a checkout process in the Flowcart Shopify plugin that stays out of the customer’s way.
What you'll need
To provide a seamless buying experience using Shopify Lite Checkout, ensure the following requirements are met:
- An active Shopify Store to manage your products, pricing, and incoming orders
- The Flowcart Shopify Plugin installed and configured on your Shopify admin to bridge your store data with WhatsApp
- Shopify Lite Checkout activated on your plugin interface
- Customers with a valid WhatsApp phone number who have opted in to receive messages
How to activate the Shopify Lite Checkout flow
To activate the Shopify Lite Checkout flow:
- Go to Flows in the Flowcart Shopify Plugin and select One-Click Flows
.png)
- Select the Shopify section
.png)
- Click on Activate to enable the Shopify Lite Checkout flow
.png)

What it looks like in practice
Once activated, here is how the search works for your customers:
- Customers type what they’re looking for (e.g., “I am looking for apples”) just like in product search
- They instantly receive a matching item card with the price, available quantity, and Add to Cart option
.png)
- Click on Add to Cart
- Customers will receive a message with their order summary with a Pay Now option
.png)
- Click on Pay Now
- Customers will receive payment information right away
.png)
How to change the delivery address during Lite checkout
To change or update the delivery address:
- Click on Change Address during checkout
.png)
- Enter the new/updated address
- Re-confirm the new address
.png)
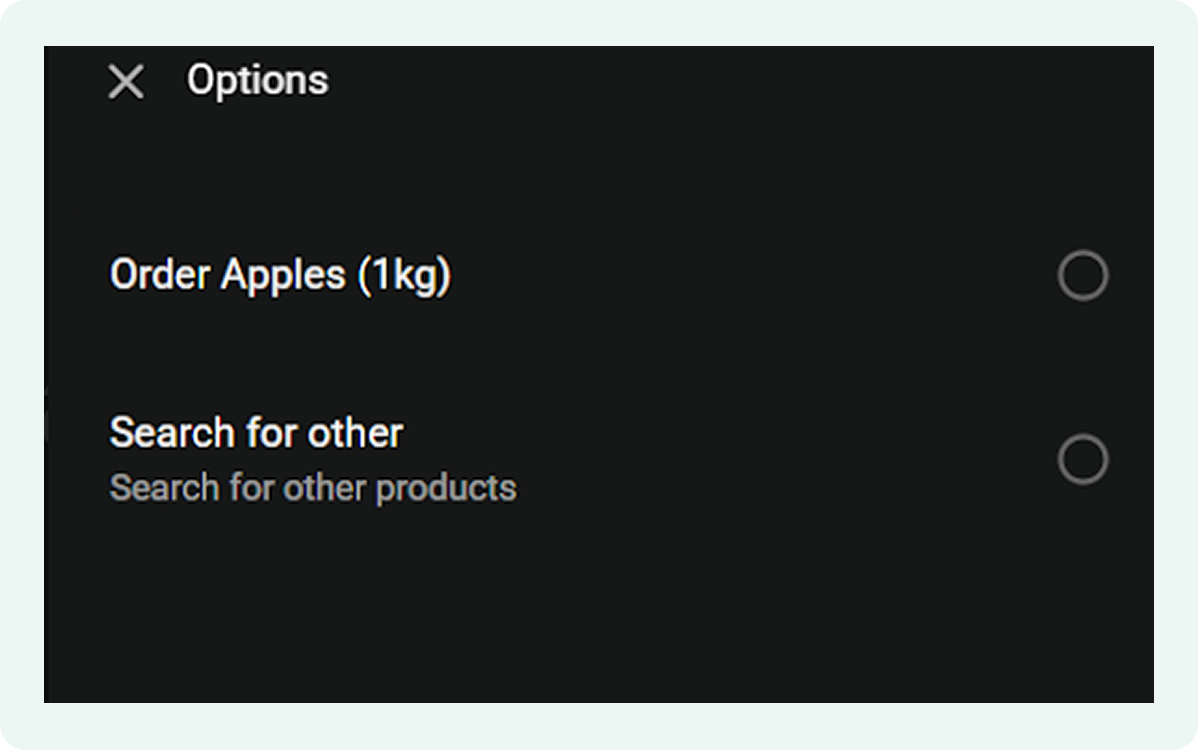
- Open Options to explore your choices
- In case the customer wants to continue with the order, they can select Order Apples or Search for Other Products.
Read: How to browse products in WhatsApp?
.png)
How to troubleshoot the Shopify Lite Checkout Flow
If customers are having trouble completing their orders within the chat, it is usually due to a connection gap or a sync delay. Most issues can be resolved by following these steps:
Ensure the checkout flow is activated
The merchant should verify that the Shopify Lite Checkout flow shows Activated within the Flowcart Shopify Plugin. If this is disabled, customers will be redirected to the standard web checkout instead of the chat-based interface.
Check payment gateway integration
For a successful transaction, the Shopify store must have an active payment gateway (such as Shopify Payments, PayPal, or Stripe) that supports automated links.
Verify customer contact information
The flow requires a valid WhatsApp phone number to deliver the checkout link. If the customer's Shopify profile is missing a phone number or it is formatted incorrectly, the message cannot be sent.

Flows & AI Bots
The Flows and AI Bots section is the central intelligence of your WhatsApp storefront. By combining structured automation (Flows) with conversational intelligence (AI Bots), you can transform your WhatsApp channel from a simple chat app into a 24/7 sales and support team.
The Two Pillars of Flowchart Automation
To get the most out of your setup, it is important to understand how these two components work together to drive revenue:
1. WhatsApp Flows
Flows are your "pre-set playbooks." They are triggered by specific events in your Shopify store, like a customer leaving a cart or an order being fulfilled.
- Purpose: To move a customer toward a specific goal (e.g., finishing a purchase or tracking a package)
- When to use: Use Flows for predictable, high-value actions like Abandoned Cart Recovery or Order Updates
2. AI Bots
AI Bots handle the "unpredictable." They use natural language processing to understand customer intent, answer product questions, and provide support when a customer types a message that doesn't fit a pre-set flow.
- Purpose: To provide instant, human-like assistance and product discovery
- When to use: Use AI Bots to handle real-time queries like, "What is your return policy?" or "Do you have this in red?" so you never miss a lead
Navigating to Flows & AI Bots
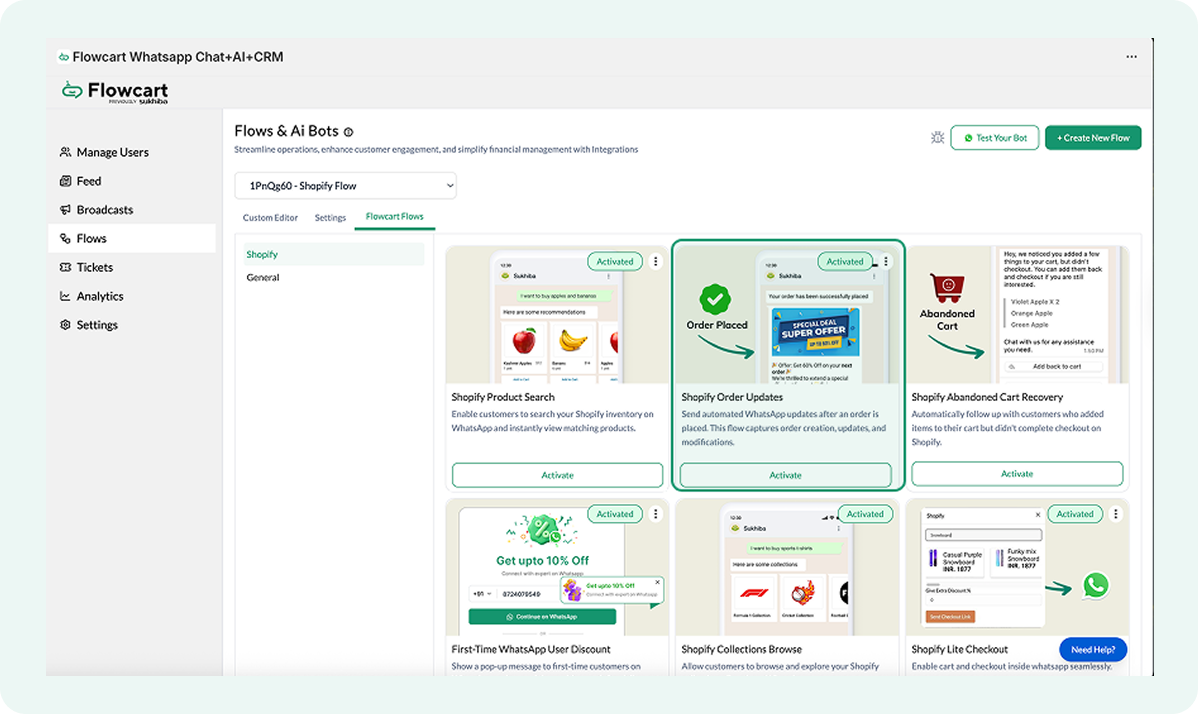
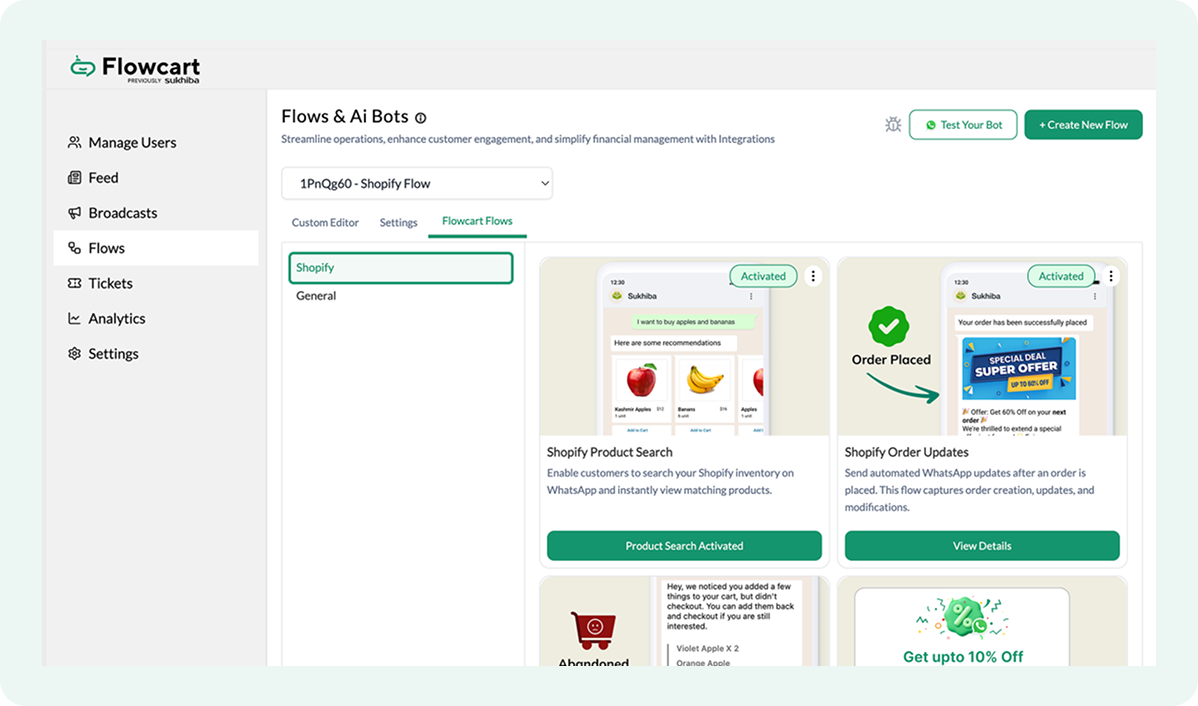
To access your automation command center within the Flowcart Shopify Plugin, follow these steps:
- Log in to the Flowcart Whatsapp Chat+AI+CRM dashboard
- In the main navigation menu, find Flows
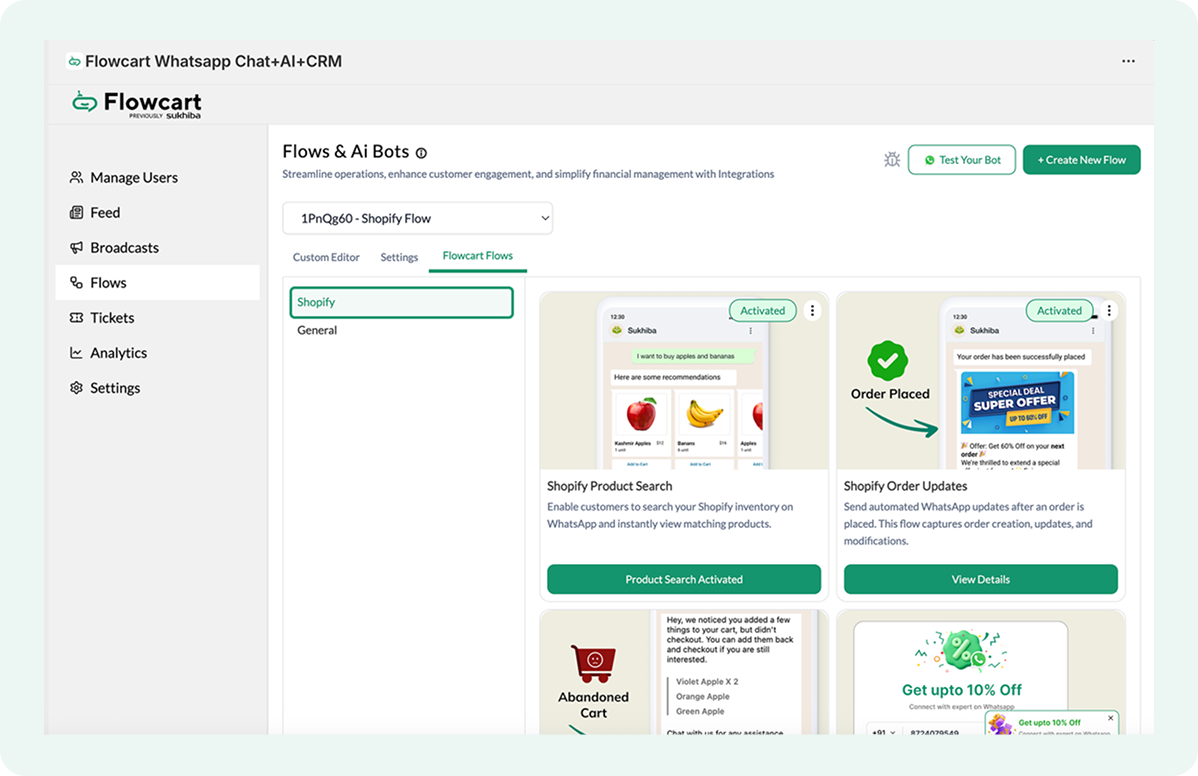
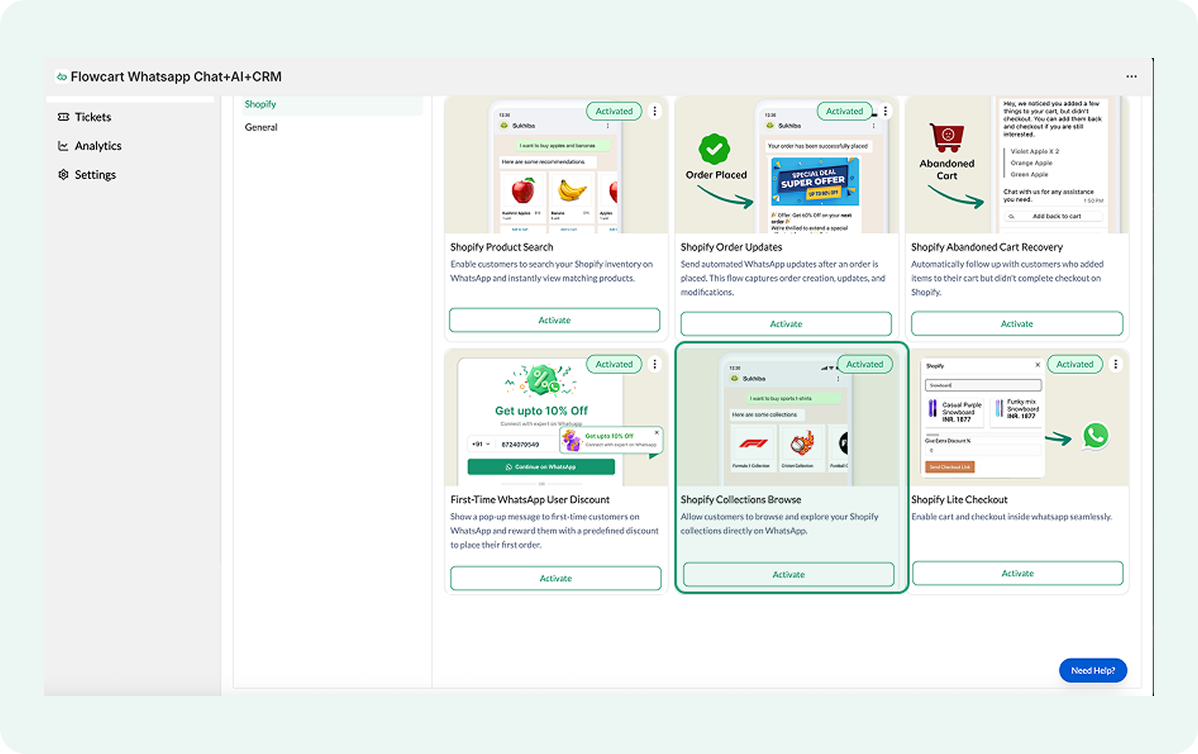
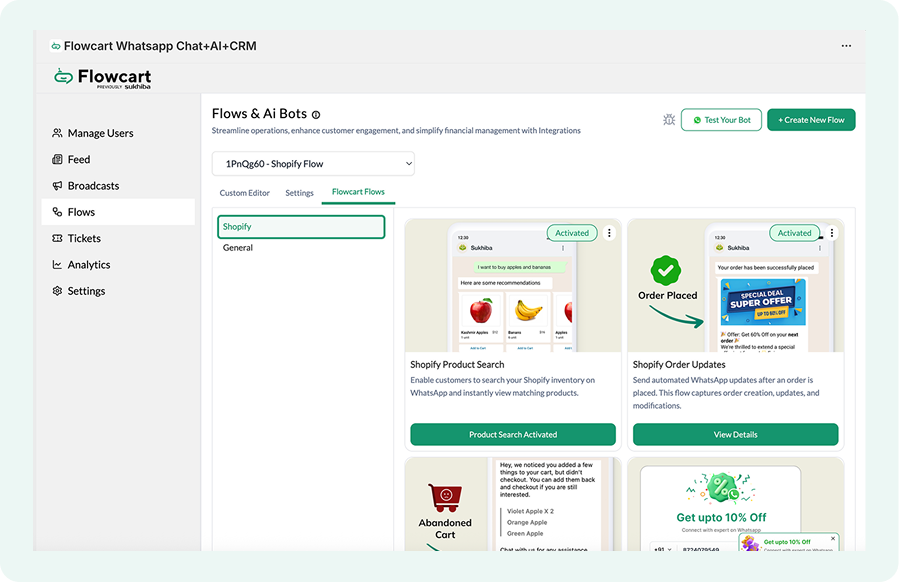
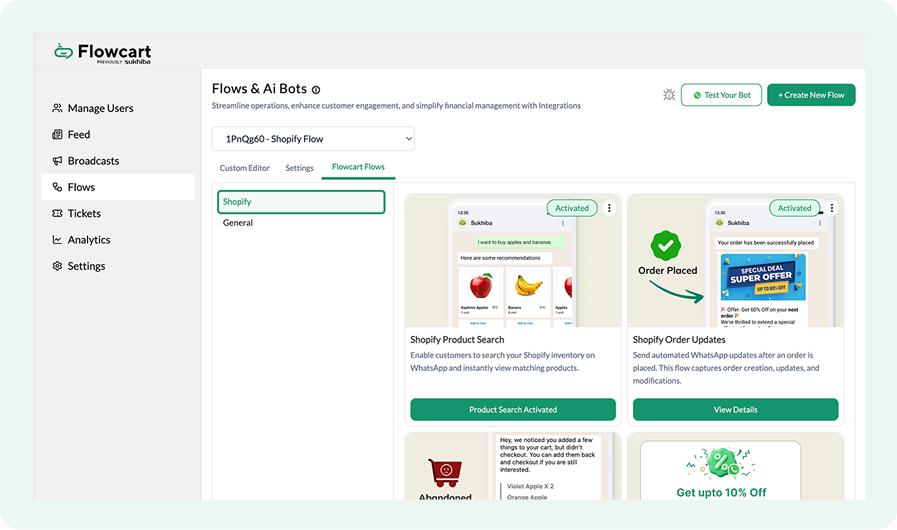
- Navigate to Flowcart Flows and select Shopify to view your store-specific automations
.png)
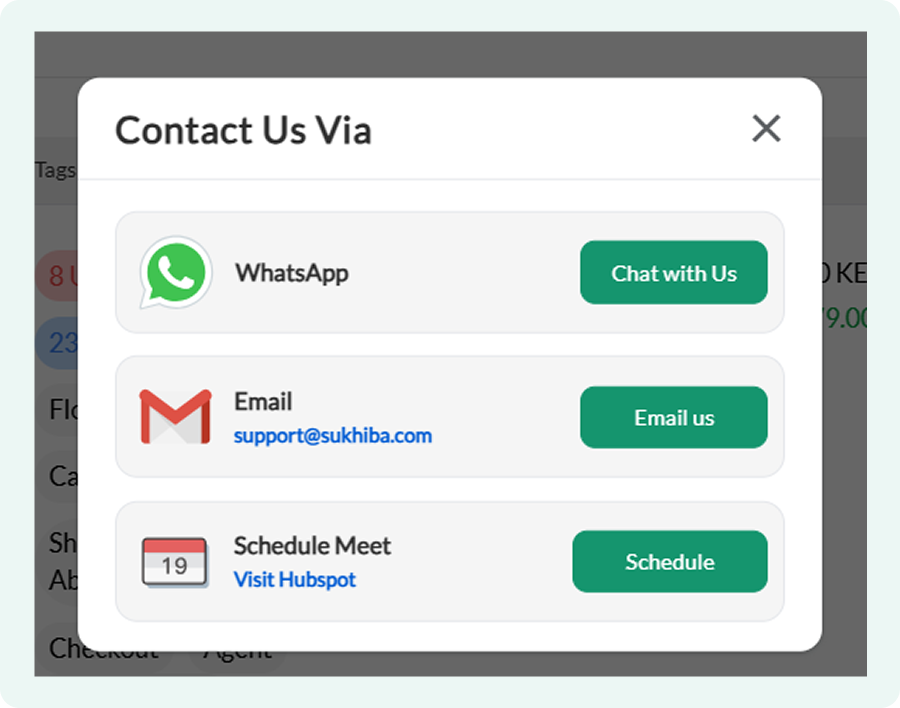
- Merchants can also use the Need Help option available in the Flowcart Shopify Plugin:
.png)
- Contact us via WhatsApp for assistance
.png)
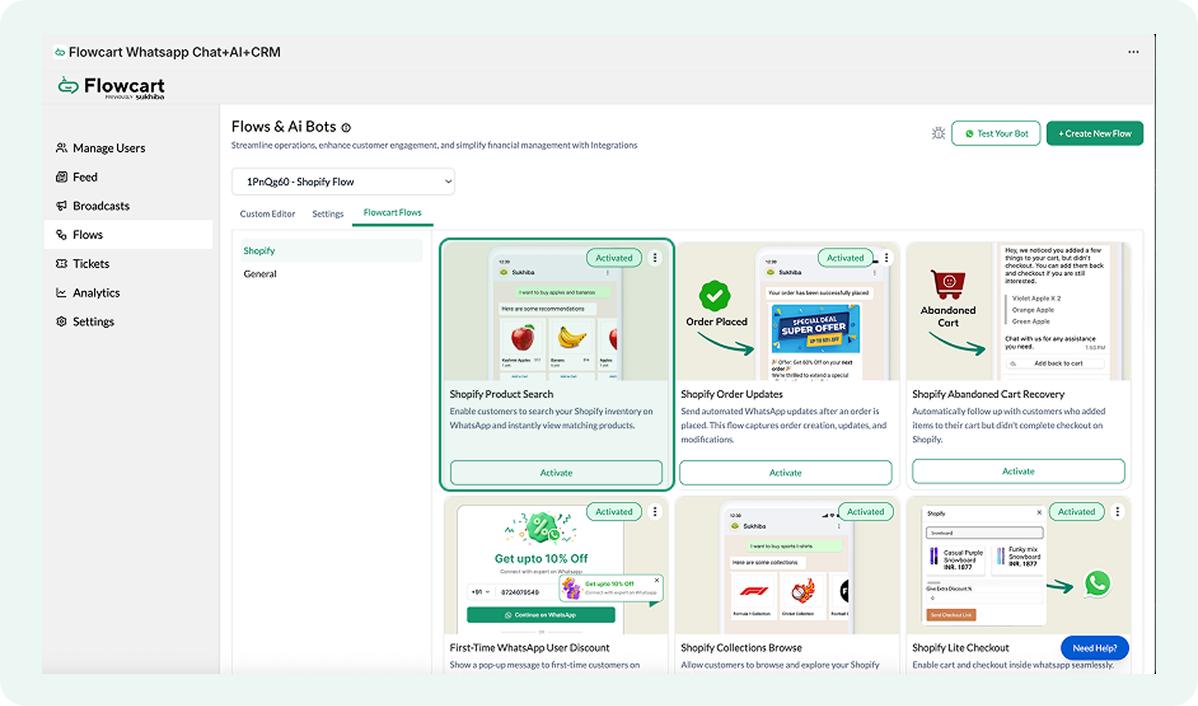
Available Flows to activate
You are now ready to put your store on autopilot. Explore the following guides to activate and customize your flows:
- Shopify Abandoned Cart Recovery: Automatically follow up with customers who added items to their cart but didn't complete checkout.
- Shopify Lite Checkout: Enable a seamless cart and checkout experience directly inside WhatsApp.
- Shopify Order Updates: Keep your customers in the loop with automated WhatsApp notifications for order creation, modifications, and fulfillment status.
- Shopify Product Search: Empower your customers to search your real-time Shopify inventory on WhatsApp and instantly view matching products.
- Shopify Collections Browse: Let customers explore your curated collections directly on WhatsApp, making product discovery easy.
- First-Time WhatsApp User Discount: Convert new visitors instantly by showing a pop-up message that rewards first-time WhatsApp users with a predefined discount.
Broadcasts in the Flowcart Shopify Plugin
The Broadcasts feature is a direct line to the entire customer base, allowing merchants to send high-impact messages to thousands of users simultaneously.
They can scale their outreach by sending personalized offers, product announcements, or urgent updates to specific customer segments.
How to Access Broadcasts
To access broadcast messaging in the plugin:
- Log in to the Flowcart Whatsapp Chat+AI+CRM dashboard
- In the main navigation menu, find Broadcasts
.png)
The Broadcast dashboard displays a chronological list of all broadcast campaigns, including their names and creation timestamps.
.png)
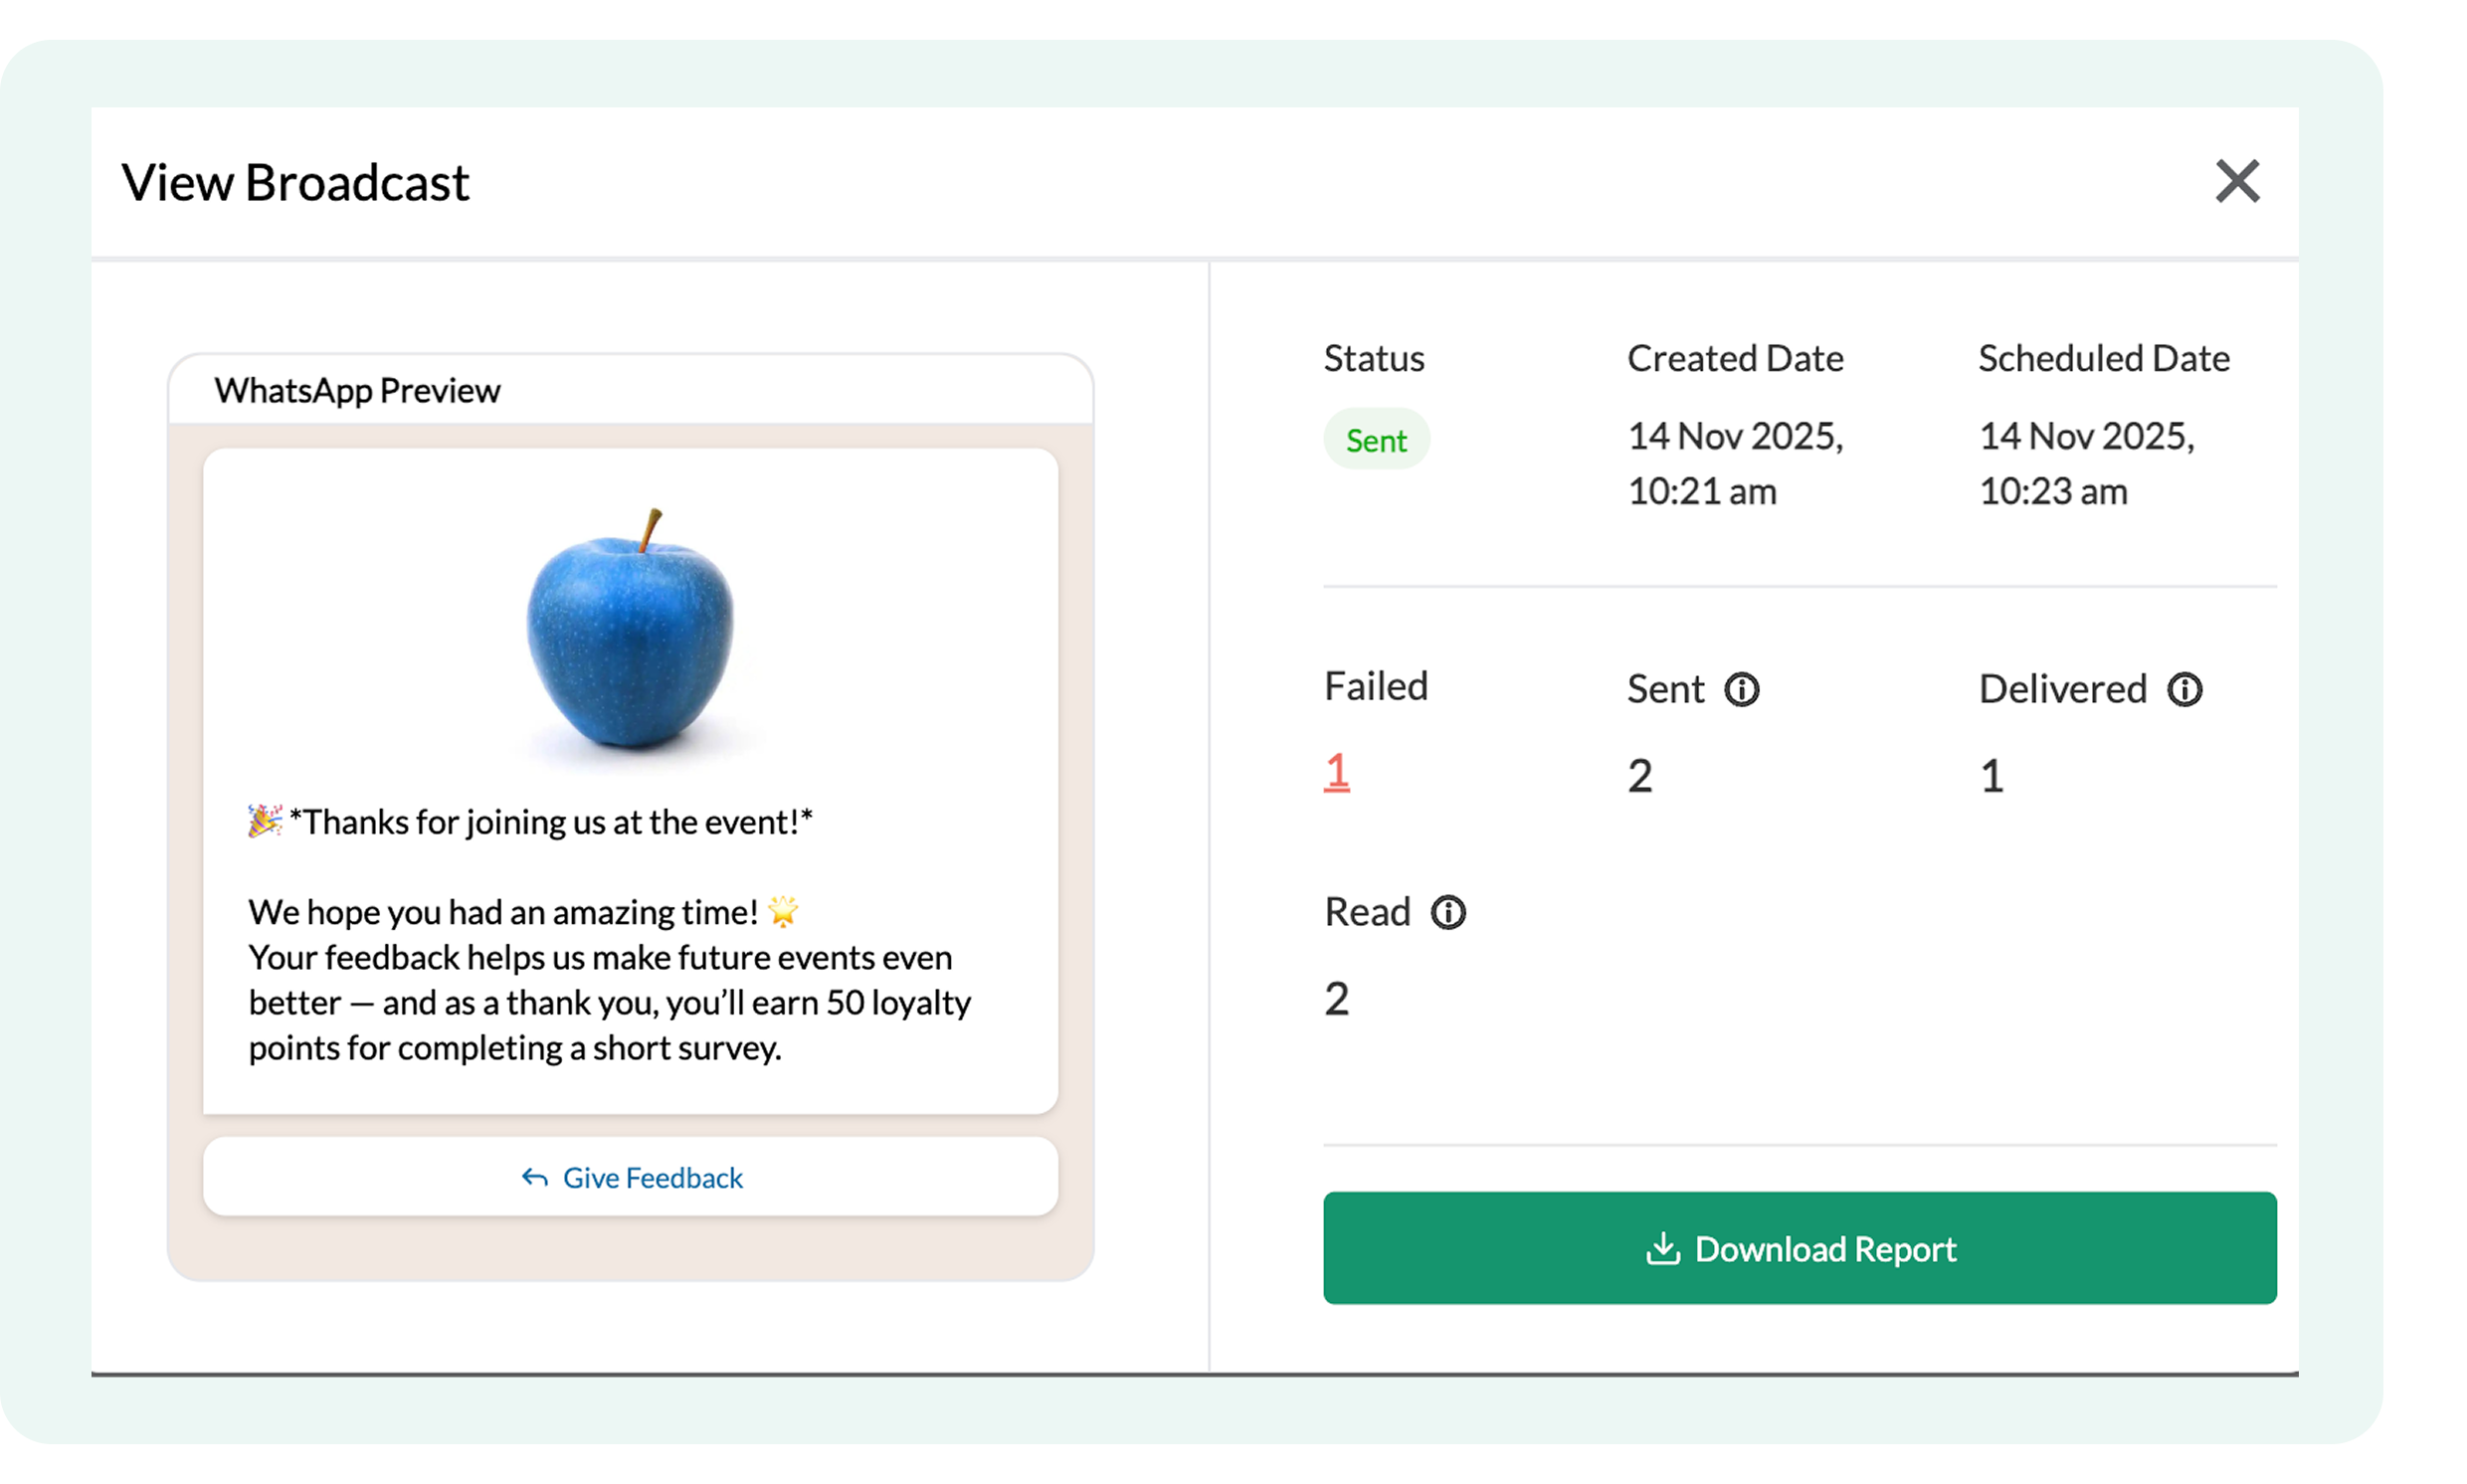
- Click on any campaign to view a message preview, check its status, and download a detailed performance report.
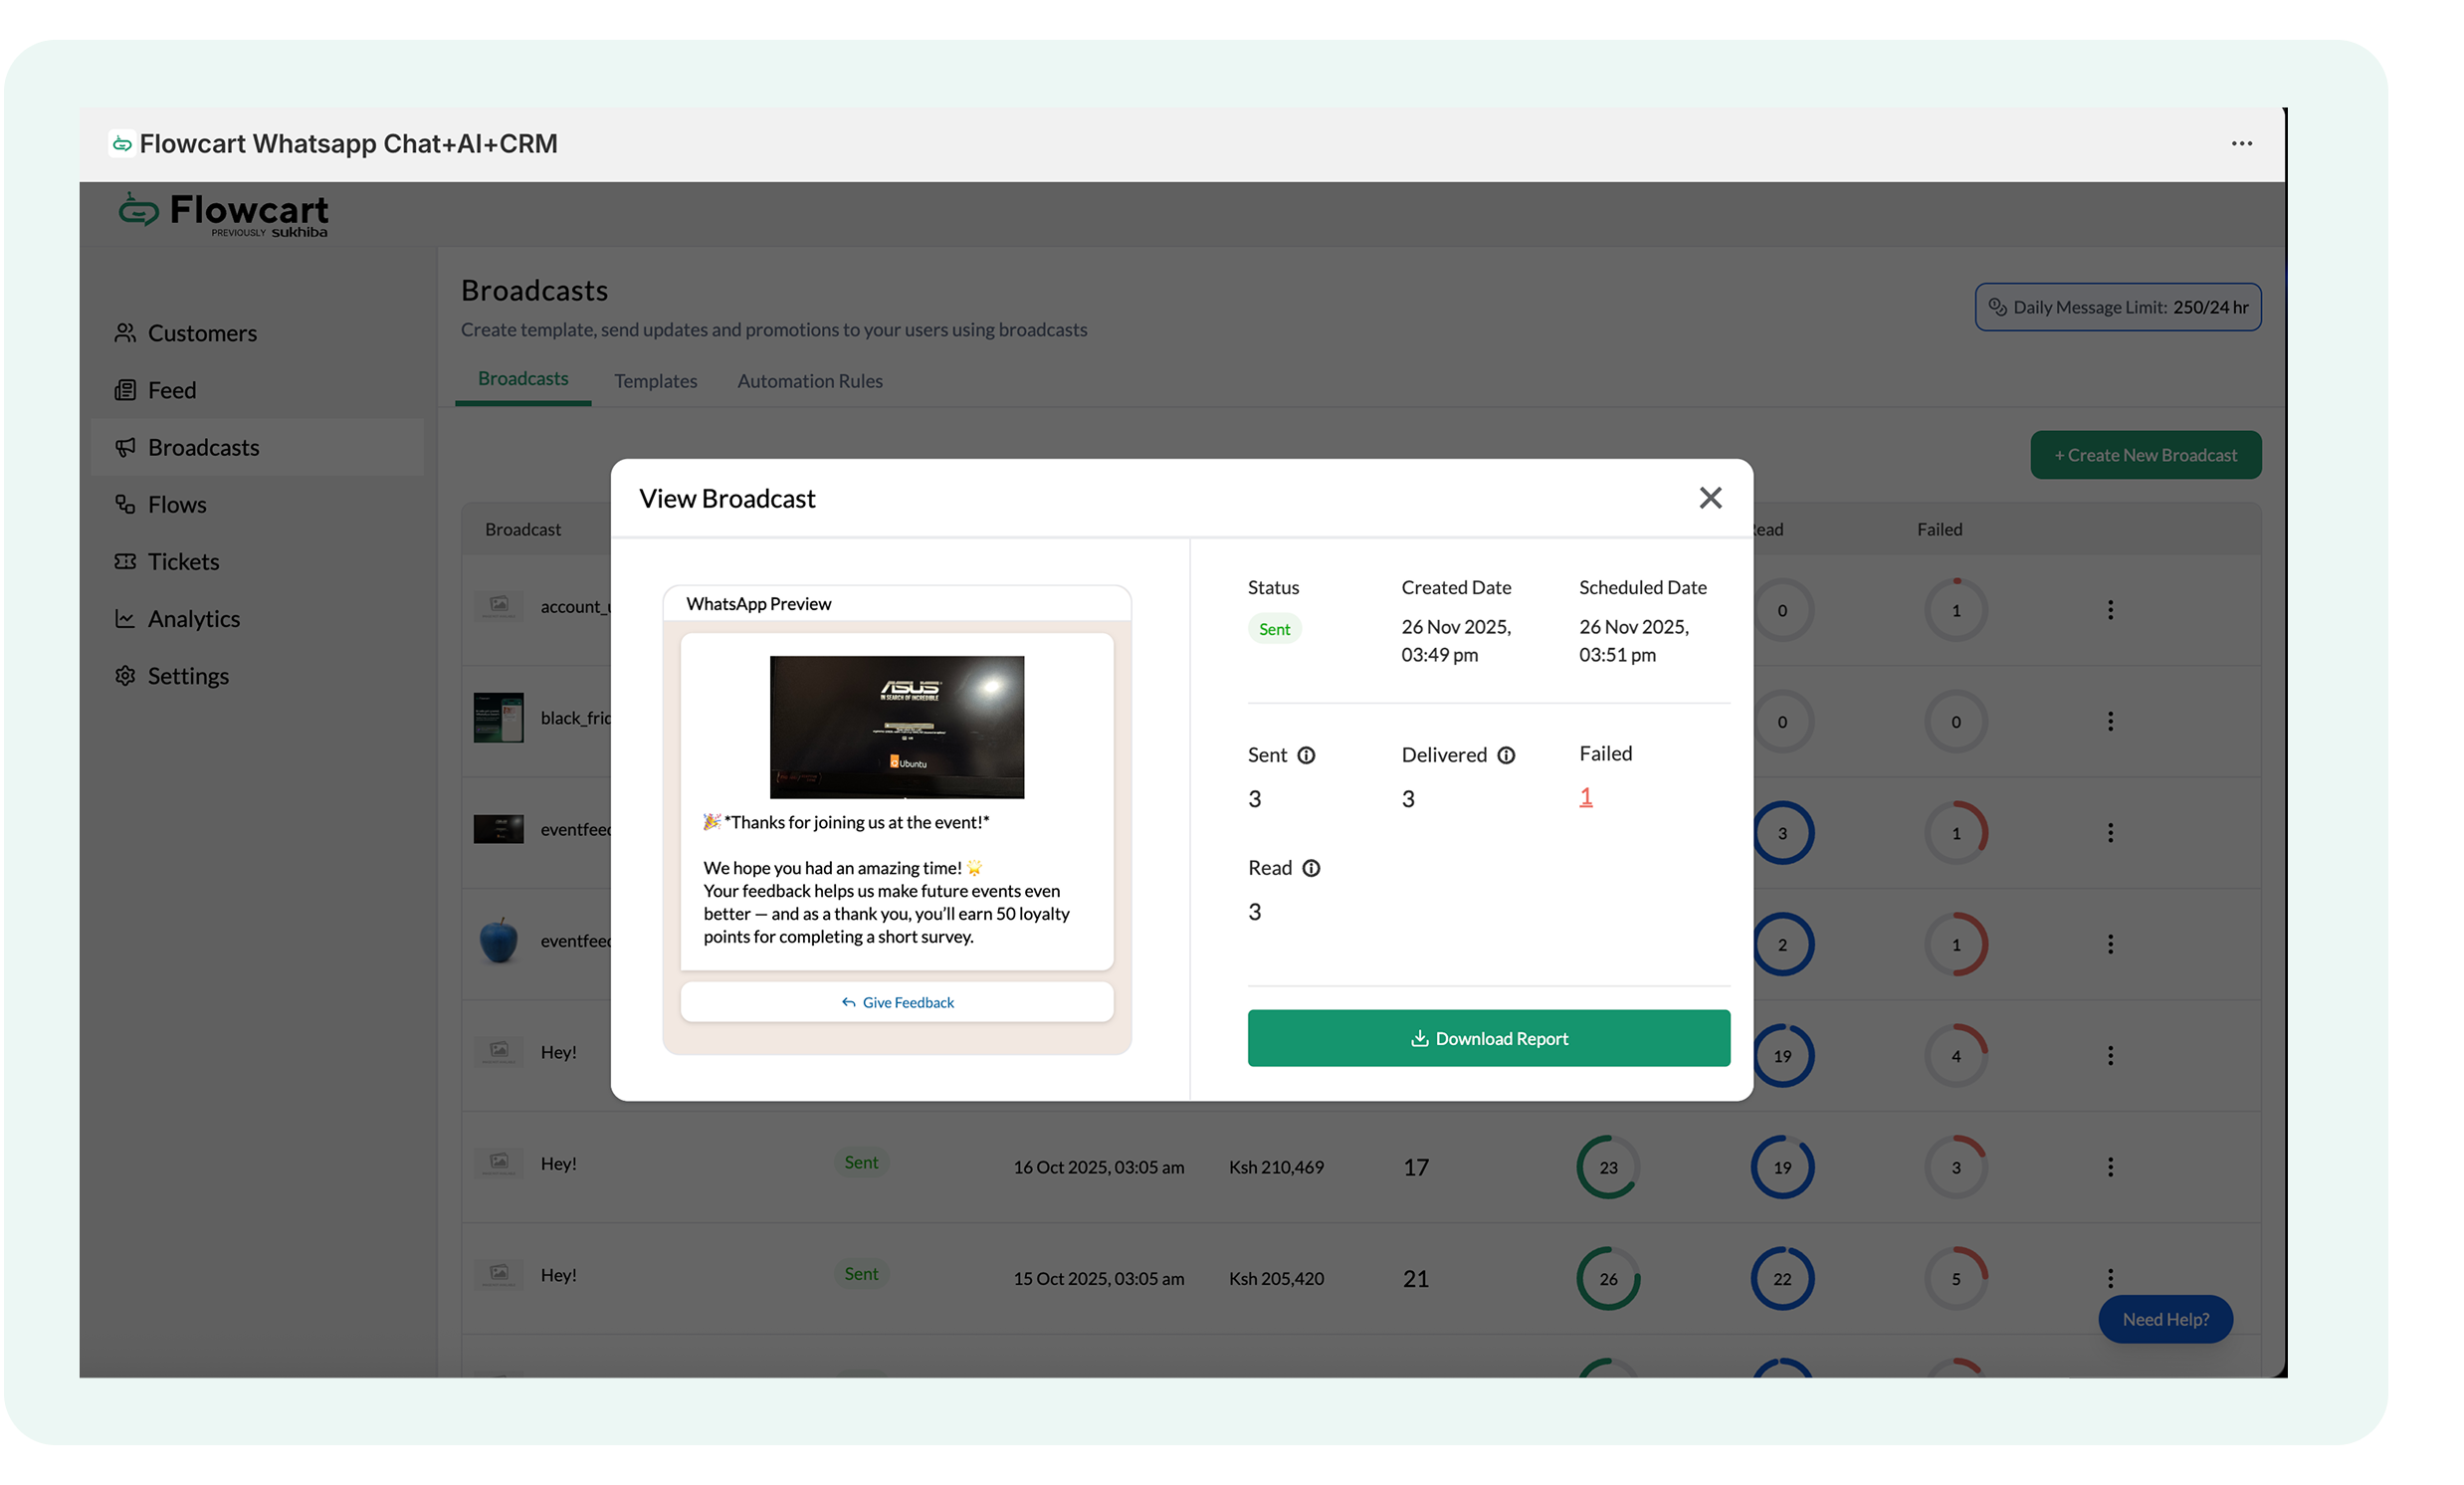
- Keep an eye on the Daily Message Limit displayed at the top of the dashboard to manage your messaging capacity effectively
.png)
Start a new Broadcast
- Click the + Create New Broadcast button to start.
.png)
Merchant has two paths to build the message: create a new template or use pre-approved templates.
.png)
If the user clicks on Create New Template, another window will open with sample templates and do-it-yourself options:
.png)
Say, for example, the user clicks on Create Your Own Template, a dialogue box with blank columns will appear:
.png)
- Assign a template name, category, and language
.png)
Decide the header type and add the header message copy (this is an optional step)
- Write the message copy in the next text field
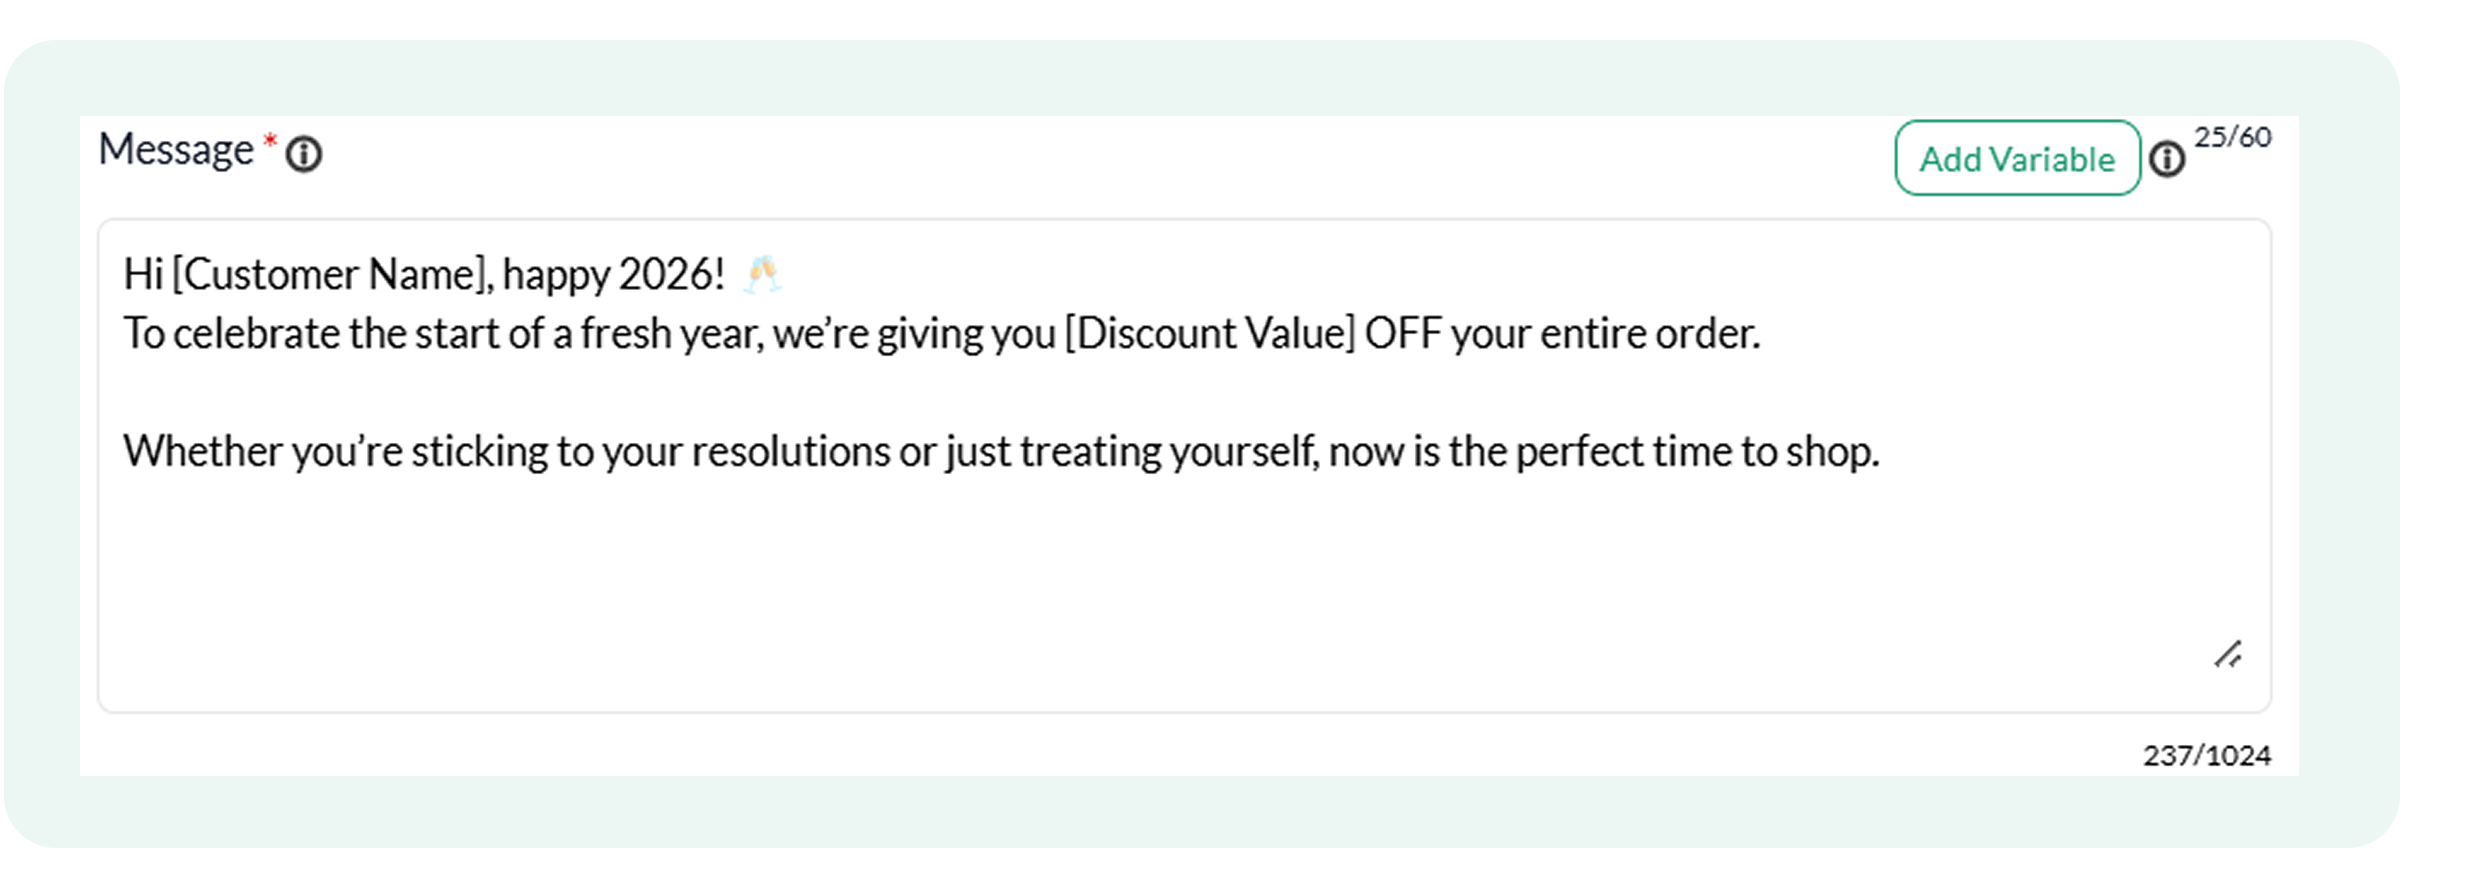
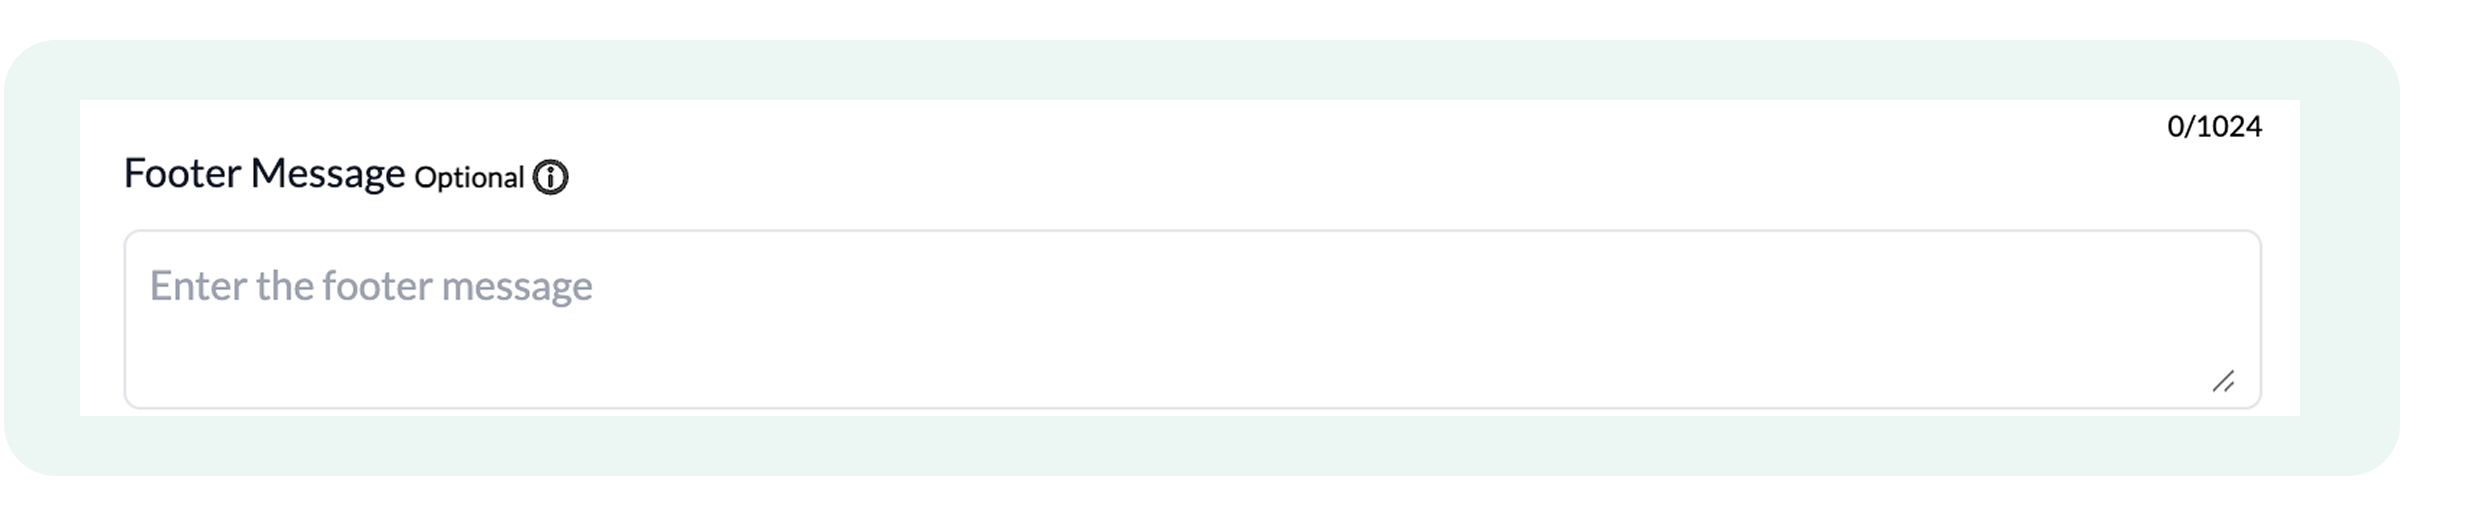
- Add the Footer Text if needed next (this step is optional)
- Choose the Button Text and Type, and feel free to add more buttons if required
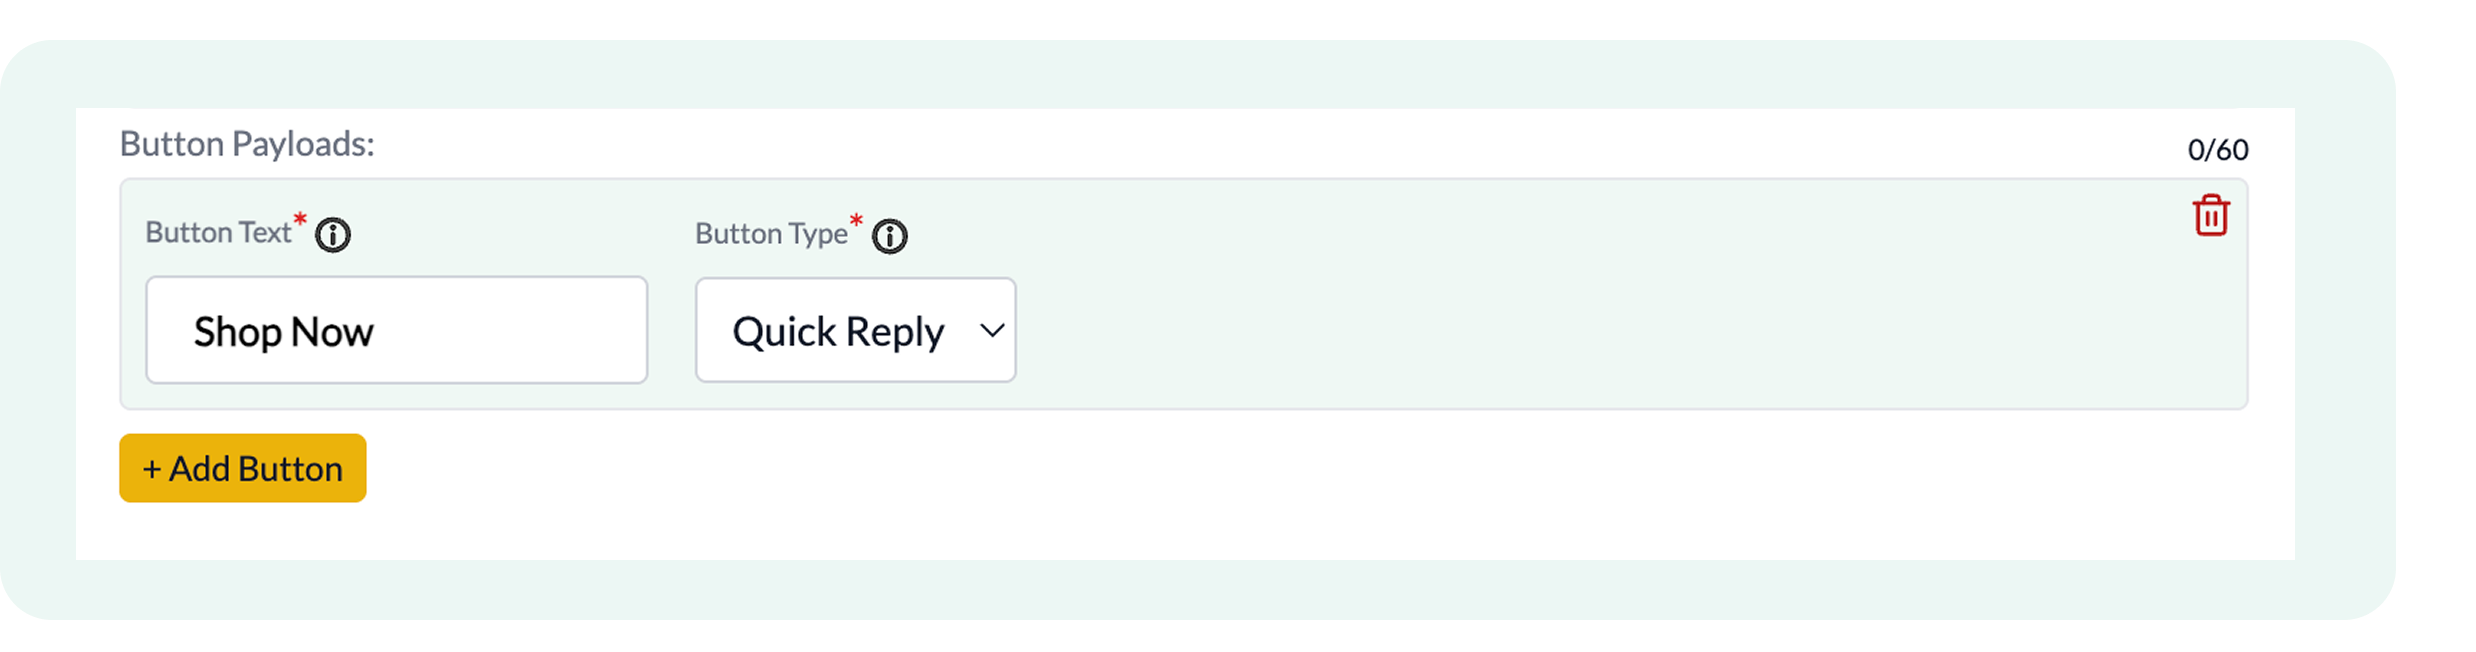
- Once done, the user can Submit the template design and wait for approval from Meta.
The merchant can check the status of their template in the Template section, next to Broadcasts.
.png)
Accessing approved Meta templates
To get started immediately while waiting for custom designs, select an Approved Template:
- Go to Create New Template in the Broadcast section
- Click on a suitable Approved Template design
.png)
A window like this will open:
.png)
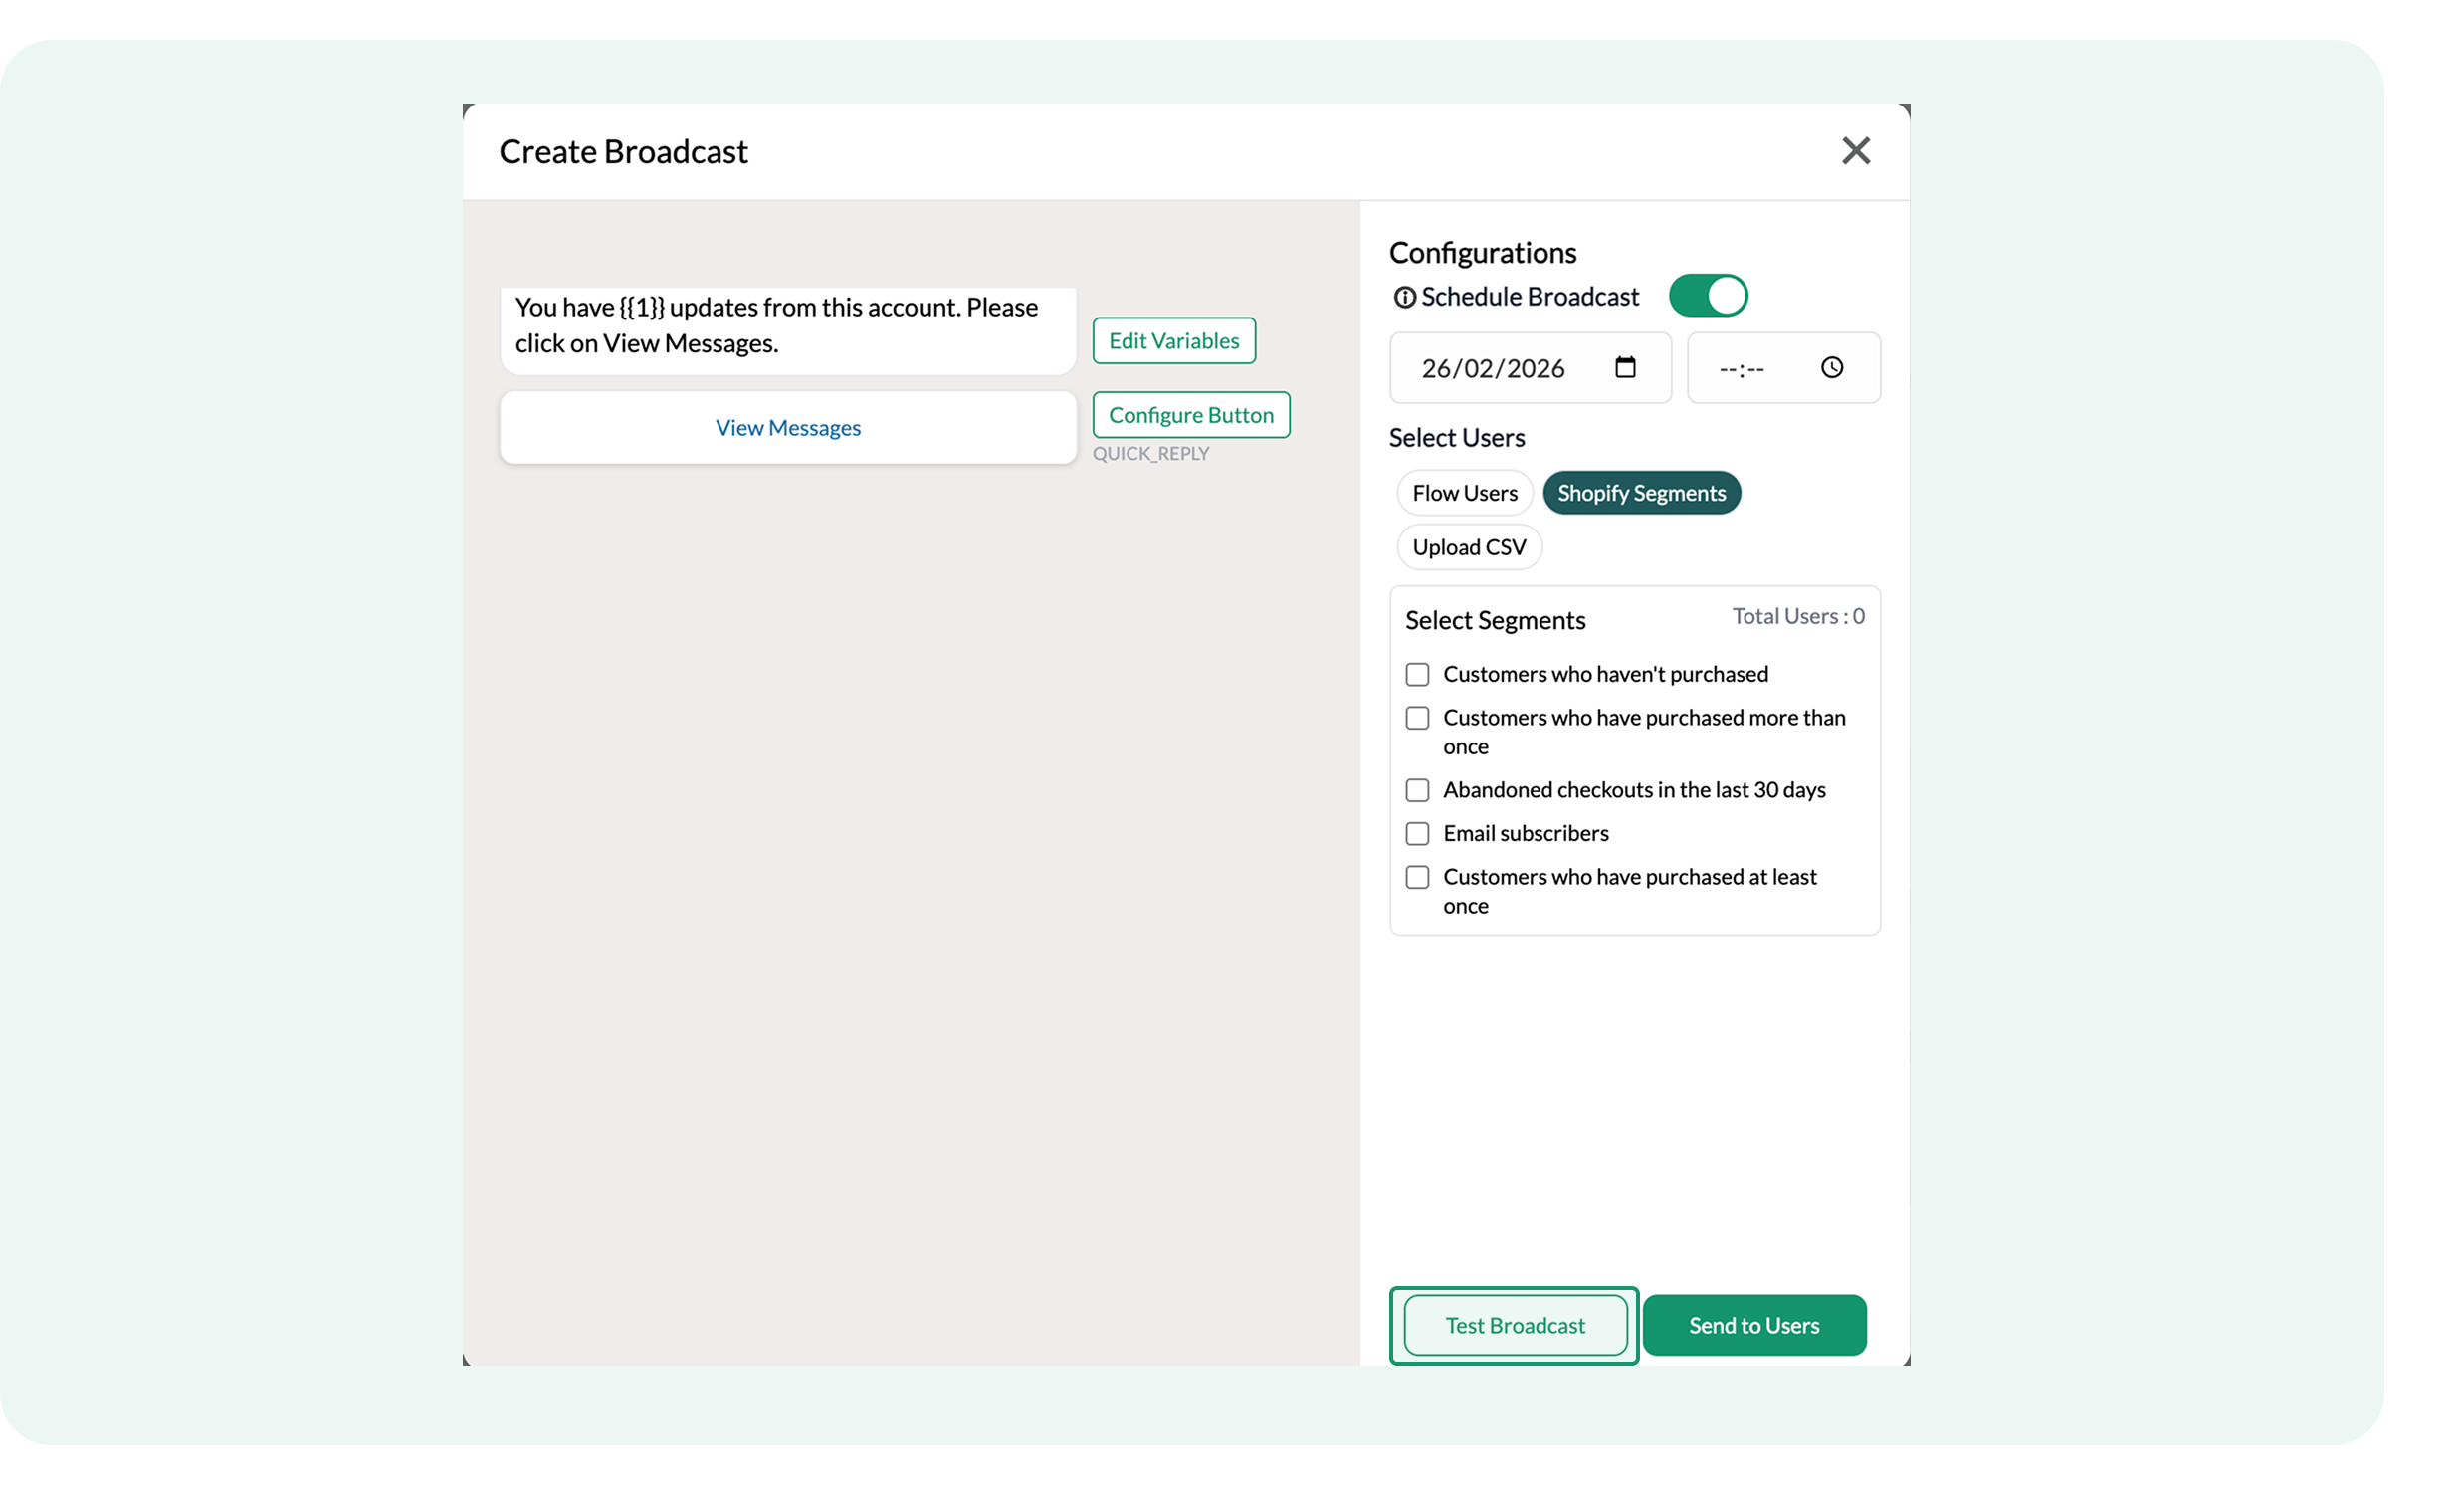
The merchant has to configure variables and buttons to complete this existing message copy

- Click on Configure variables and decide what type of message the variable should represent in the original message copy.
For example, since this is an updates-related message, we can assign the variable to a Custom input and add a number
.png)
- Click on the Configure Button and choose what the button should do, while also adding the Button label in the message section.
For example, for an update-related message, the right button label can be View Message, with the perform action command, so that as soon as the customer clicksthe button, the message appears.
.png)
- Toggle the Schedule Broadcast button to select the specific date and time for delivery
.png)
- Select segments to send the message using Send Users (feel free to select multiple options under one segmentation umbrella)
.png)
Merchants can also send broadcasts to Flow users and/or upload a CSV file to message a particular set of customers. For more information on configuring this, contact Flowcart support.
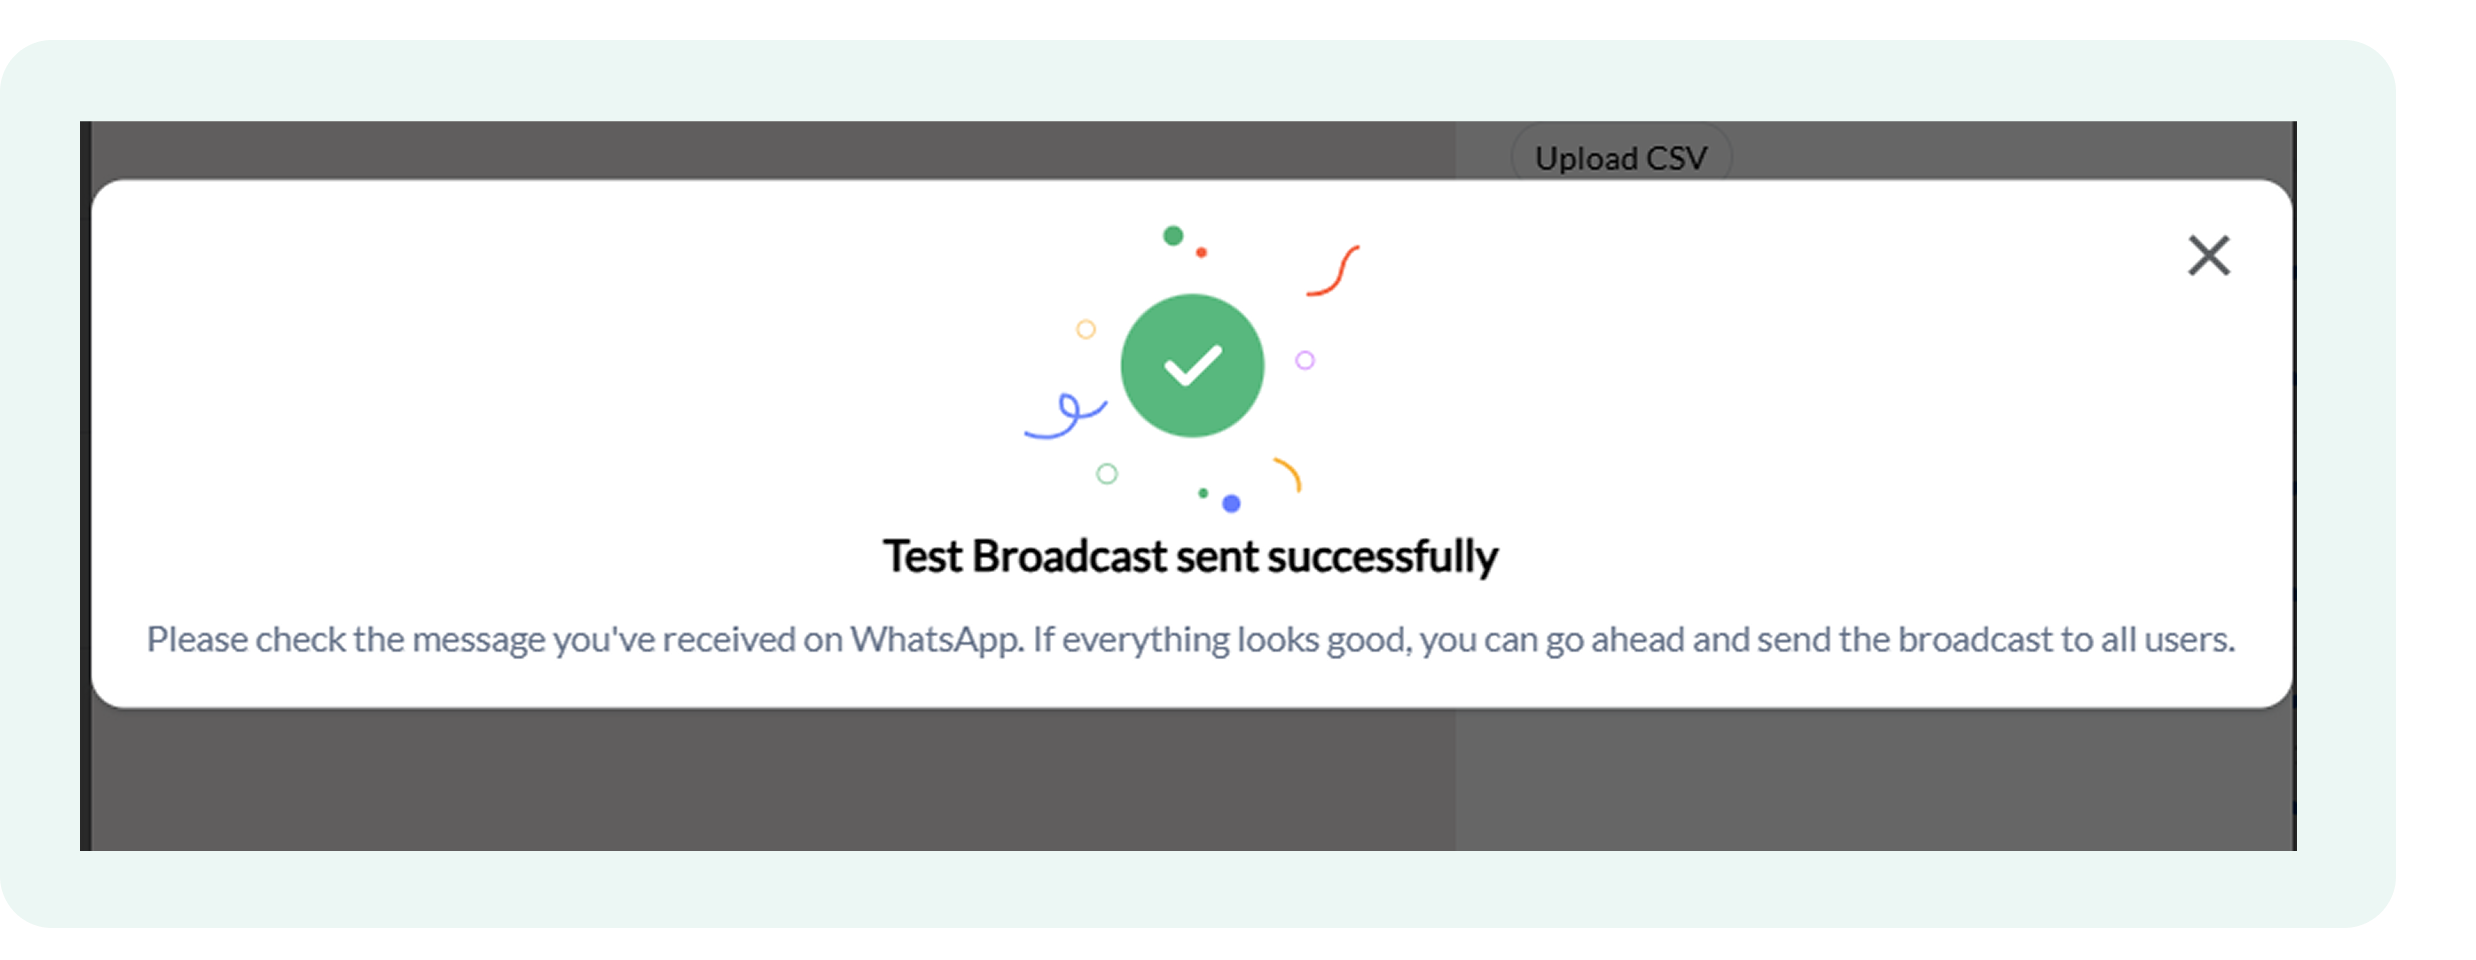
- Test Broadcast or send it directly to the customers using either of these two options
This is how the Test Broadcast notifies the user once it sends the message:
In case the broadcast does not get delivered, it shows Failed as the status:
Merchants facing this issue or having other questions regarding Broadcasts can contact Flowcart support for immediate solutions.
To protect your customer experience, advanced Automation Rules are pre-configured by our team. Because improper setup can disrupt your workflows, please contact Flowcart Support to customize rules for complex logic rather than configuring them manually.
Manage Carts in Feed
Creating and sending customized carts via the Feed section is a highly effective way for merchants to provide a personalized shopping experience during customer interactions.
These carts can be configured directly from the chat window, enabling merchants to tailor product recommendations, apply discounts, and streamline the checkout process in real time.
Sending customized carts in chat
The Flowcart Shopify plugin enables merchants to send two types of customized carts:
.png)
Send Cart
This cart allows you to access the Flowcart Commerce catalog to share products and create personalized shopping experiences for your customers.
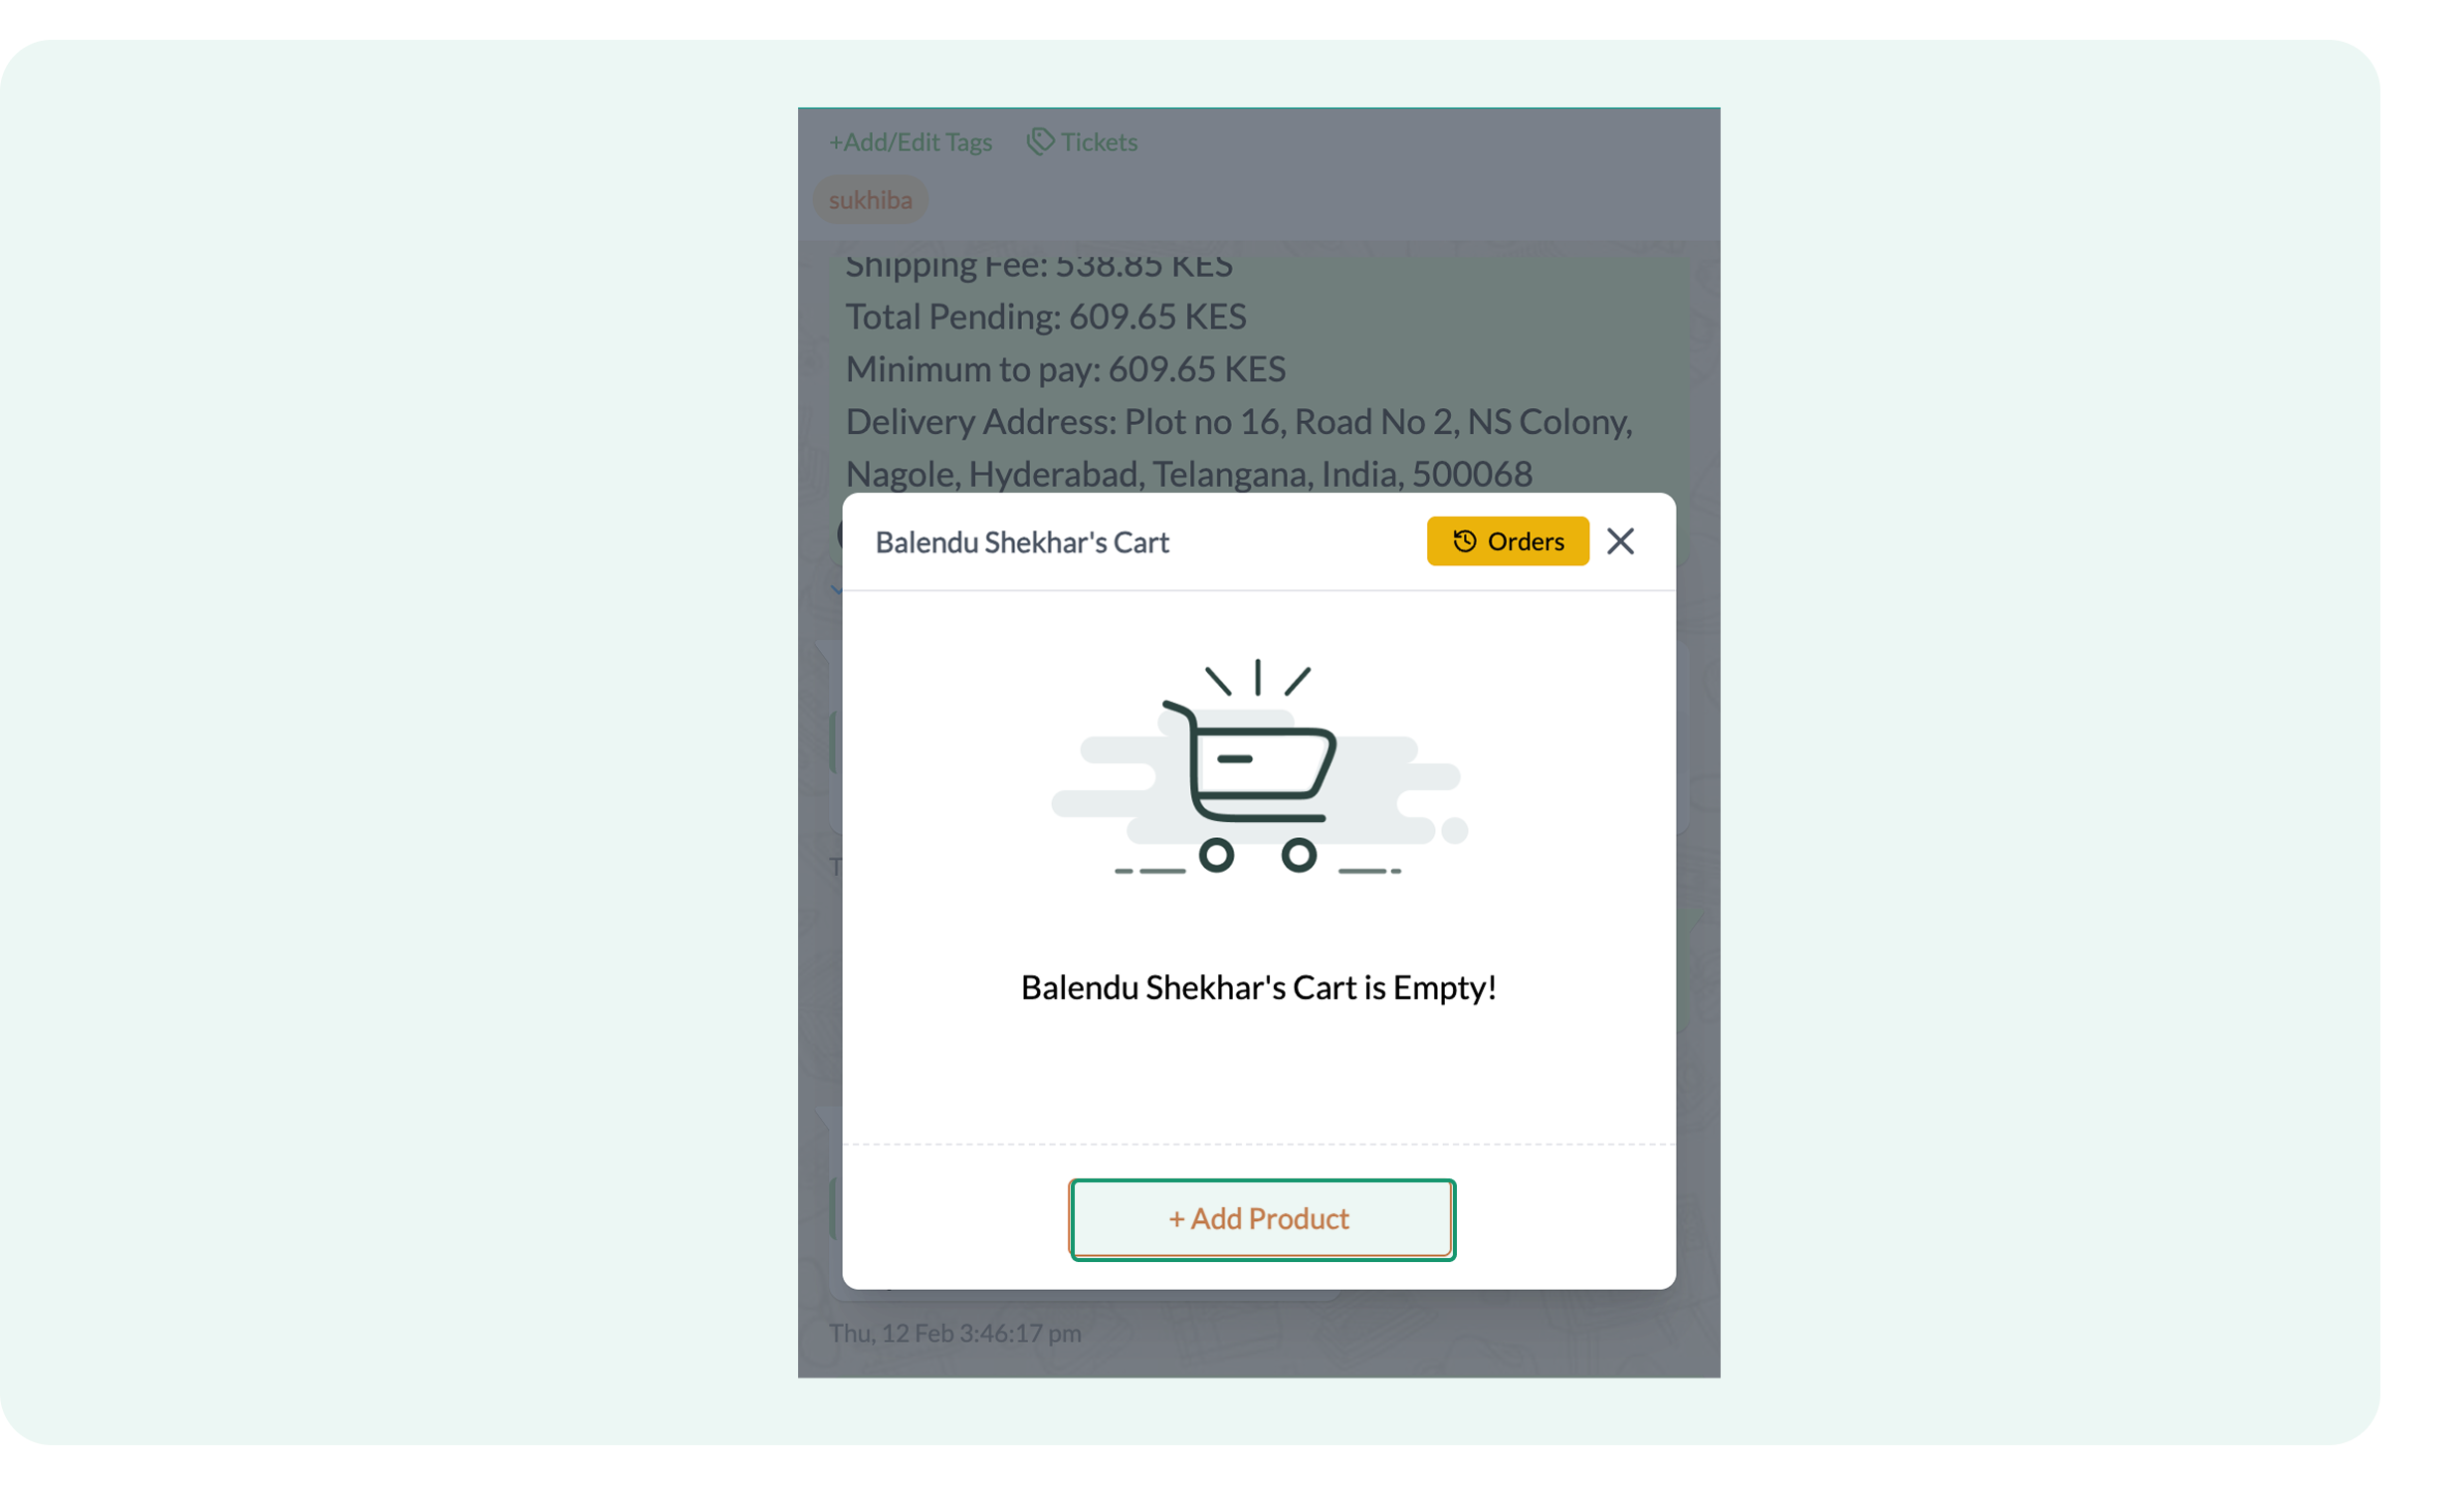
- Click on Send Cart in the chat window and open the cart tool. This window will open:
.png)
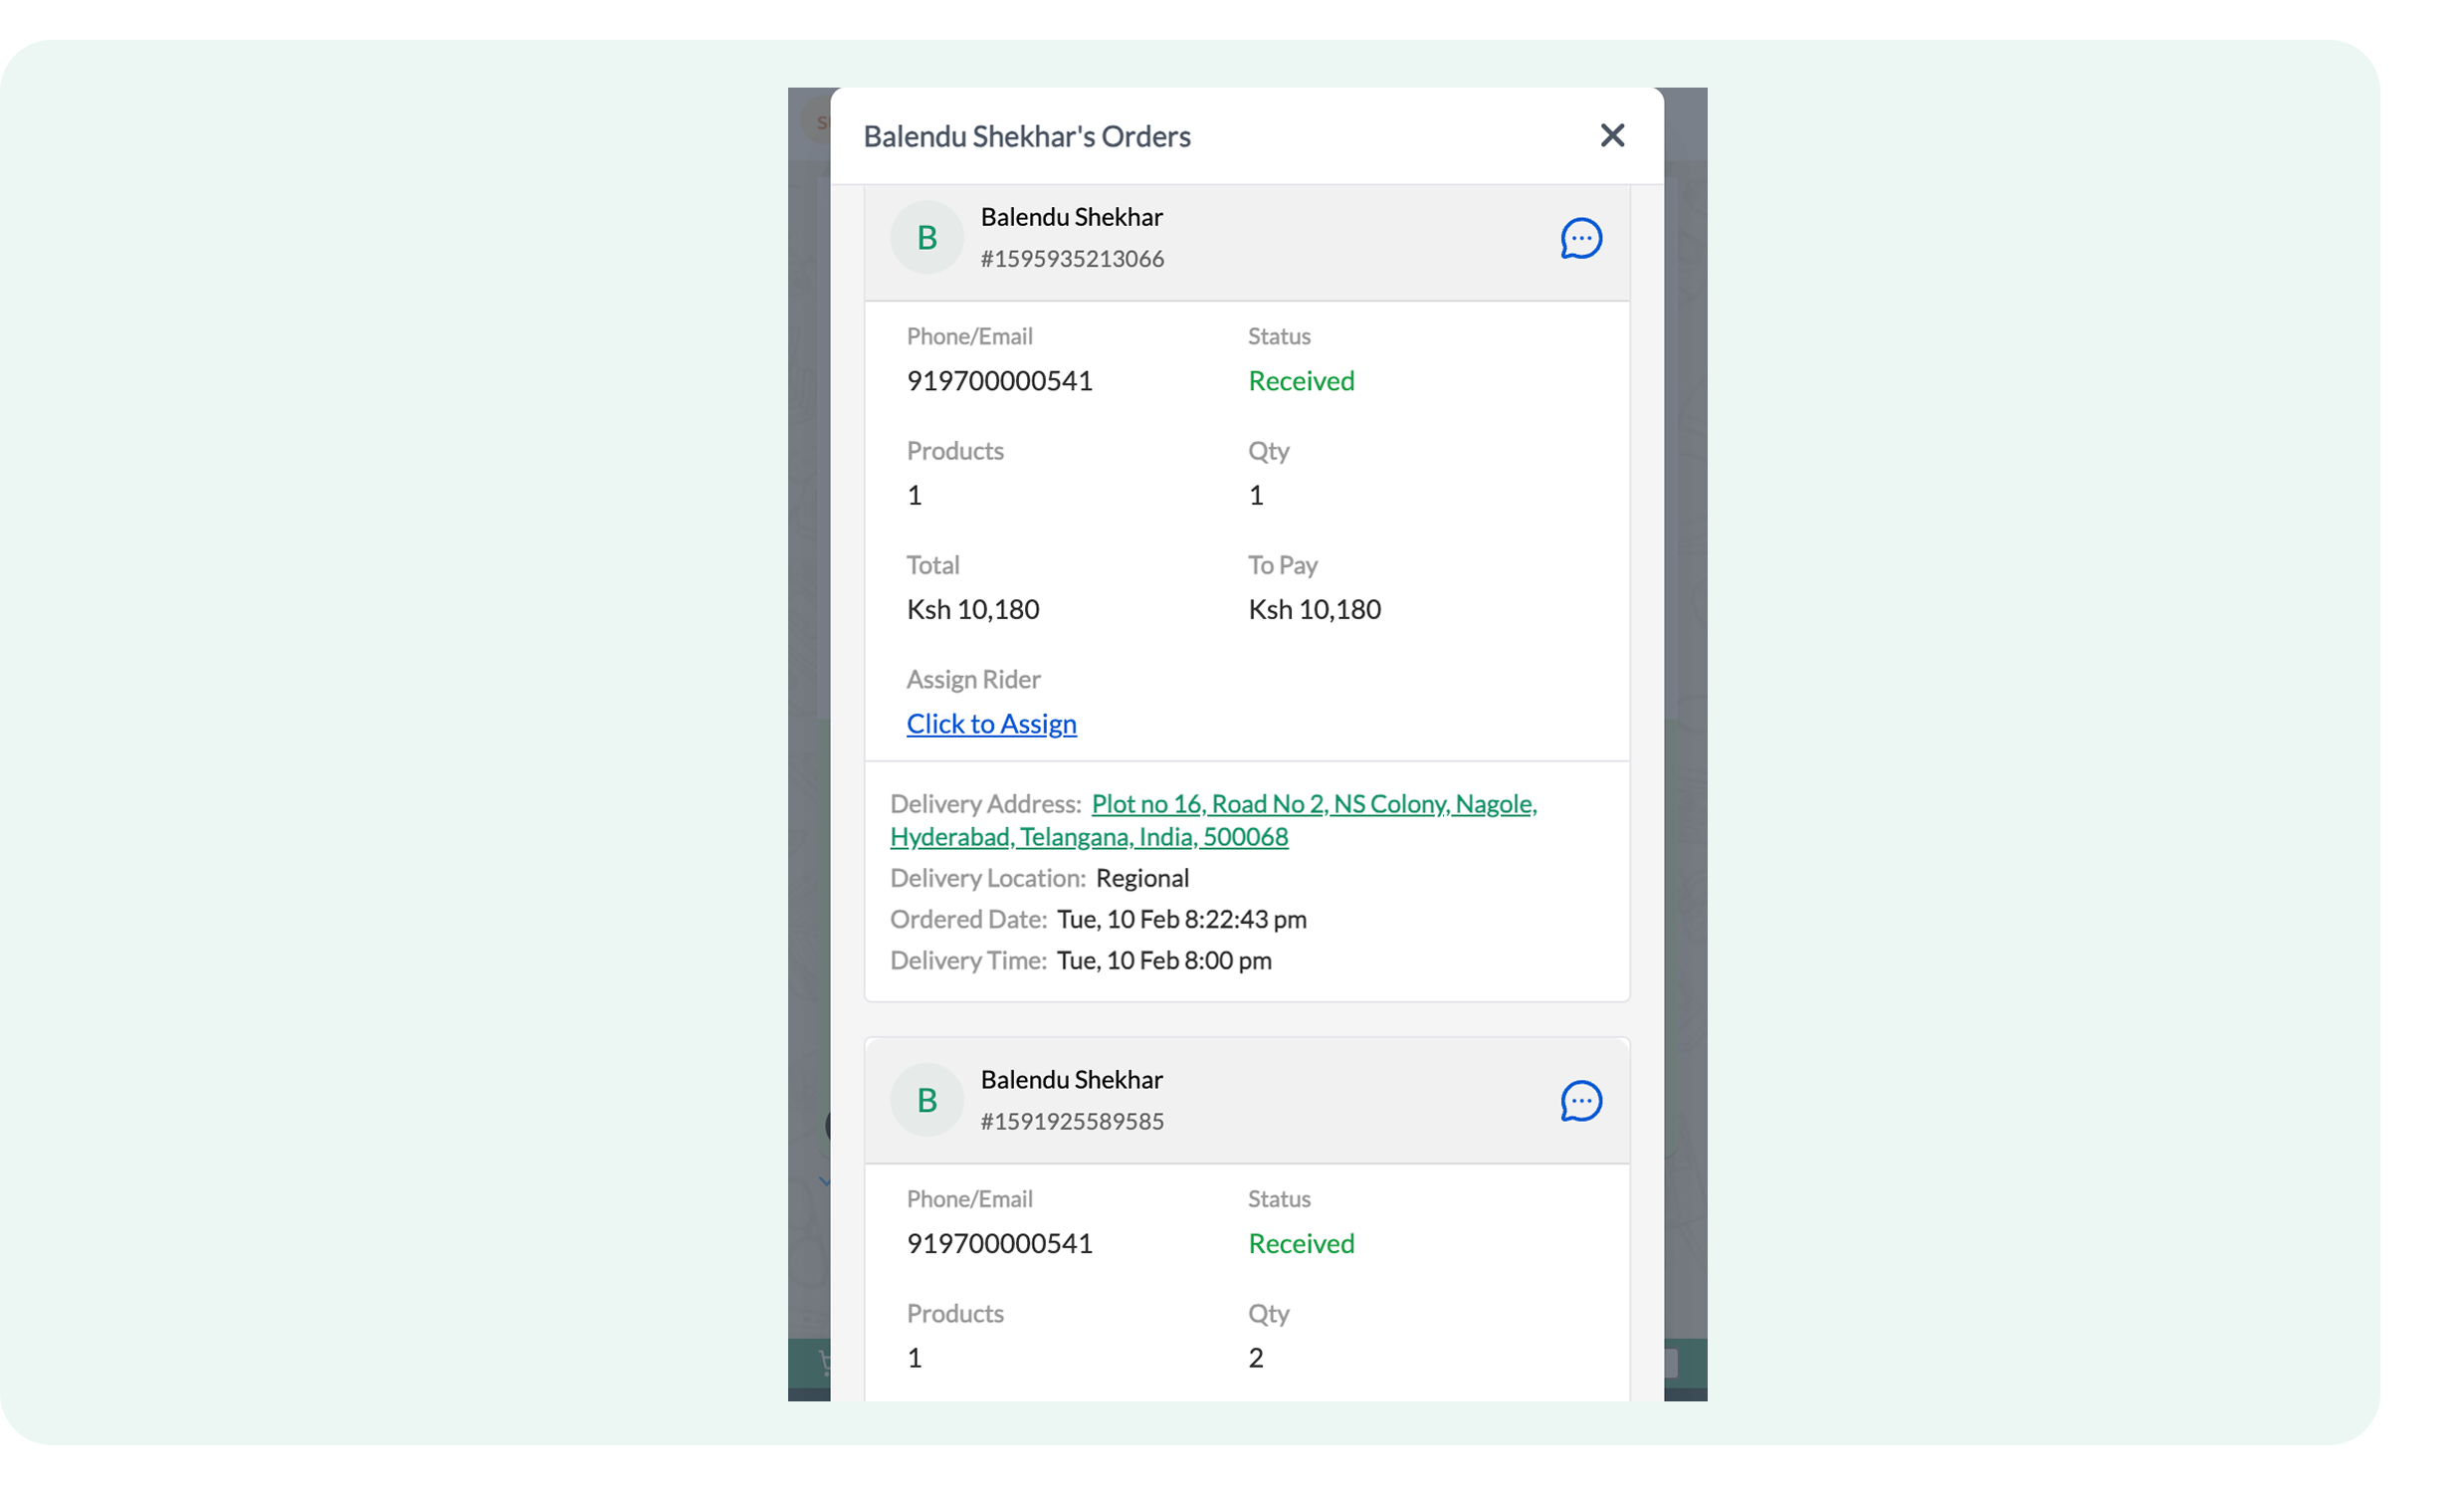
- Check the customer’s order history by clicking on Orders

For example, Balendu’s cart will display their previous purchases for reference.
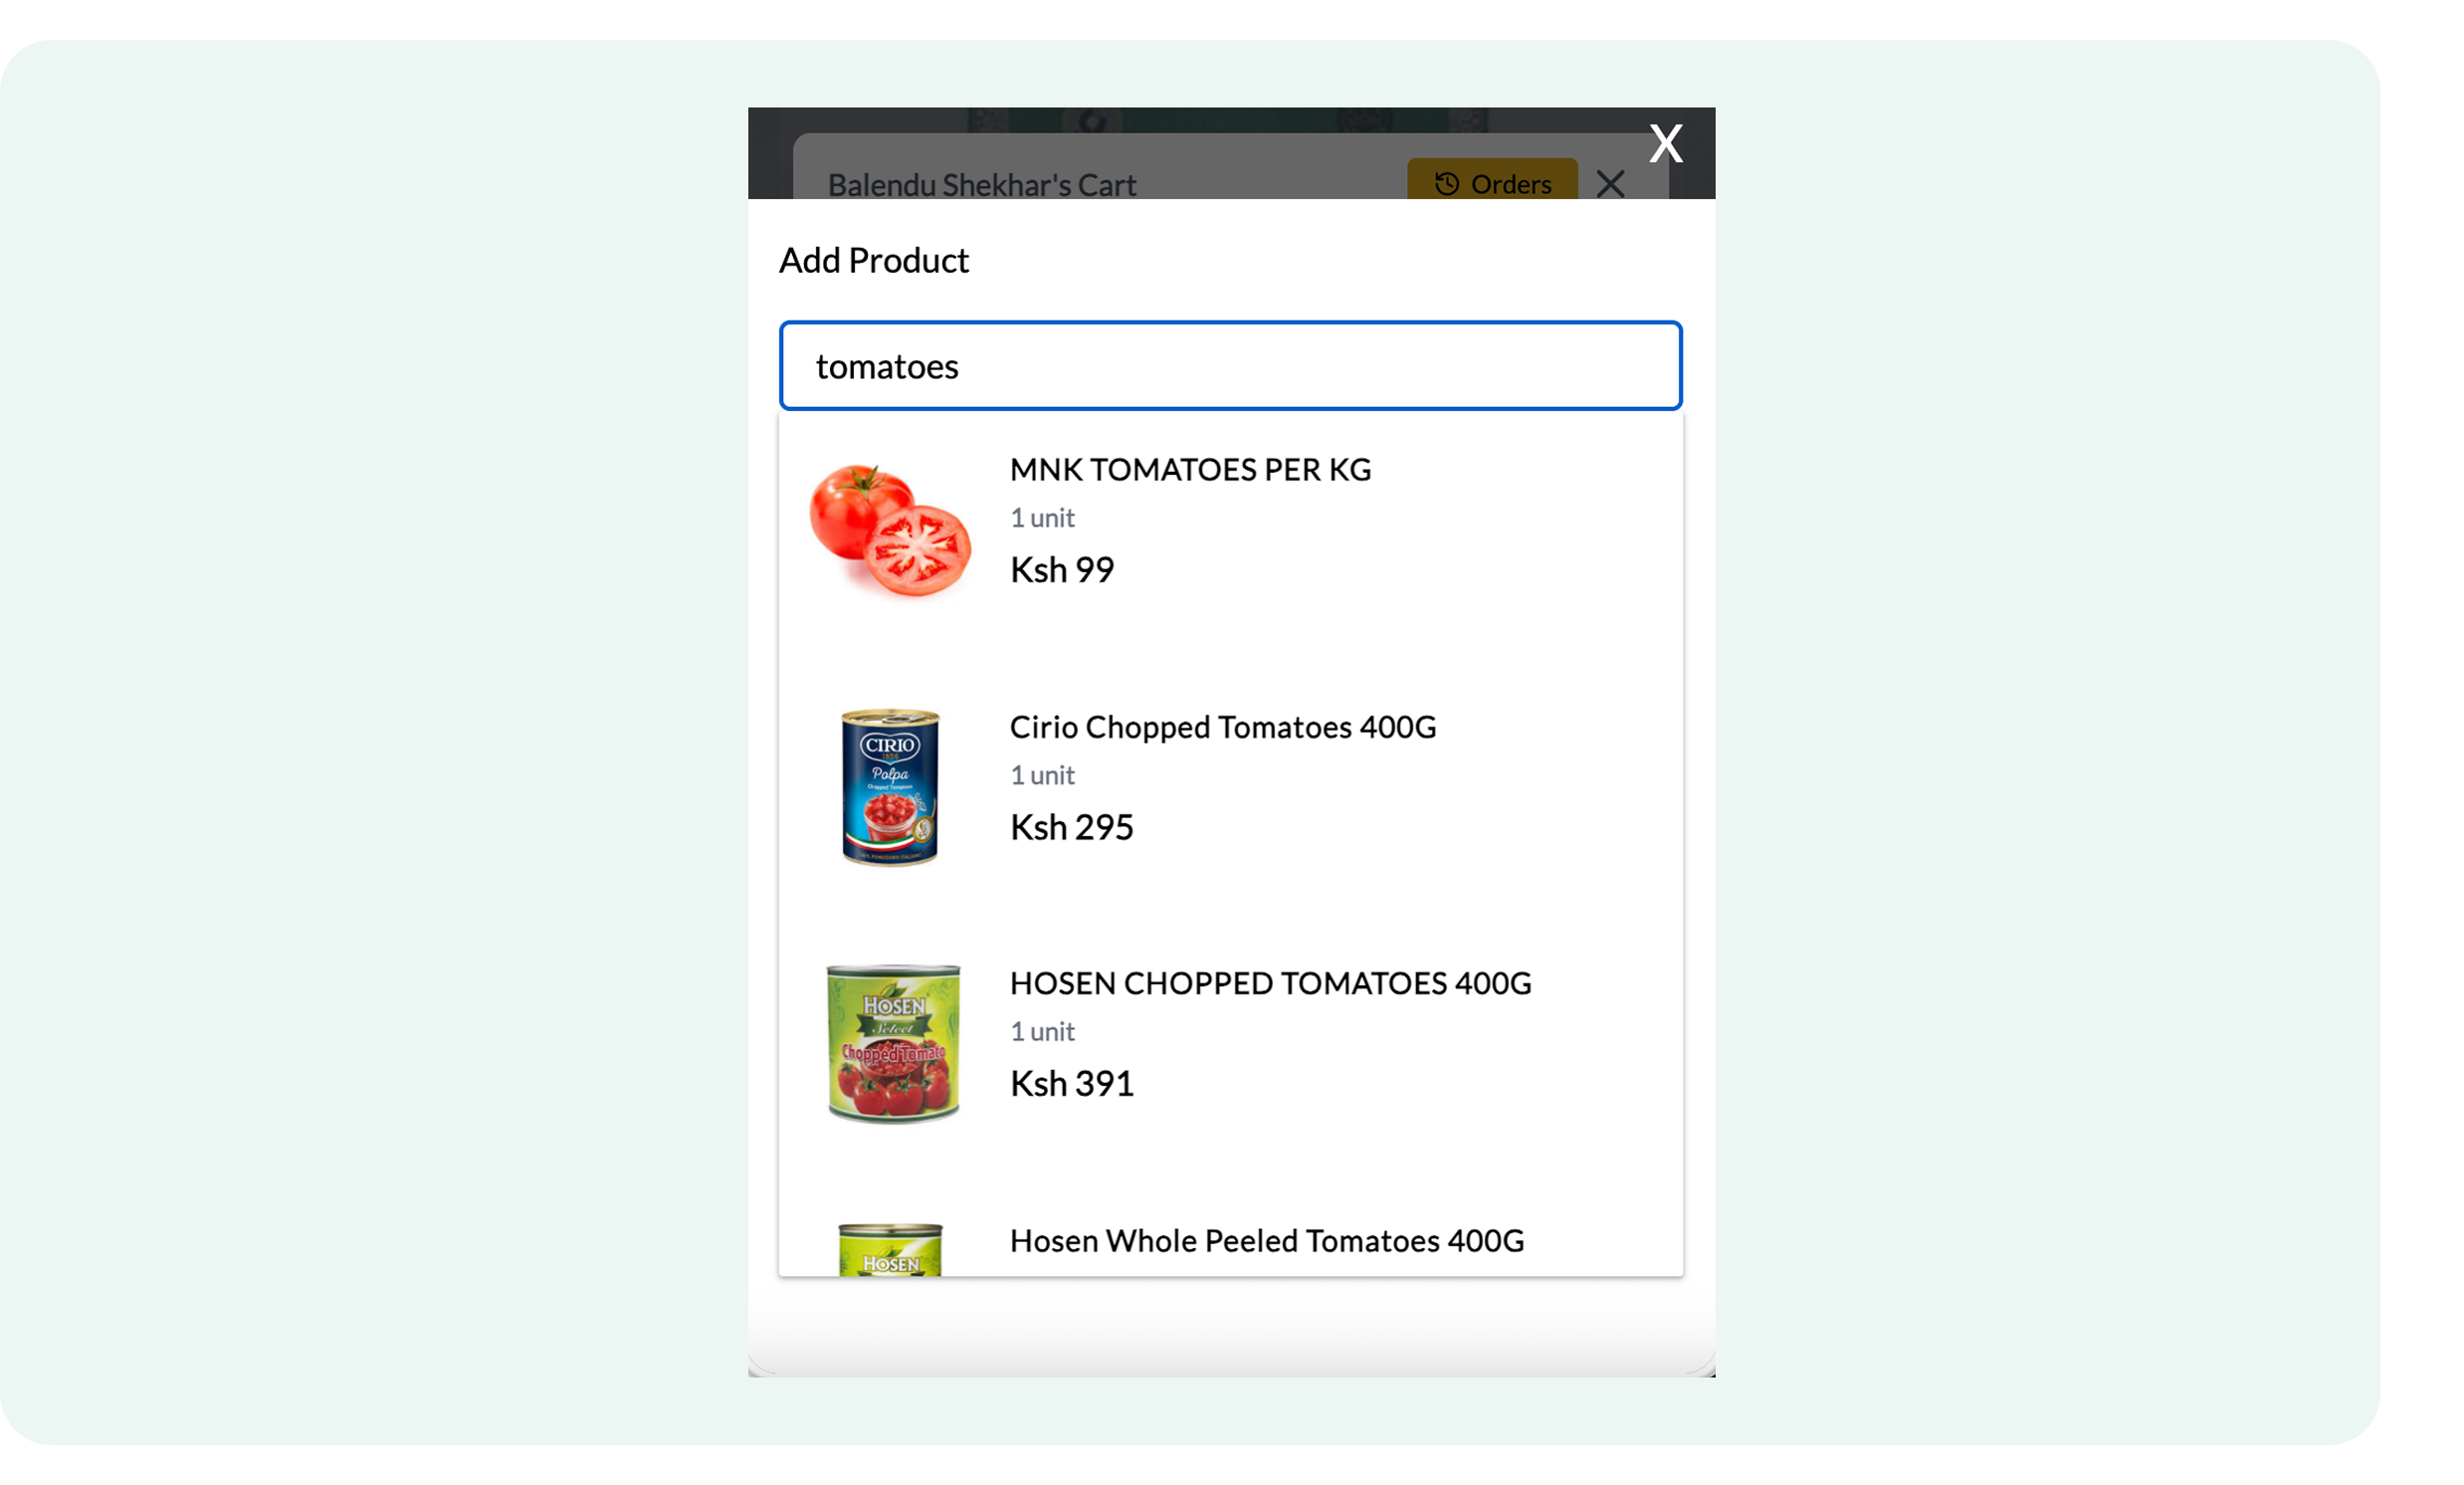
- Click Add Products to open the search bar
- Enter the product name in the search bar and select it to add to the cart. For example, adding specific items to Balendu’s cart results in a customized product selection.
A cart like this would be created:
.png)
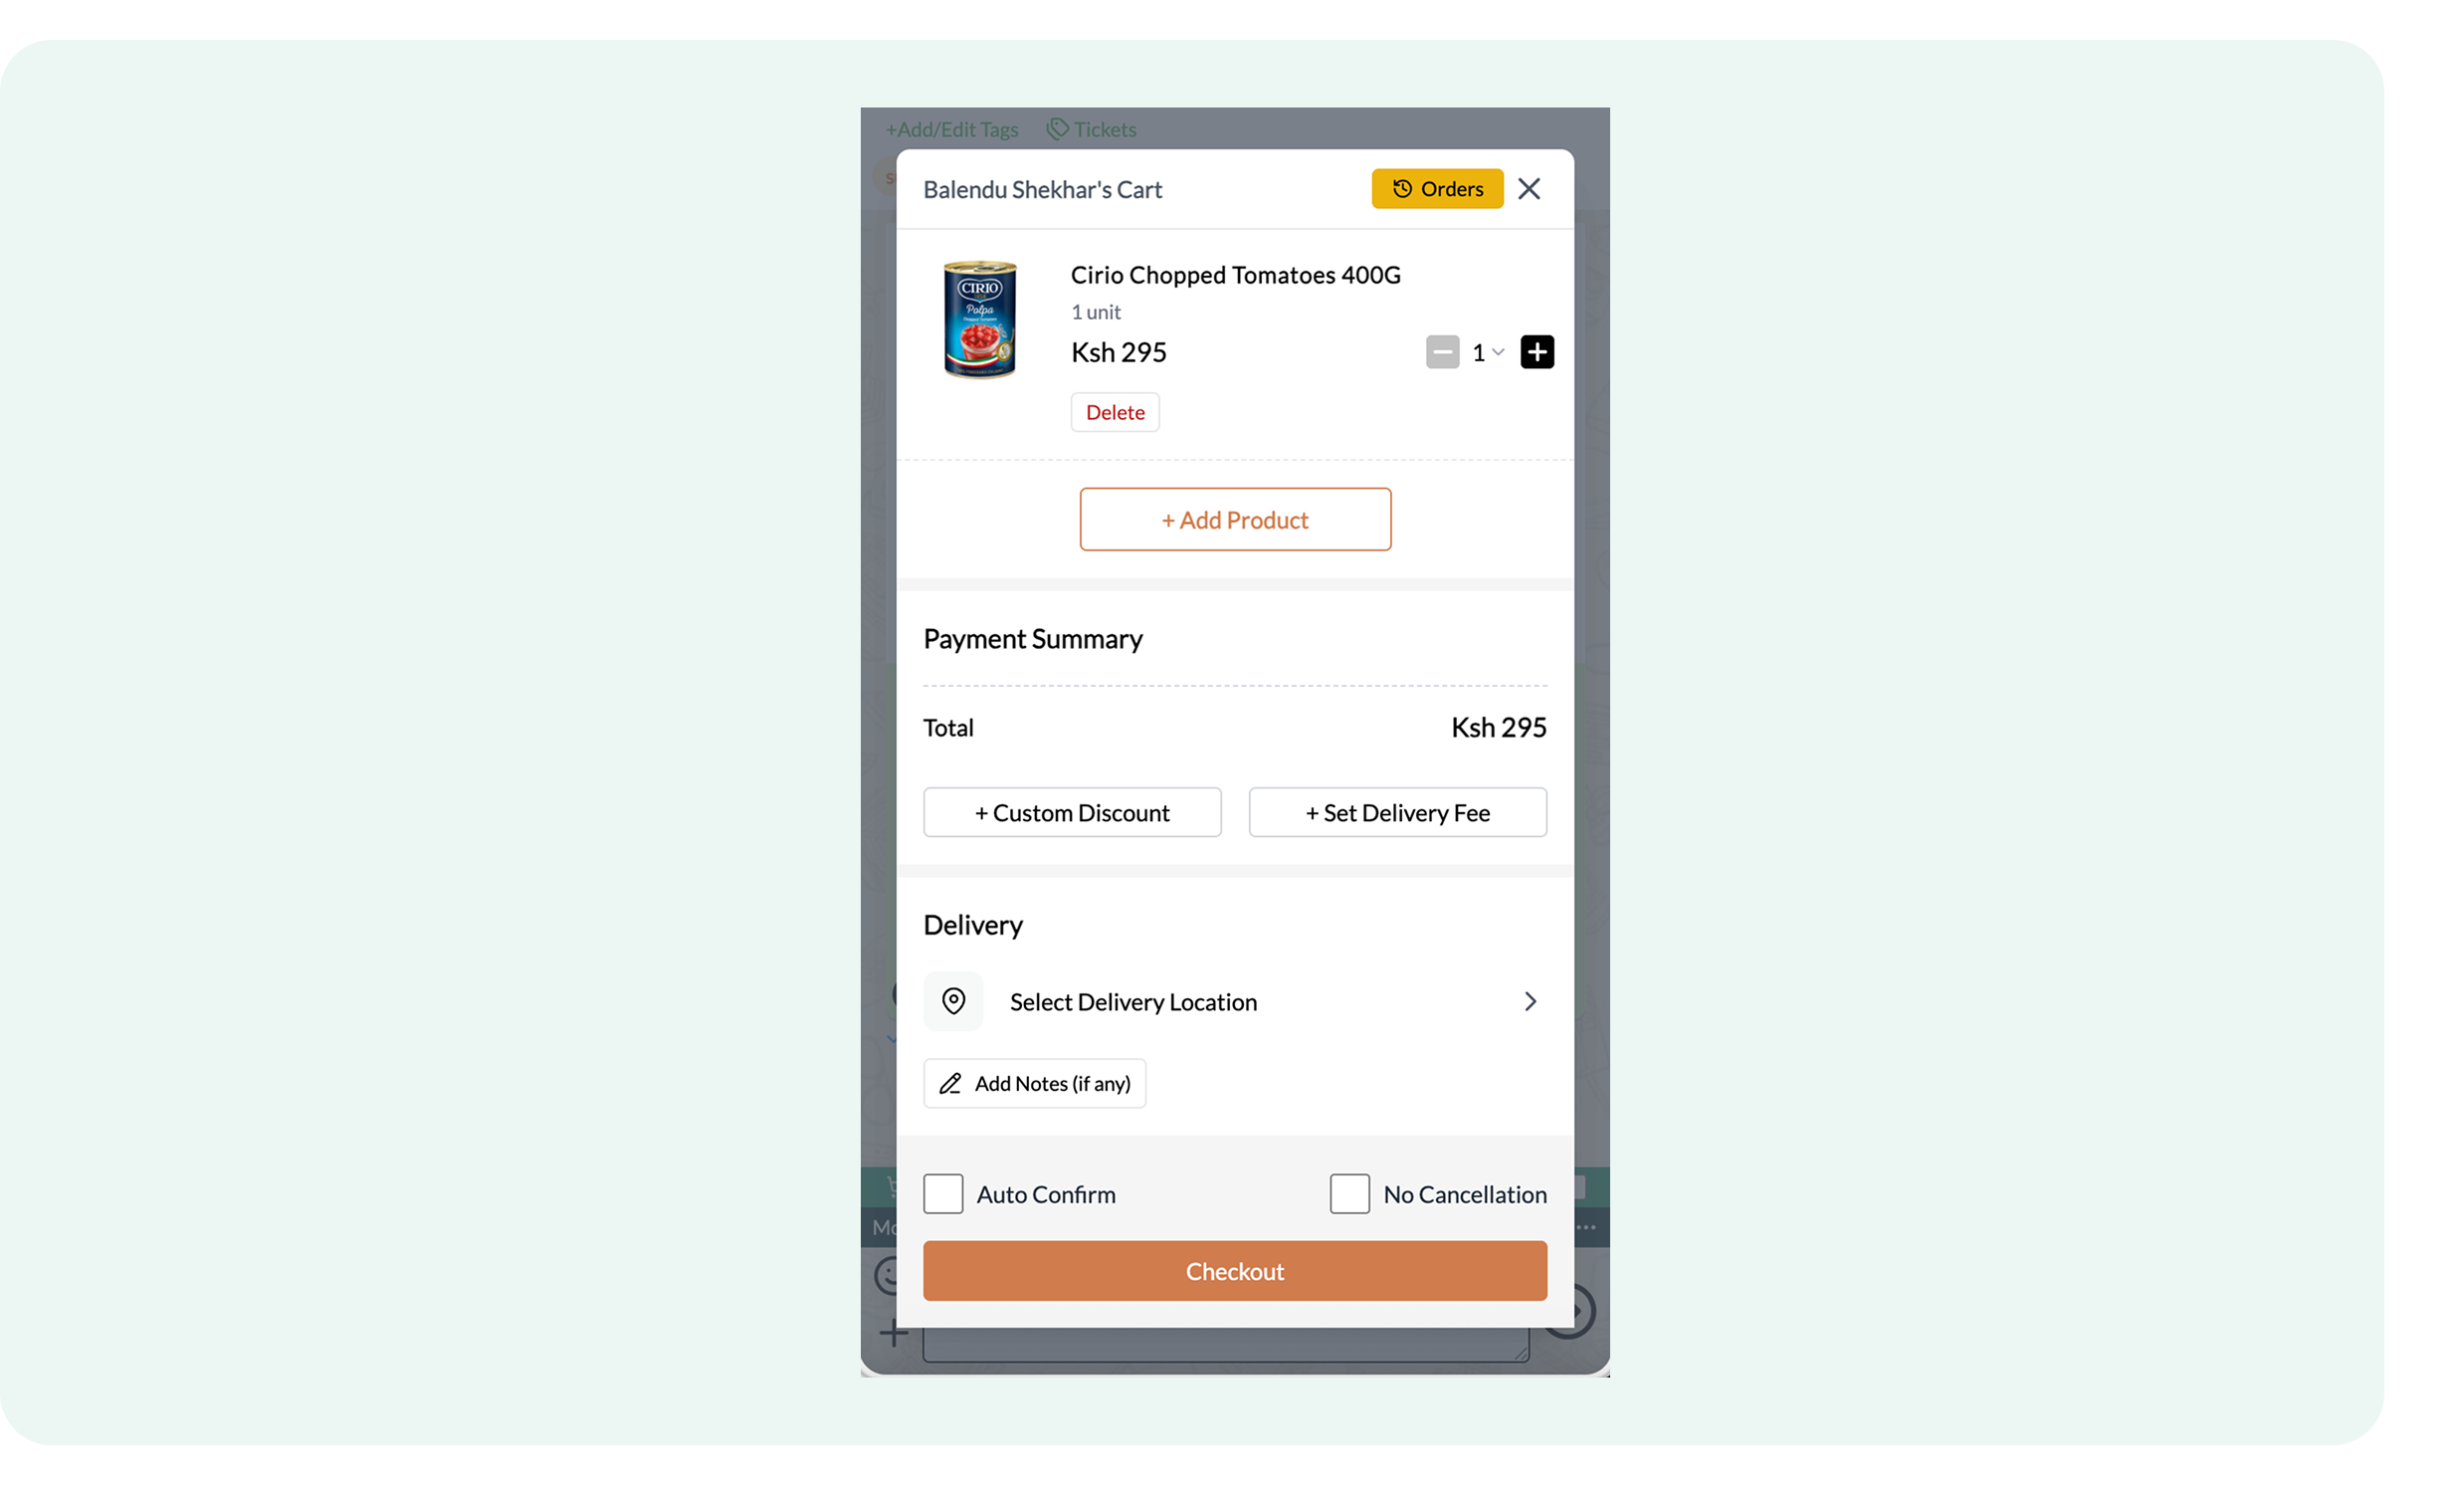
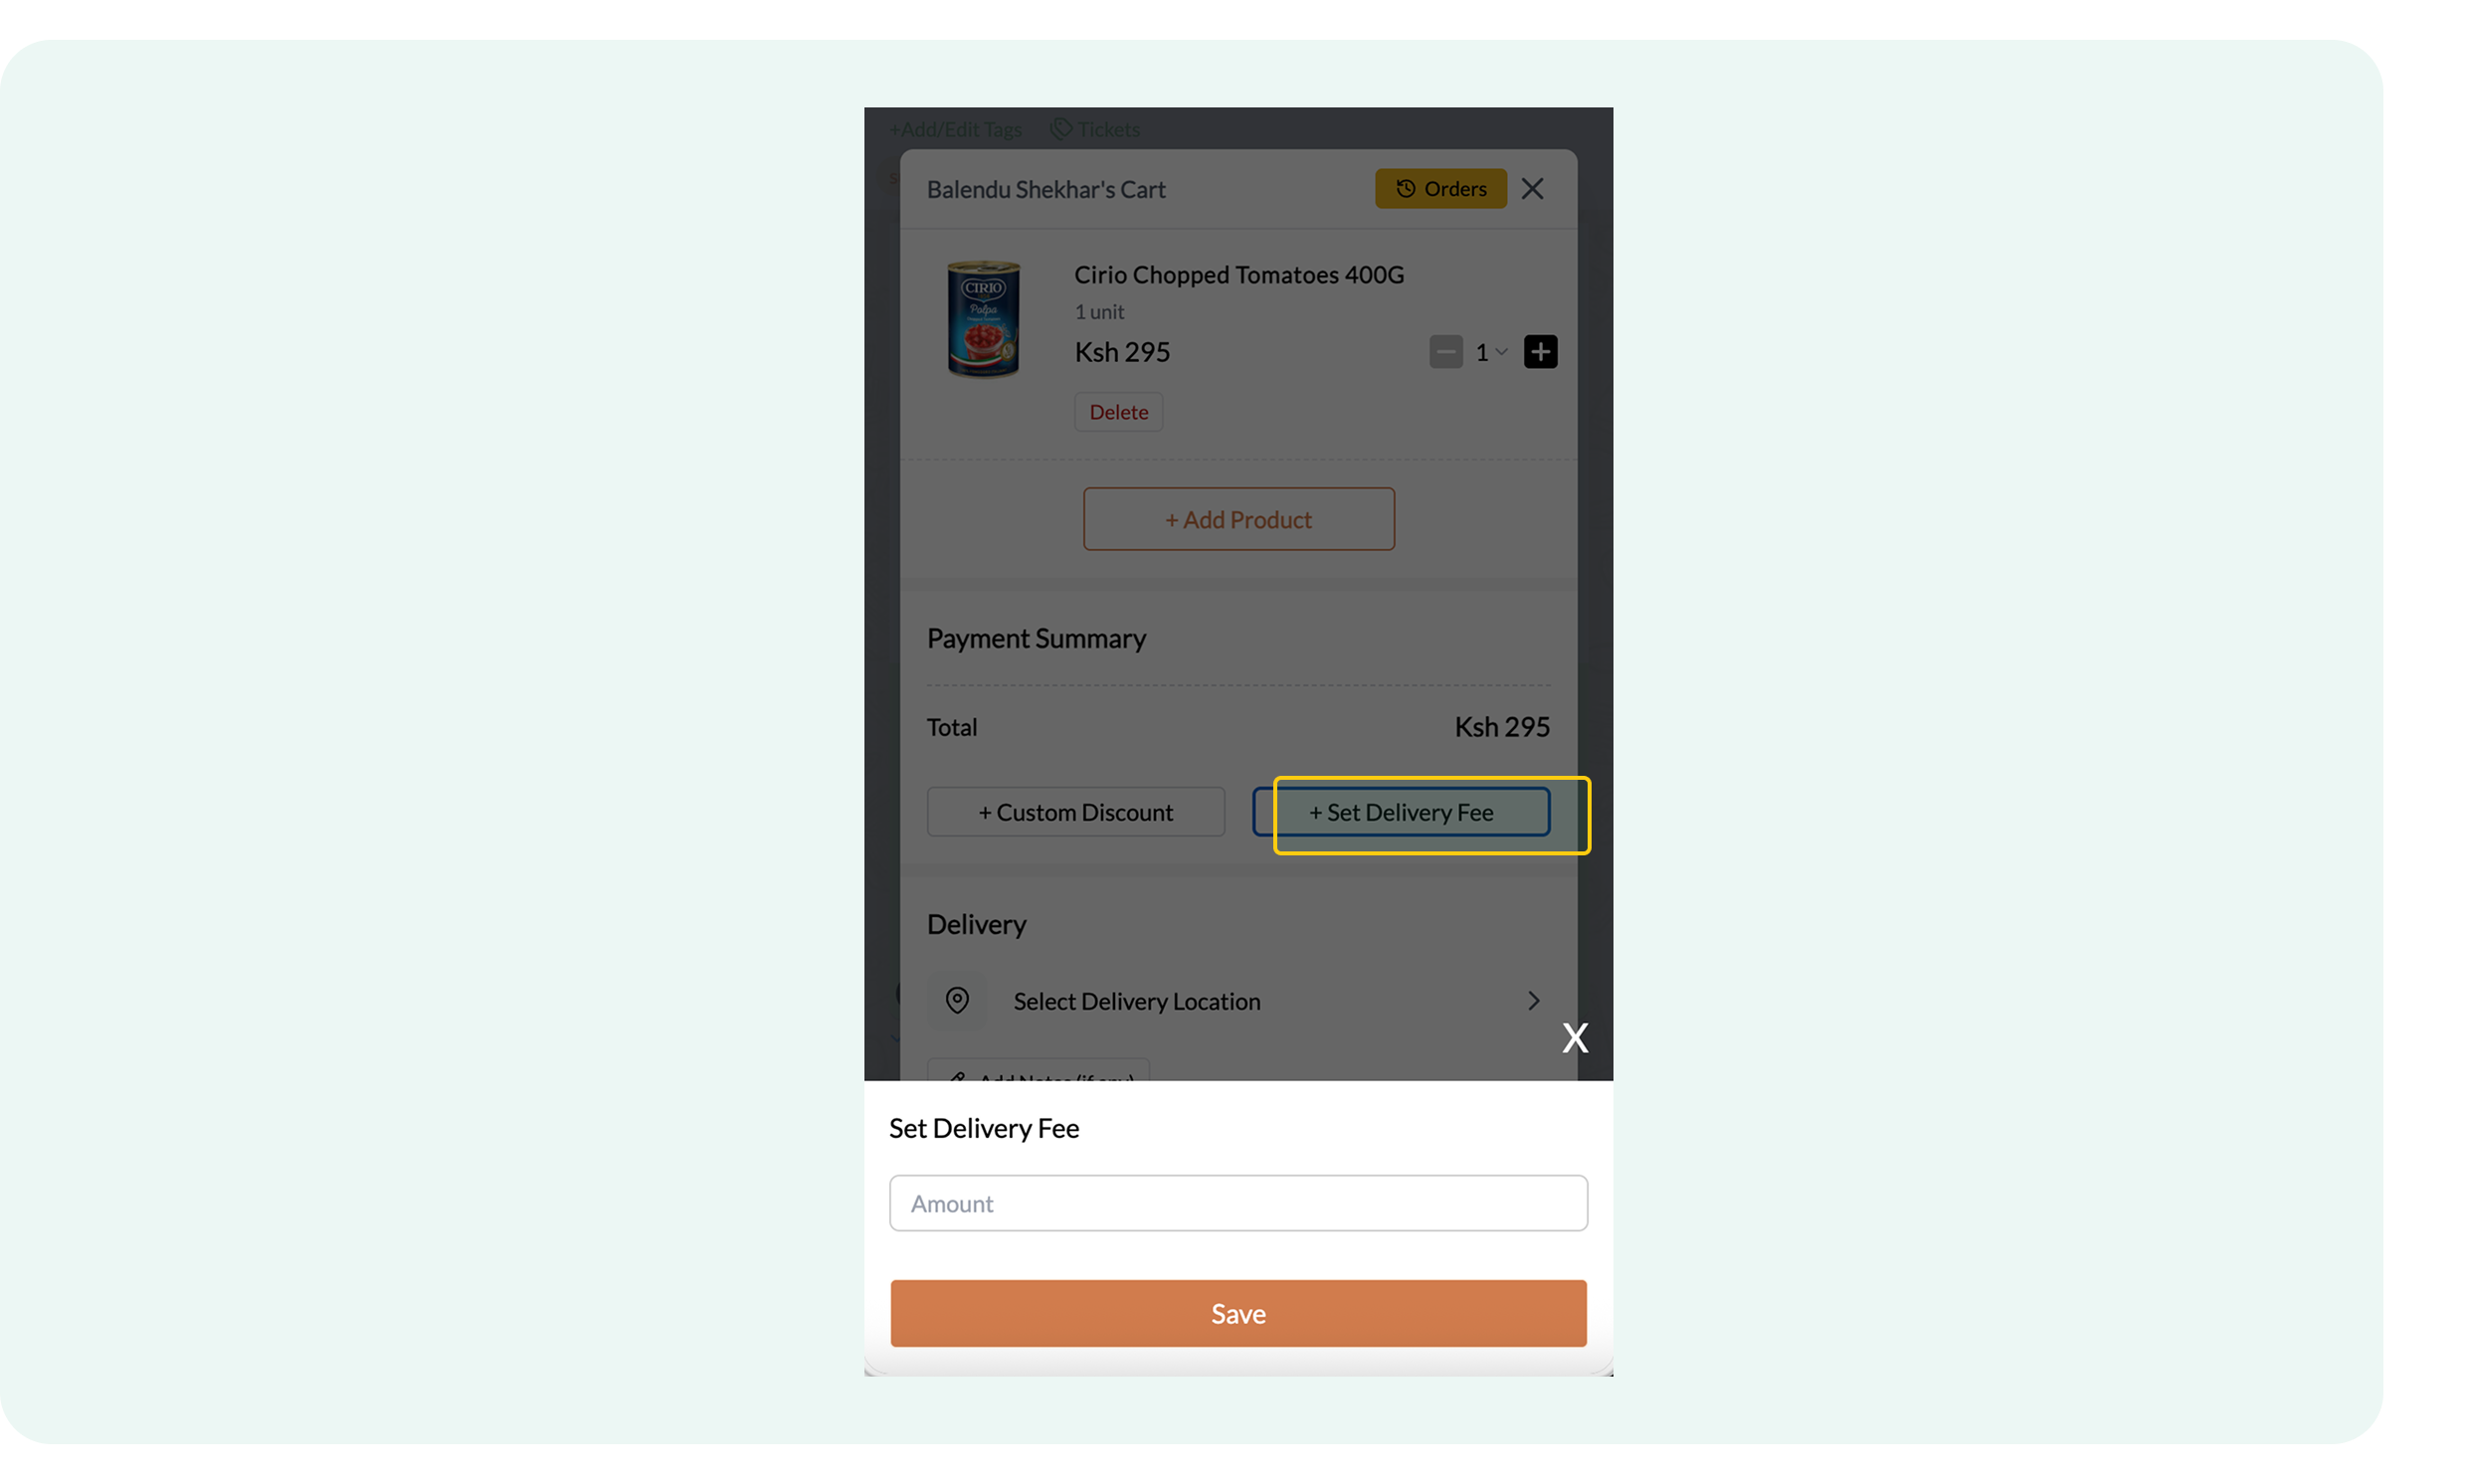
- Click Custom Discount, then specify the discount title and value
.png)
- Add delivery charges by clicking on Set Delivery Fee
Merchants can also refine the path to purchase by enabling or disabling specific order management features:
- Auto Confirm: Normally, customers click confirm cart first, then see the payment option, but with auto confirm enabled, they'll immediately receive the Pay Now link.
- No Cancellation: When no cancellation is enabled, customers won't have the ability to cancel the order.
- Do Not Notify: The do-not-notify option suppresses the notifications.
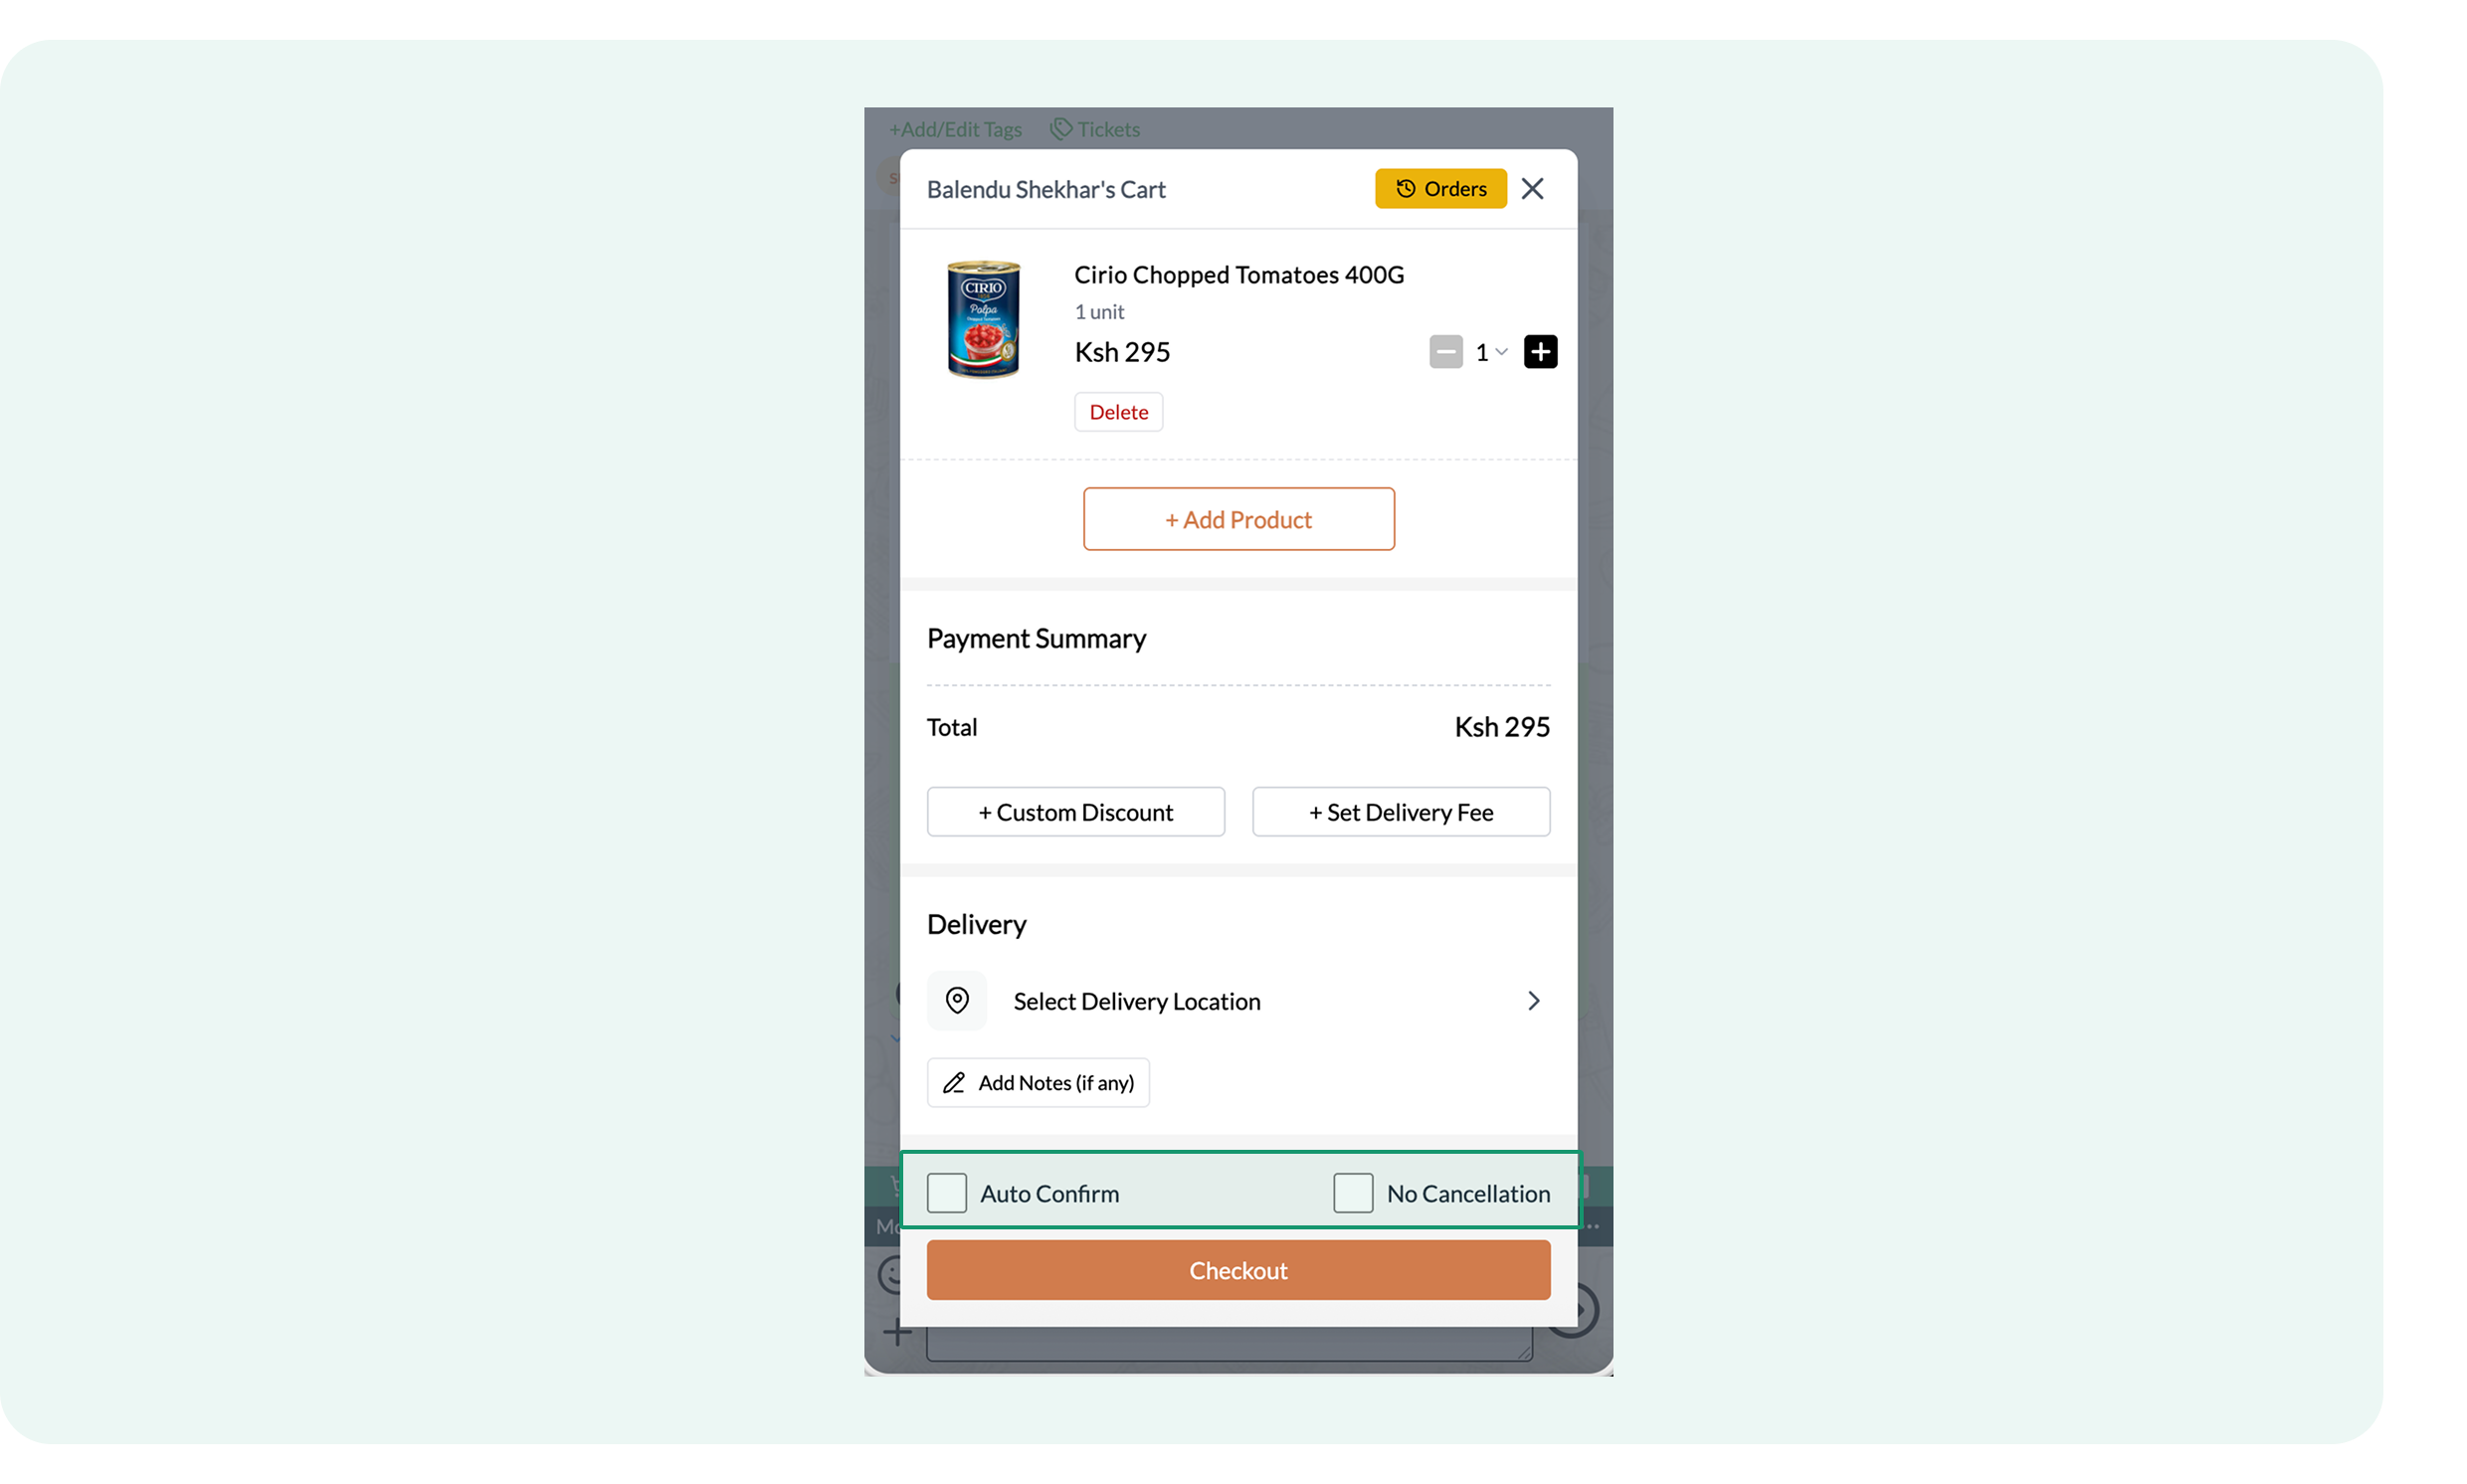
Once your preferences are configured, selecting Checkout will automatically deliver the cart to the customer according to these specific rules.
The Send Cart option is available only within the Flowcart Commerce catalog and can be accessed from inside Shops or Feeds.
Shopify Cart
The Shopify Cart option enables merchants to access products from the Shopify Catalog and share them with customers when the Shopify plugin is activated.
- Click on Shopify Cart in the chat window. This window will open:
.png)
- Click on Past Orders to understand the customer’s shopping preferences
.png)
- Use the Search Bar to find specific products in the Shopify Catalog
.png)
- Enter the Discount Value to improve the customer’s personalized shopping experience
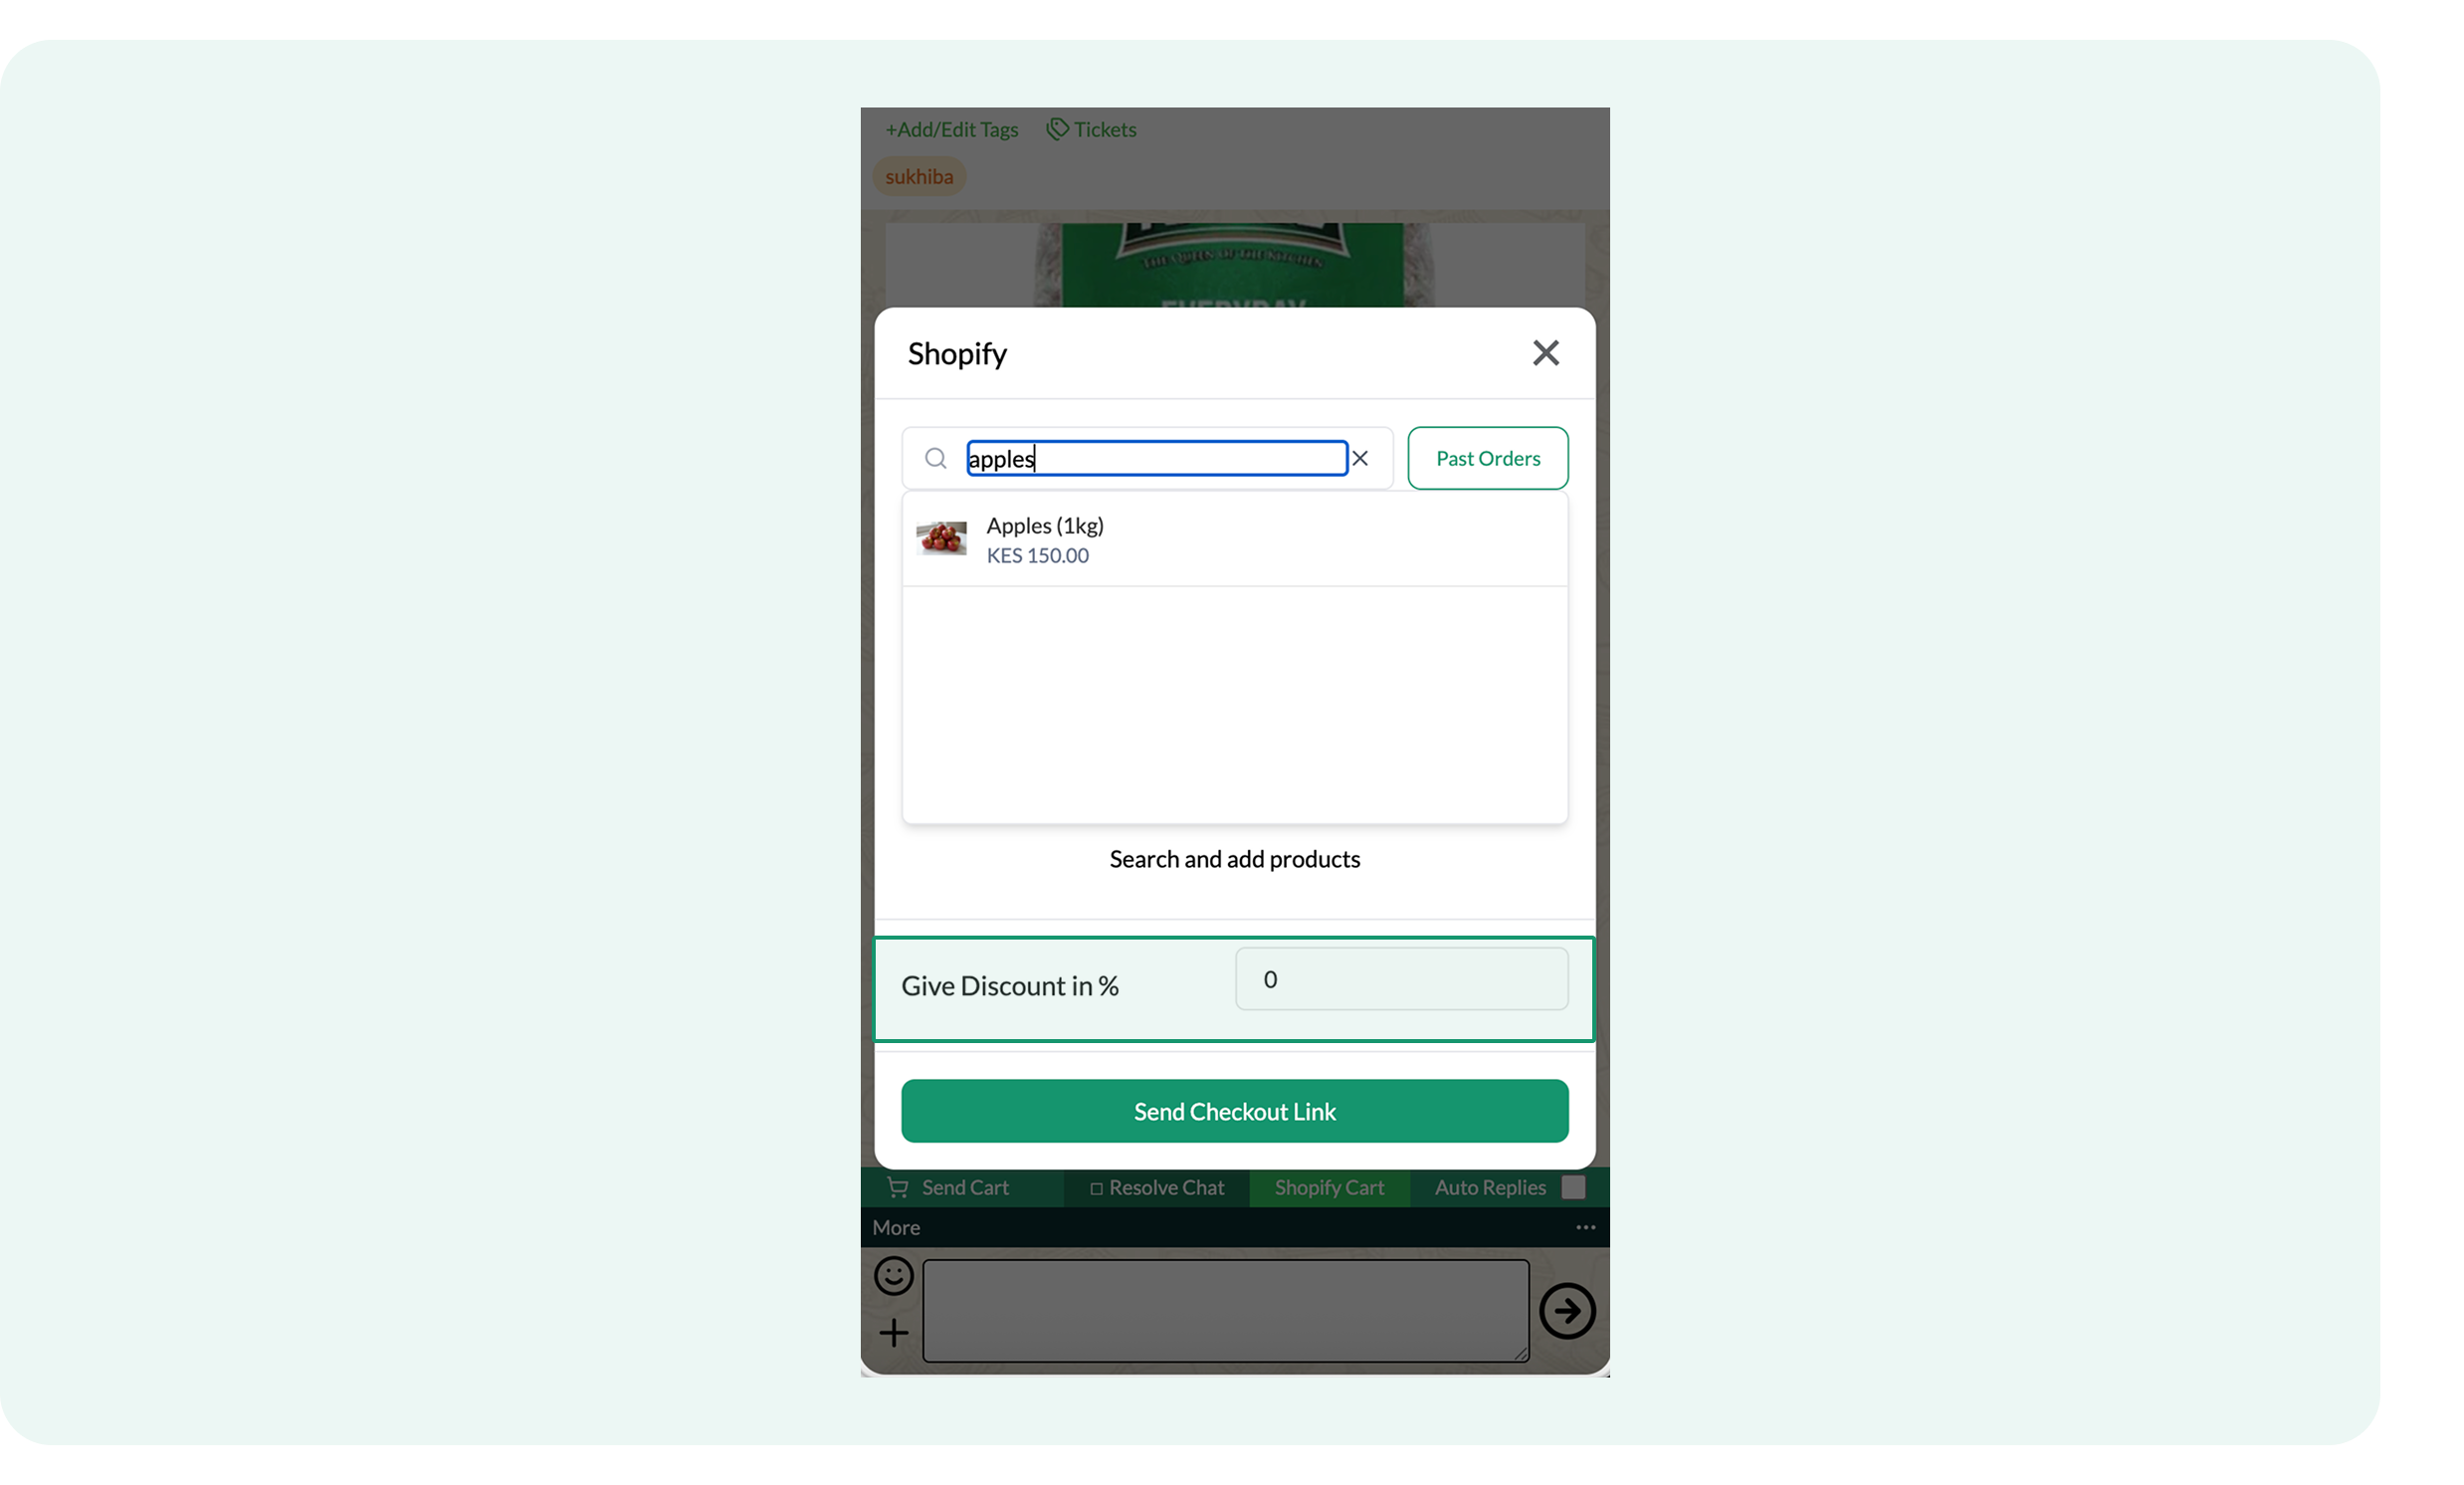
- Click on Send Checkout Link within the cart configuration window to share it with the customer
The customer will receive a message like this:
.png)
The Shopify Cart requires the Shopify plugin activation and is available when opening chats from Feed or Manage Users.
Why use customized carts?
- Create a more engaging customer experience with personalized product selections.
- Build trust and satisfaction through customized discounts and tailored recommendations.
- Increase conversion rates by reducing checkout time and offering pre-filled carts for customers.
Managing Feed in Flowcart Shopify Plugin
The Feed section in the Flowcart Shopify plugin enables merchants to access customer chats efficiently. This ensures quick problem-solving, enhances the customer experience, and helps manage interactions seamlessly.
How to access Feed
To access Feed in the Flowcart Shopify plugin:
- Log in to the Flowcart Whatsapp Chat+AI+CRM dashboard
- In the main navigation menu, find and click on Feed
.png)
- Adjust the date range by clicking on the Calendar icon to view chats for specific periods
.png)
How to access chats in Feed?
To access chats in Feed:
- Click on the user name to open that customer’s chat window. For example, click on Balendu’s name and open their chat window:
.png)
You can Add/Edit Tags and checkout Tickets information from the chat window as well, available right below the user name and phone number.
Read: How to manage Tickets
In the chat window, merchants can also:
- Type and send text messages directly to the customer from the chat window
- Toggle auto replies on or off to handle basic customer interactions automatically, such as during checkout flows or while setting delivery addresses
- Click on Resolve Ticket option to close or mark a ticket as resolved once the customer's issue has been addressed

.png)
- Add emojis in the chat while typing manual messages to customers and keep the interaction friendly
.png)
How to configure quick replies in chat?
Quick Replies save frequently used responses for more efficient customer communication. Here's how to configure them:
- Click on the More option or the three dots in the chat window
.png)
- Select Quick Replies and open this dialogue box
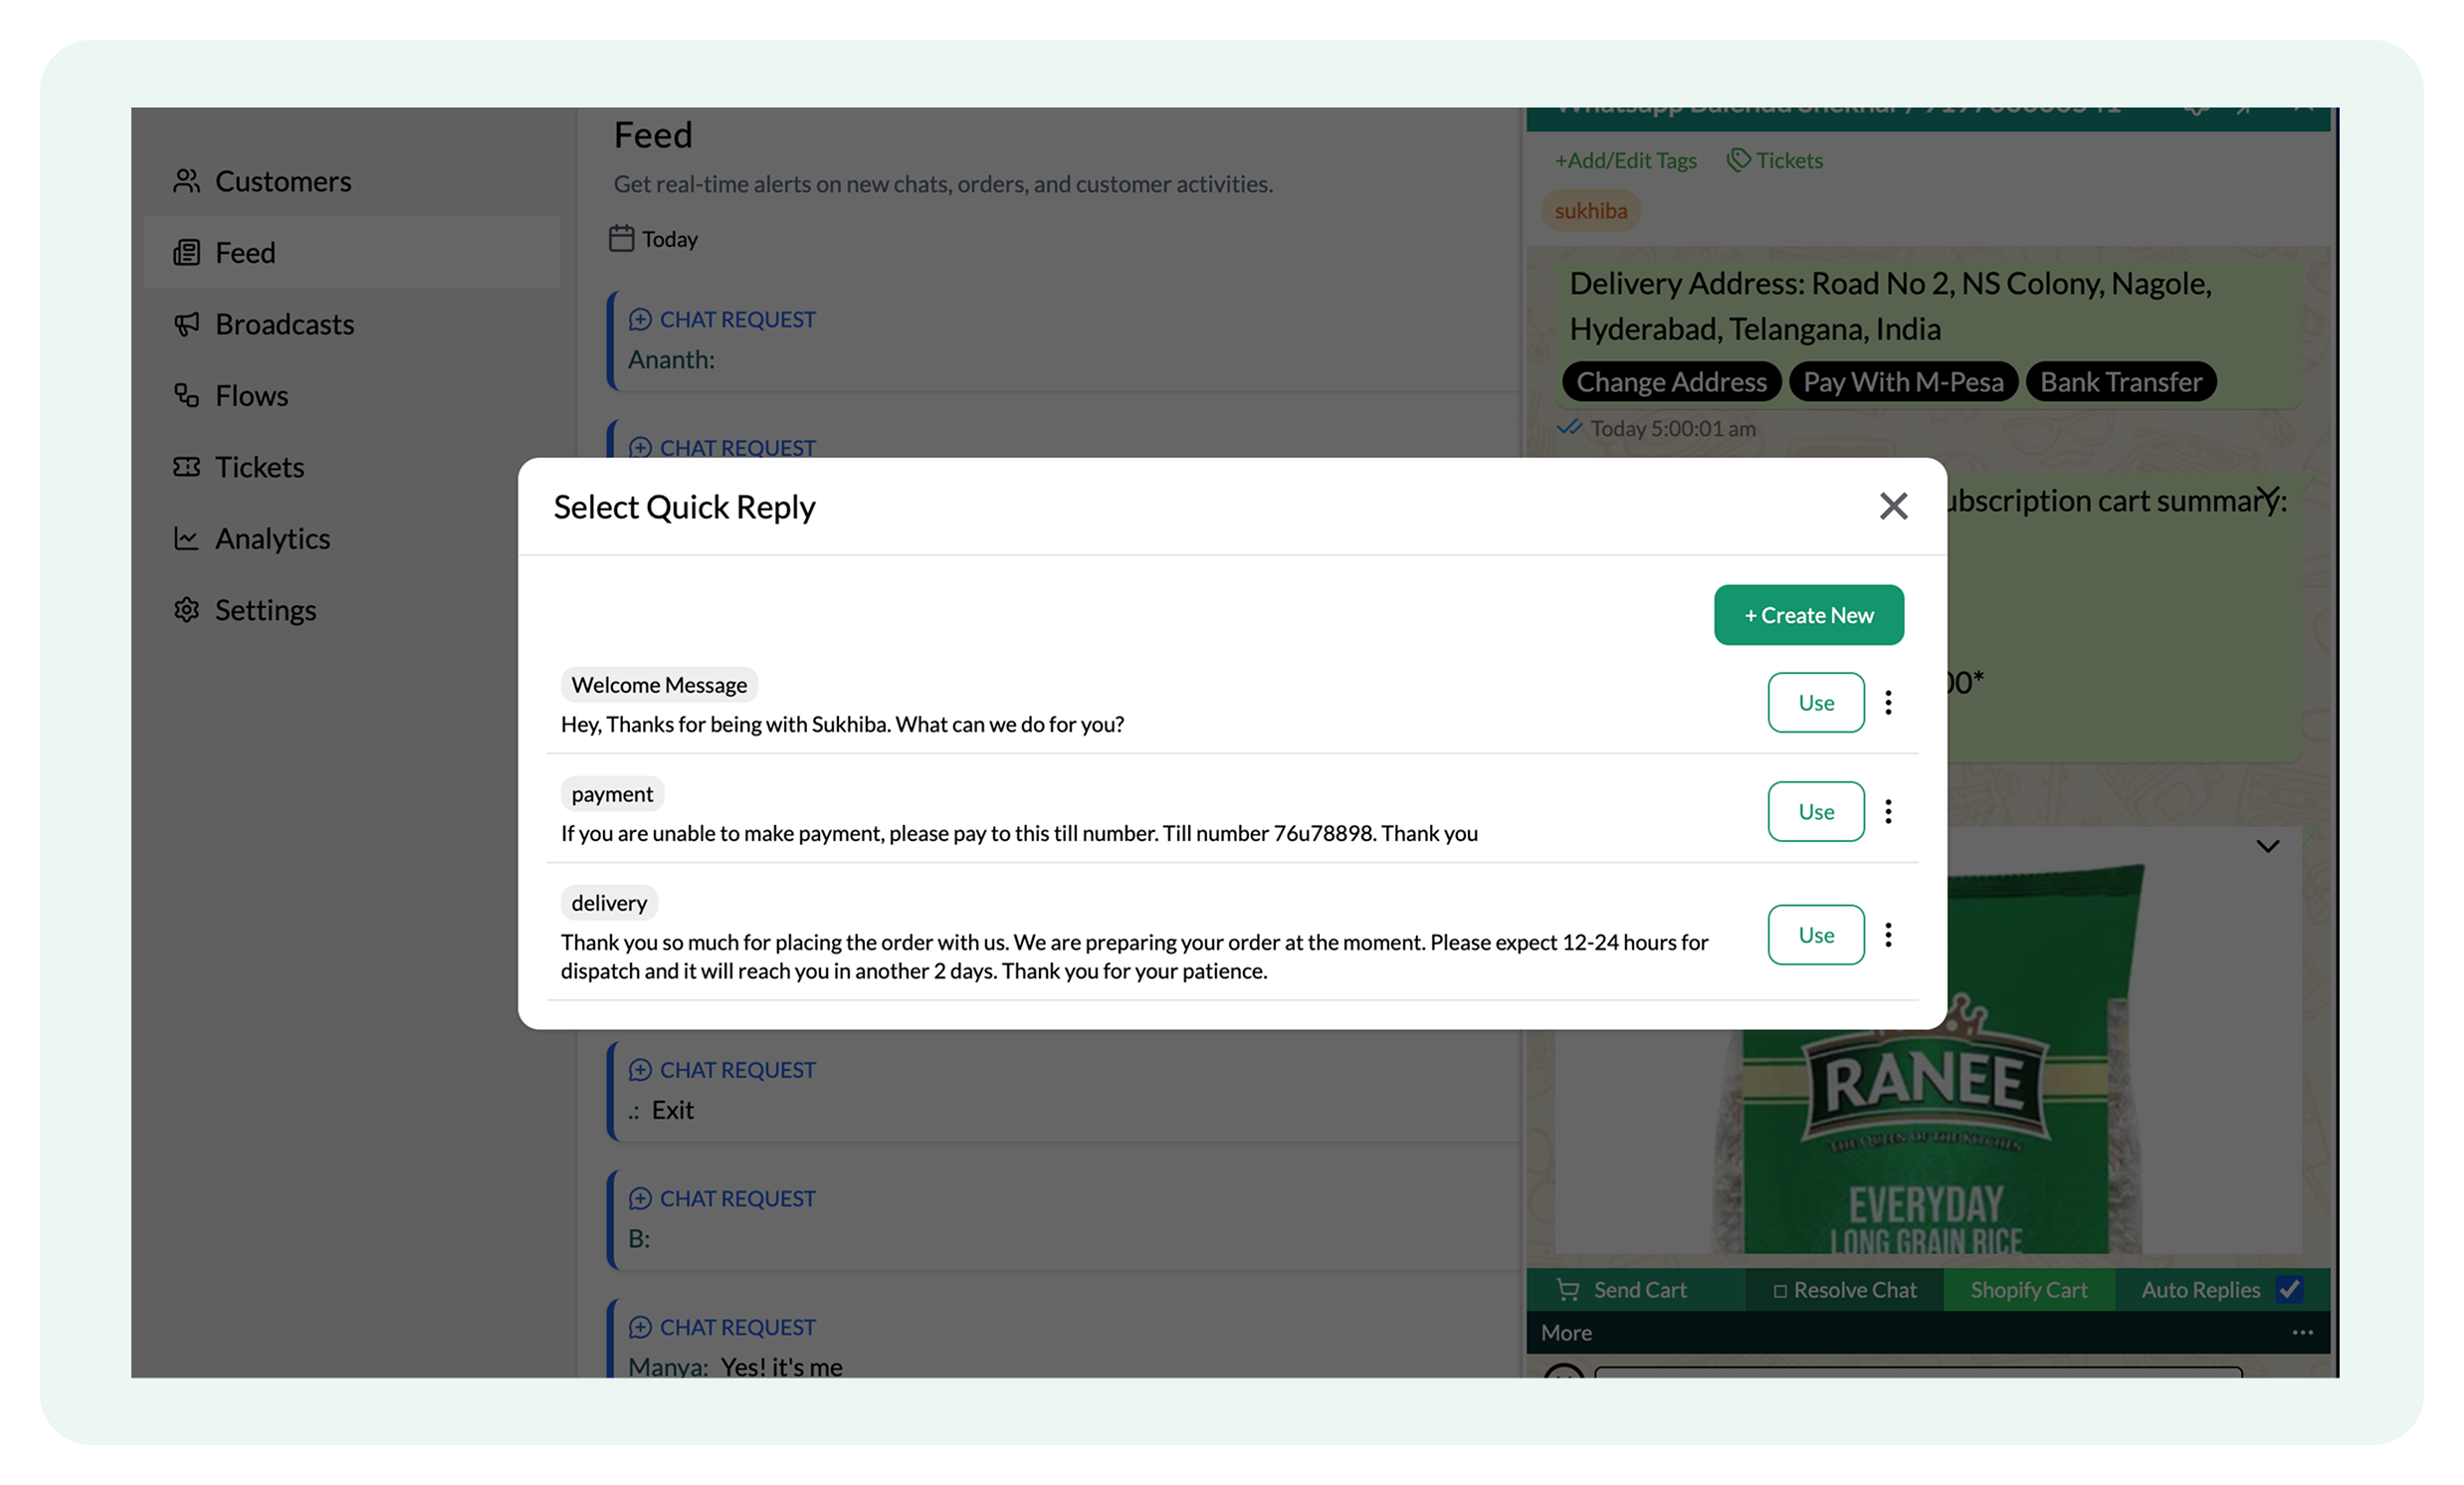
Merchants can simply Use the logged-in quick replies depending on the situation or add a new one.
- Click Create New and open this dialogue box
.png)
- Enter a name or description for the quick reply (e.g., "Payment Issue") under Title/Code
- Type in the message you want saved (e.g., "Here’s how you can resolve your payment issue...") in the Message window
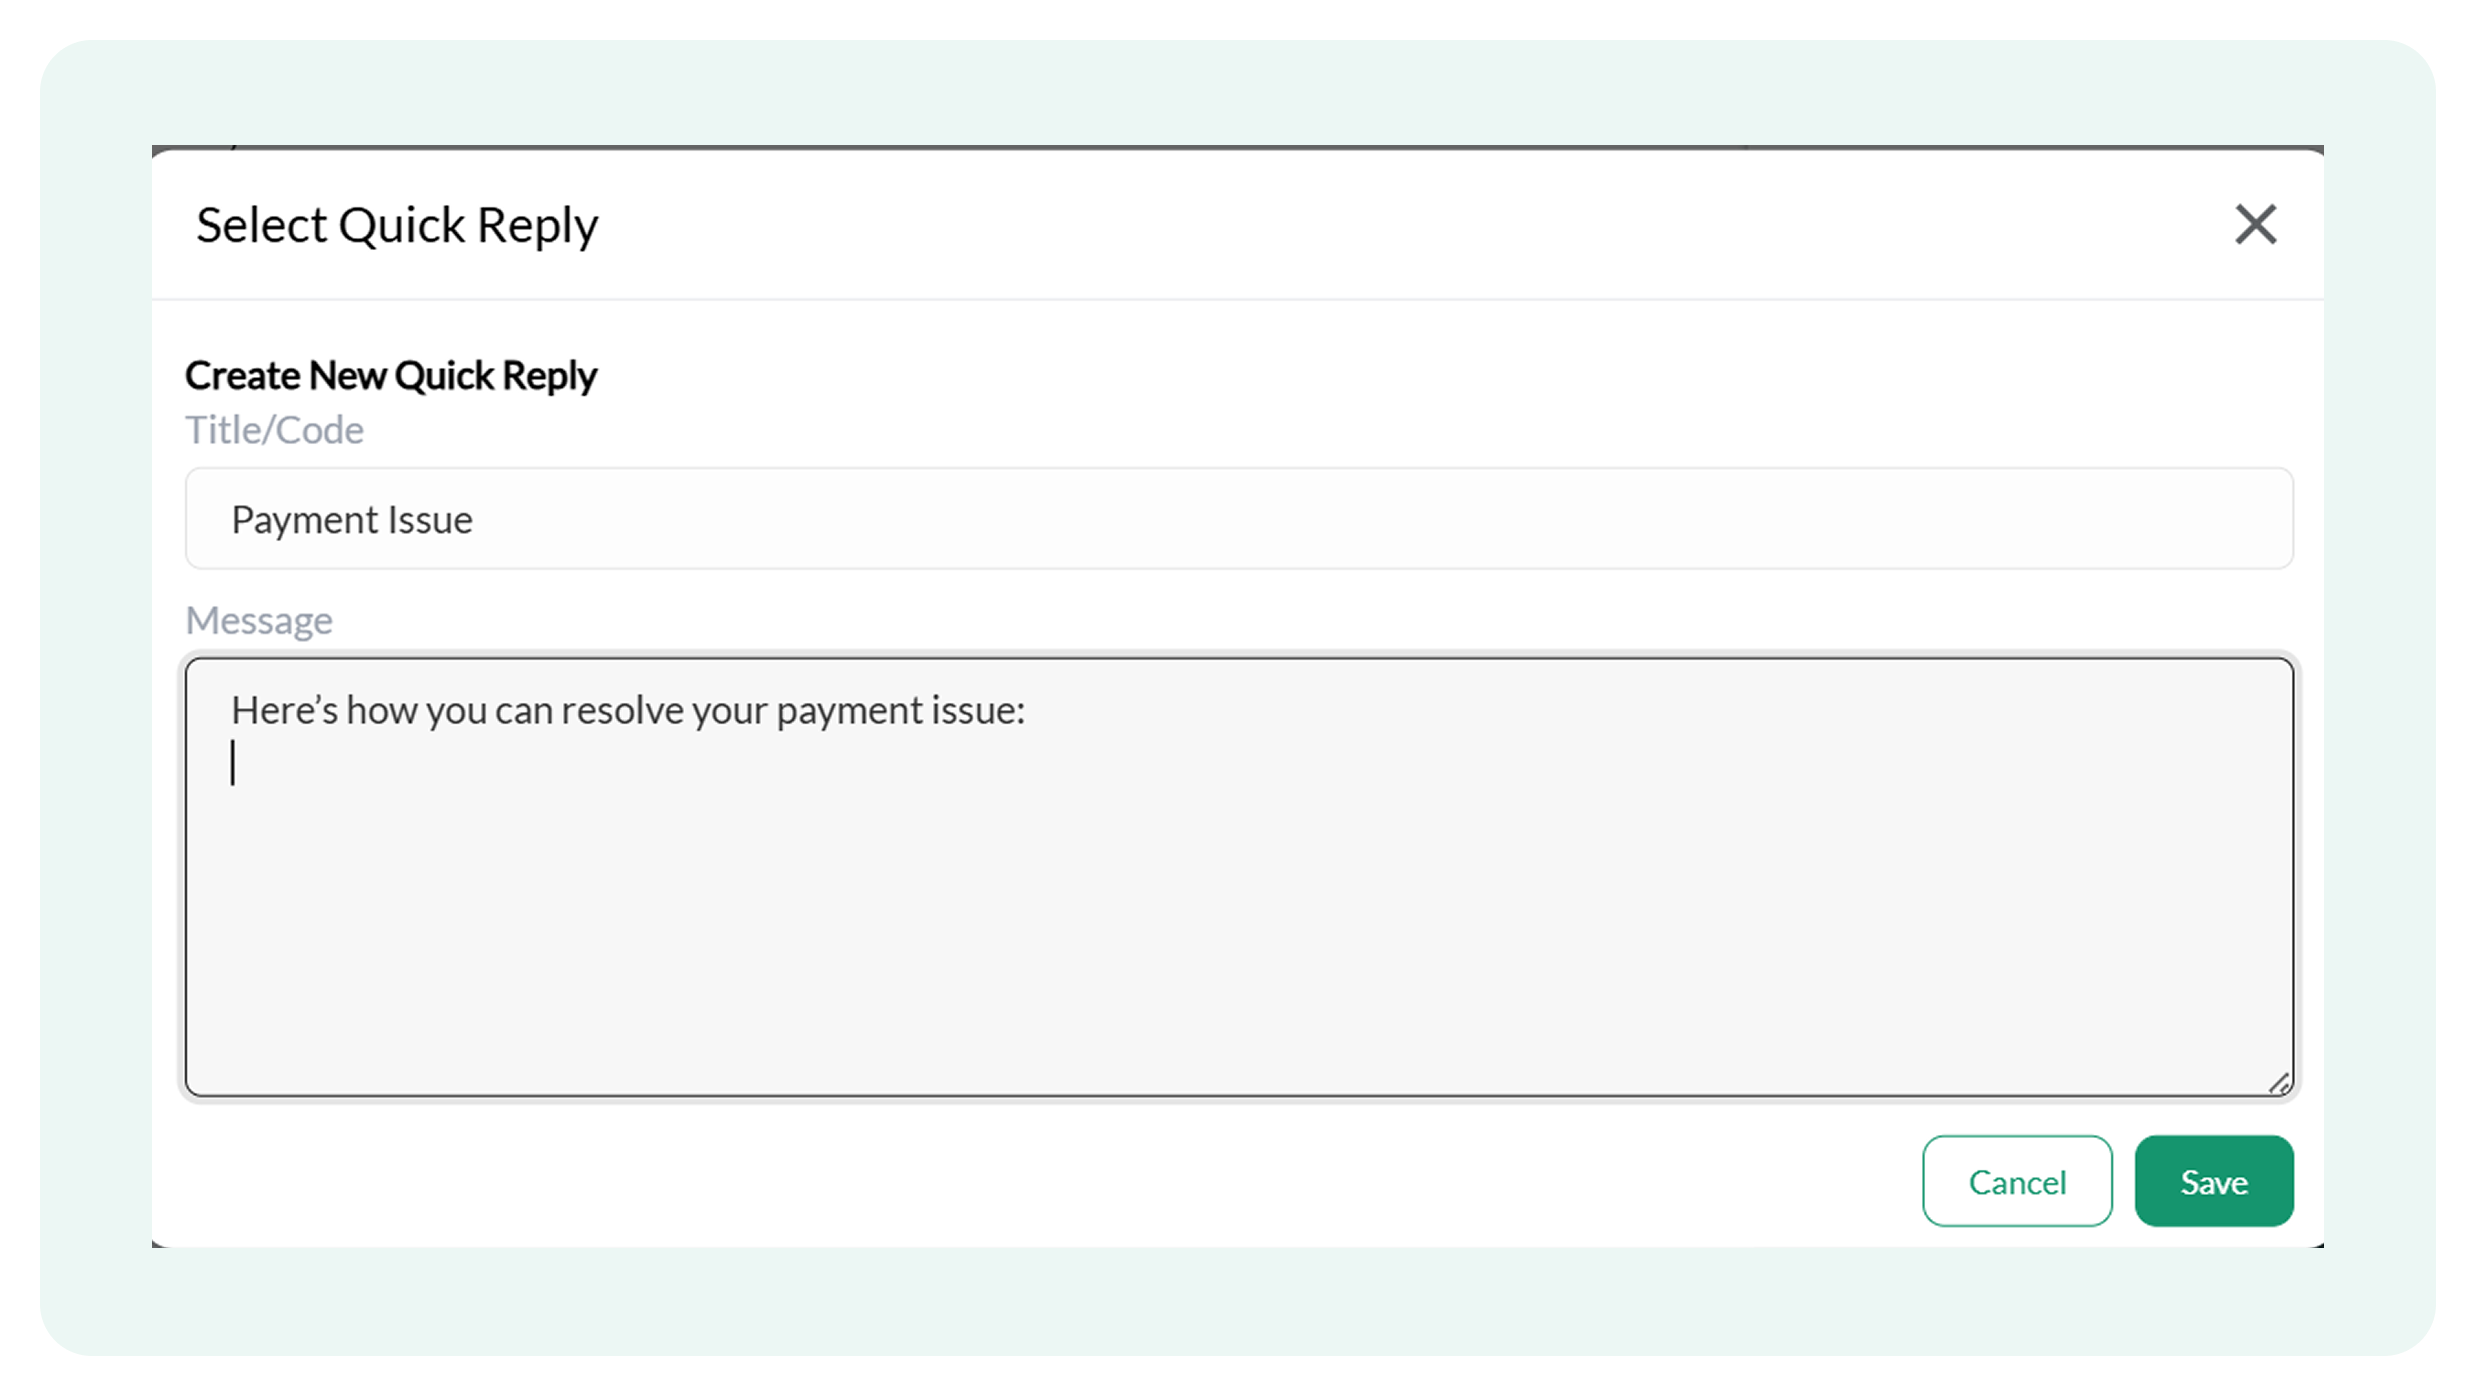
- Click Save to store the quick reply
What is Trigger State in chat?
The Trigger State feature in chat initiates automated flows or sends predefined messages (e.g., abandoned cart reminders) directly from the chat interface.
The More options include the Trigger State option, in addition to Quick Replies.
Trigger State is designed for specific automated workflows and requires proper configuration by the Flowcart support team. Contact us for your configuration requirements.
Managing User Dashboard
Merchants can use the Manage User dashboard as their central command center for overseeing both customer engagement and team performance. This interface allows them to monitor real-time interactions, manage wallets, handle chats, and oversee detailed user profiles in a single, scannable view.
This is how the dashboard looks:
.png)
Key interface elements
- Identity role and overview: The left-hand column displays the user's name and WhatsApp number
.png)
Tickets Features
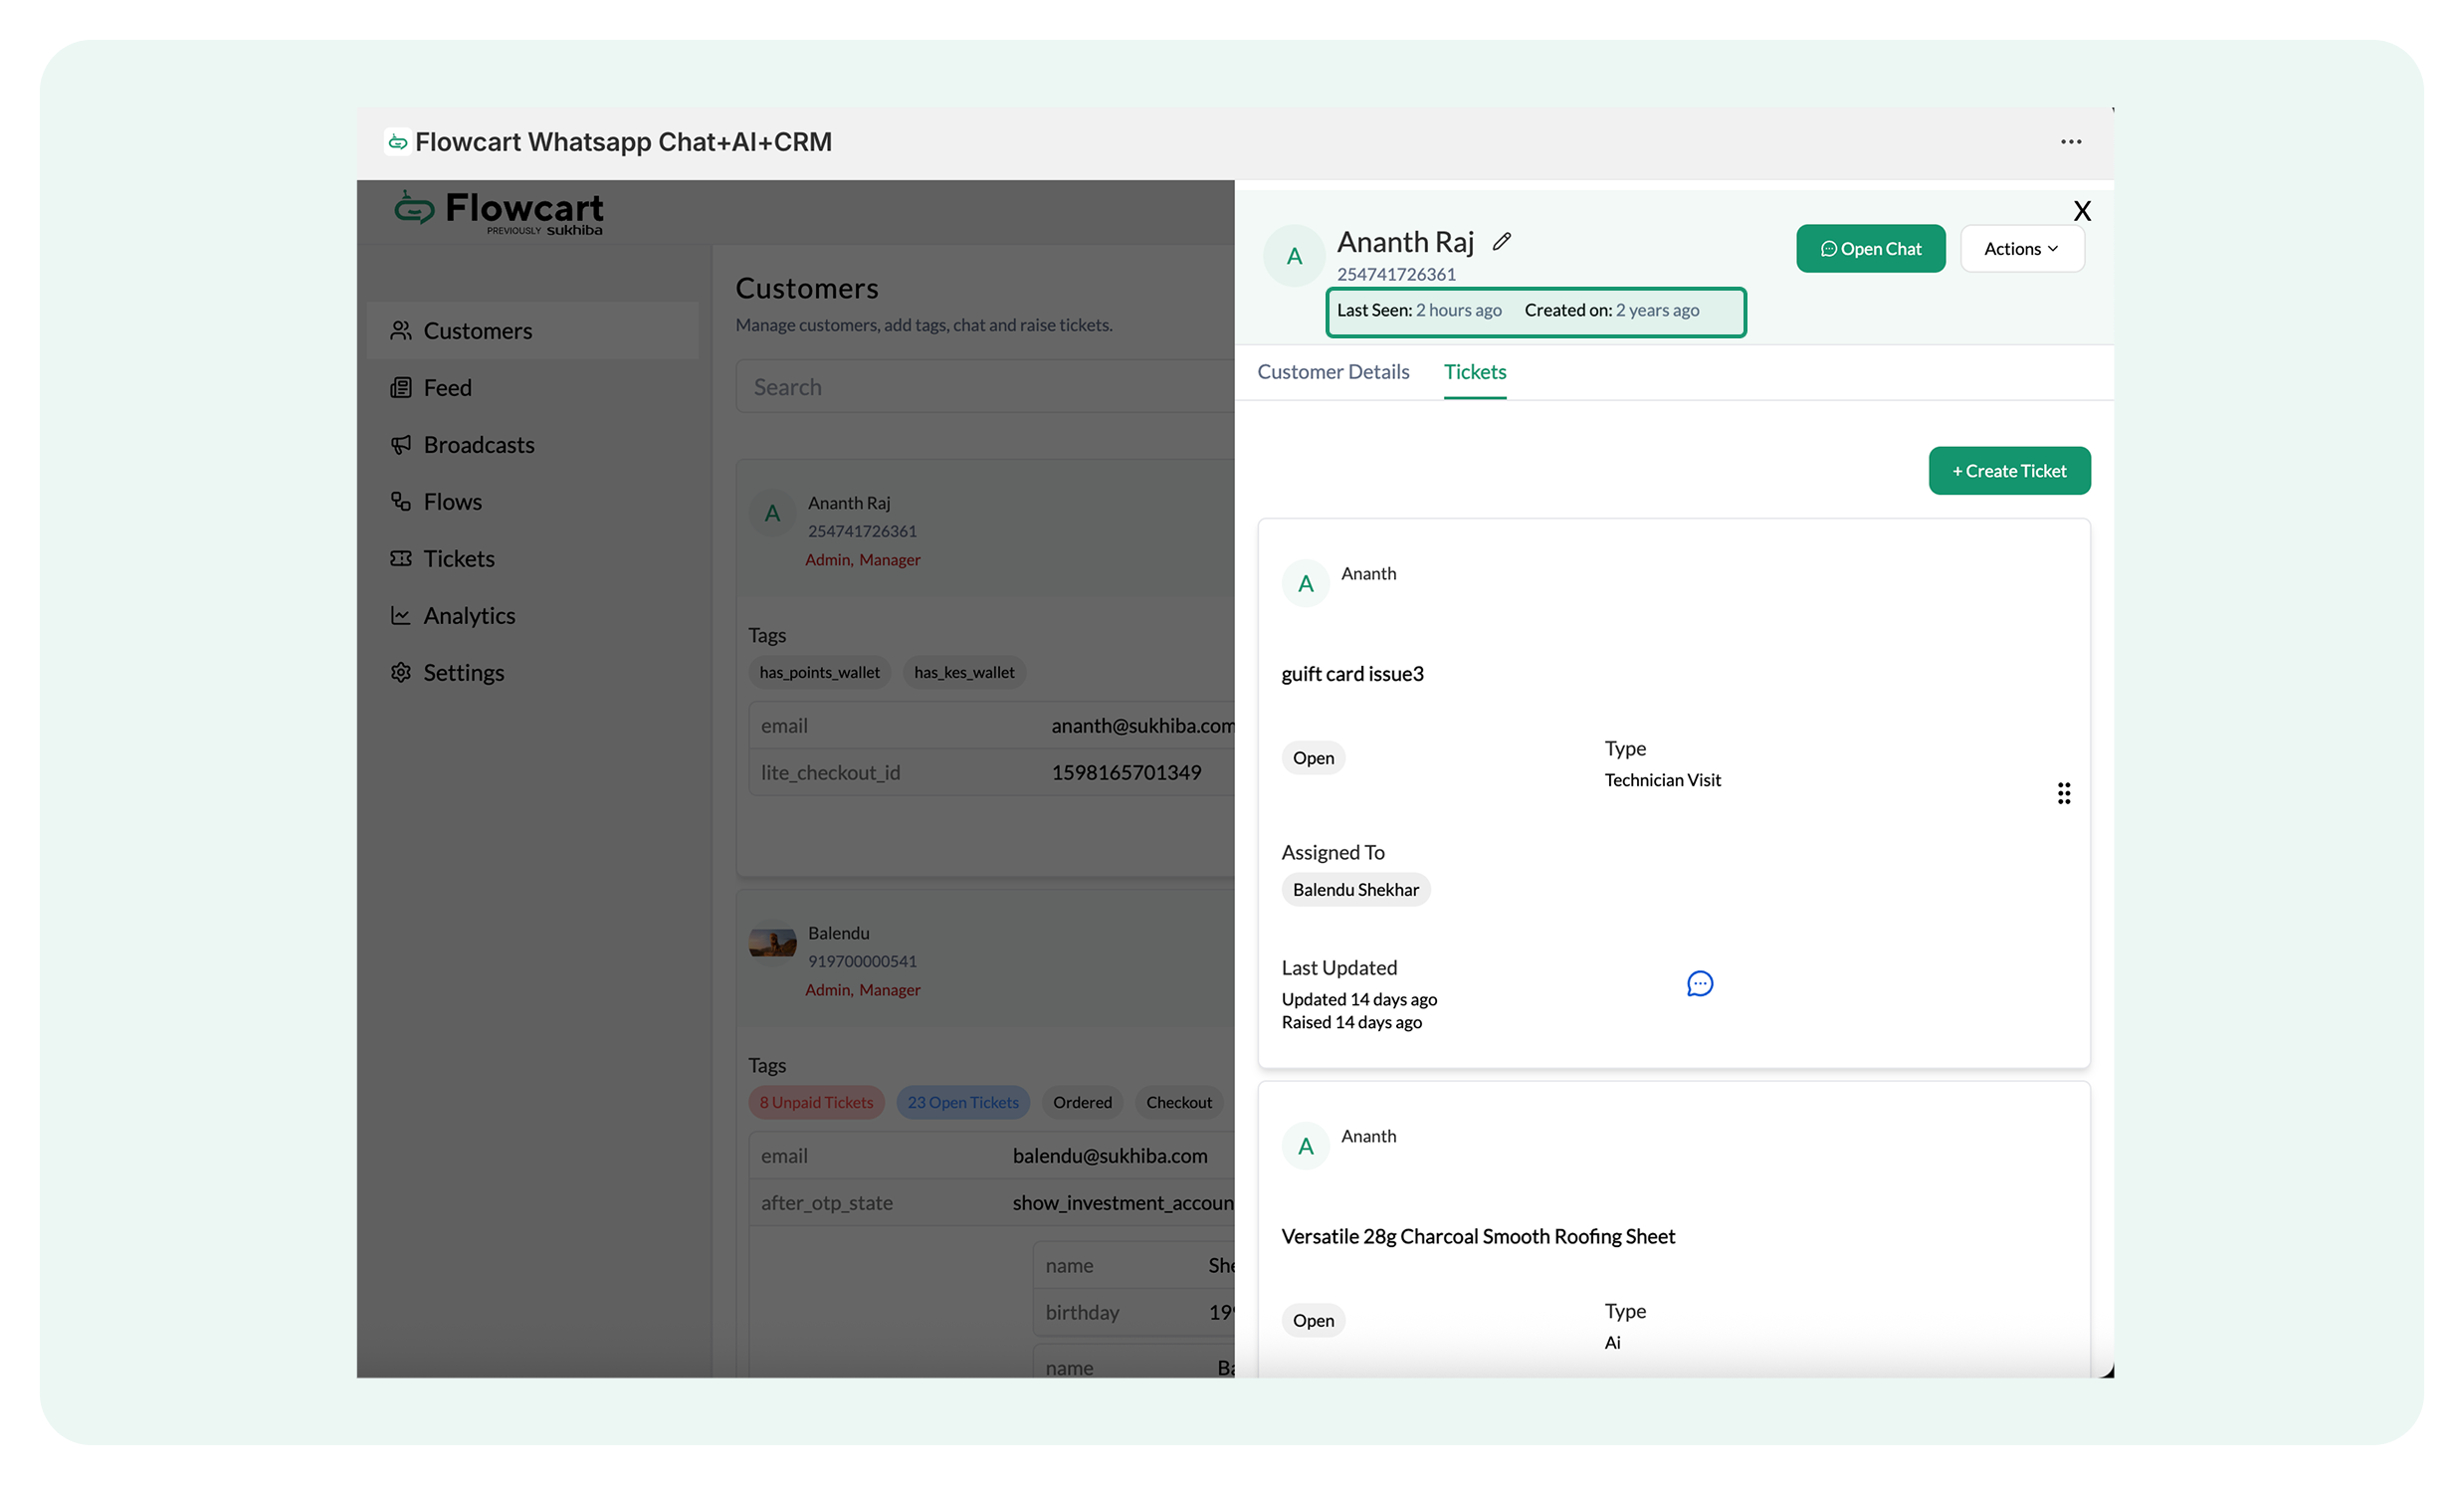
- Tickets: View the number of Open or Unpaid Tickets associated with a specific user. This helps agents prioritize customers with unresolved issues.
To access Tickets:
- Click on Tickets to open a dialogue box
.png)
- The box displays complete ticket details, such as status, description, and assigned roles. Read: How to manage Tickets
.png)
- Activity timestamps: Track user status by viewing Last Seen data and account age (Created)
- Detailed profile expansion: Click on a user row to open a detailed side panel with expanded user data. For example, this is the merchant’s current screen:
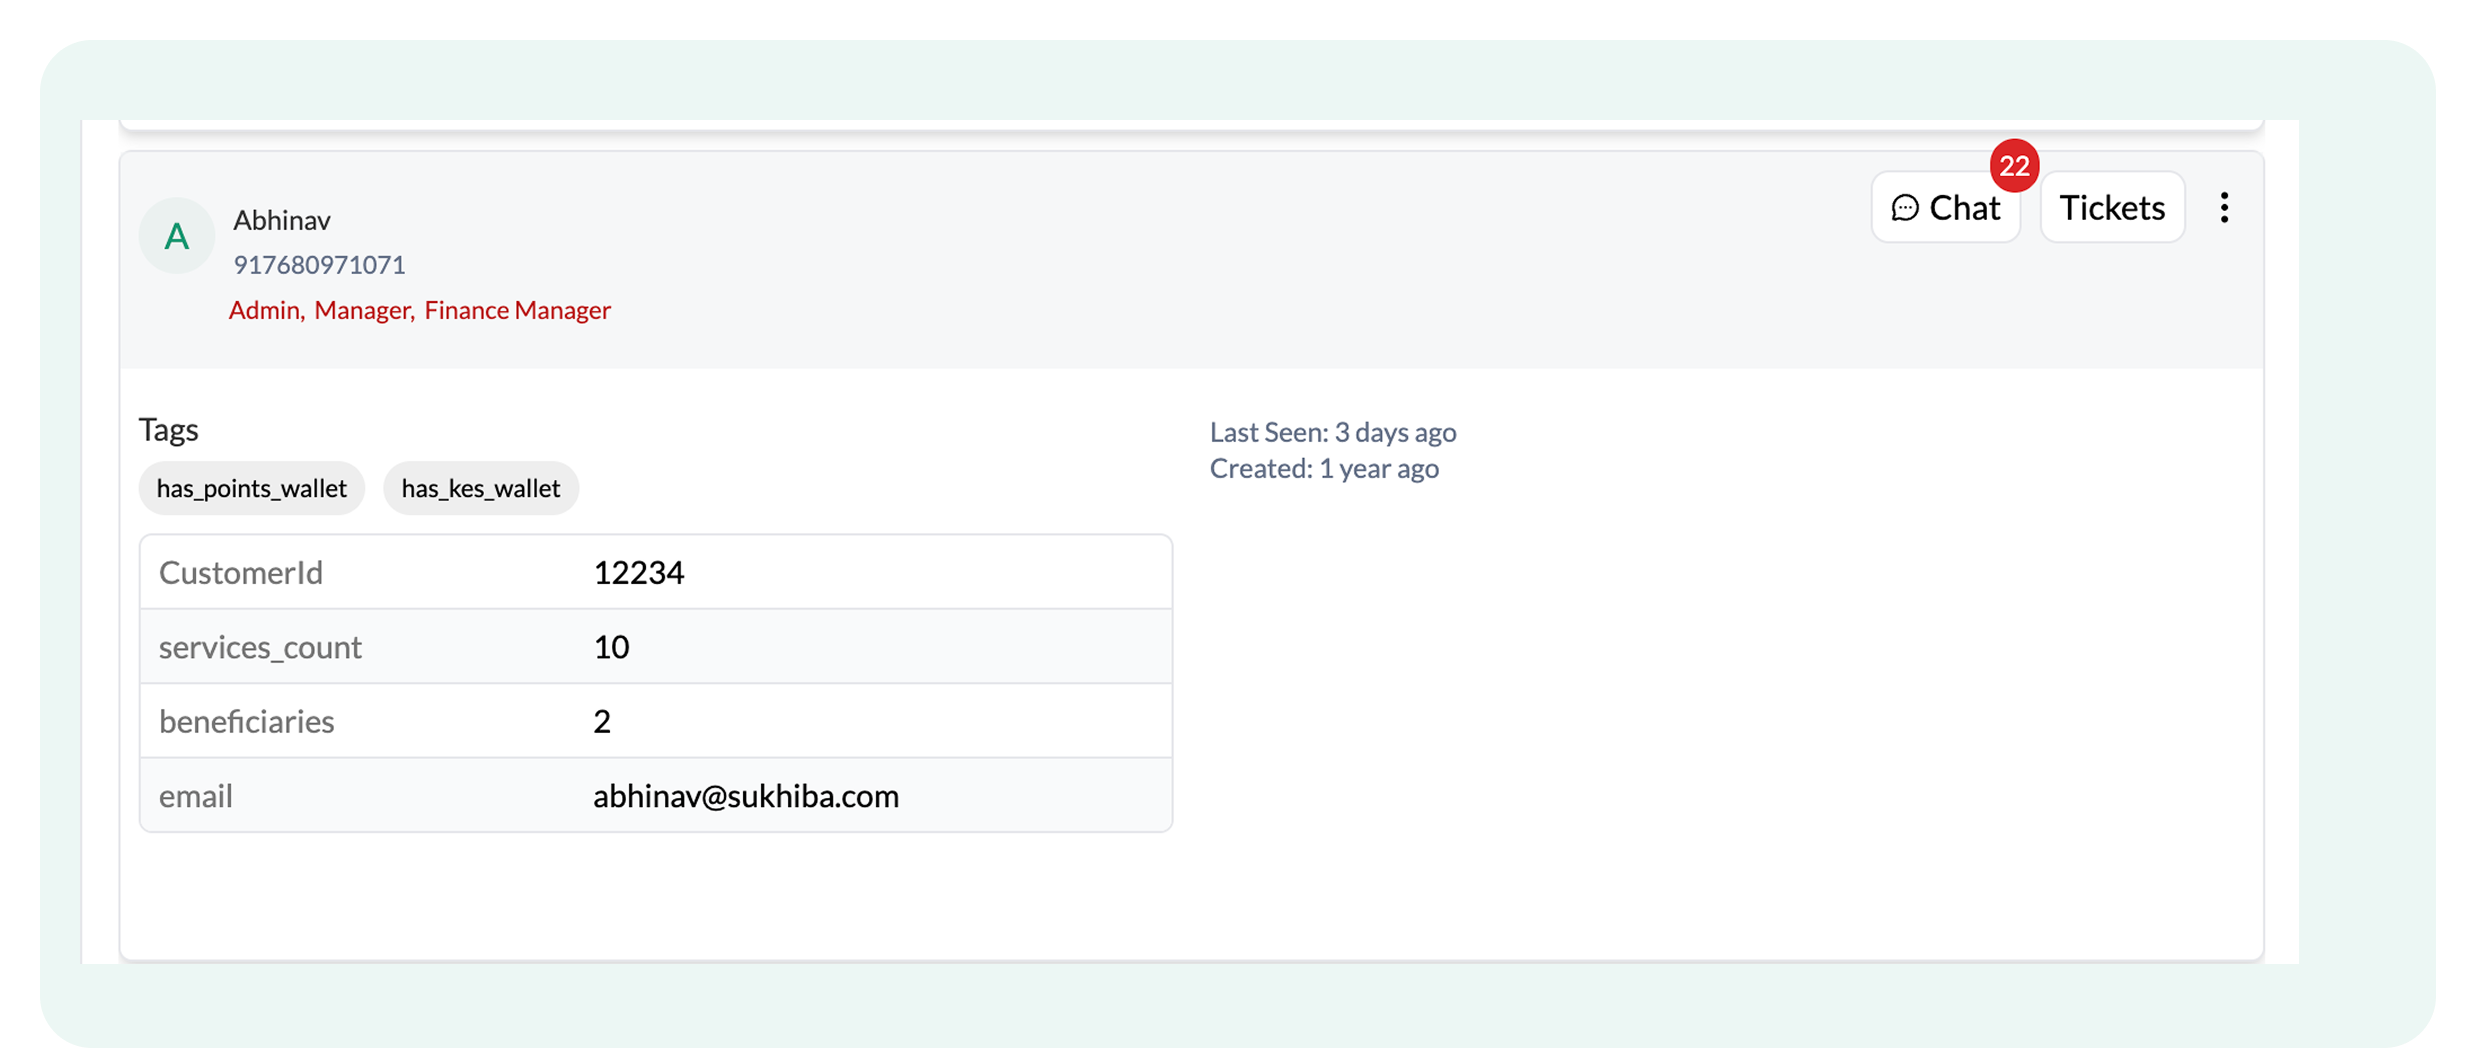
Clicking on Abhinav opens a specific side panel displaying full user details:
While viewing the full user details, merchants can also manage the Wallet.
There are two types of Wallets:
- Currency wallet: Tracks real money or credits linked to customers that can be used for refunds or purchases
- Points wallet: Tracks loyalty points earned by customers, redeemable for discounts or products
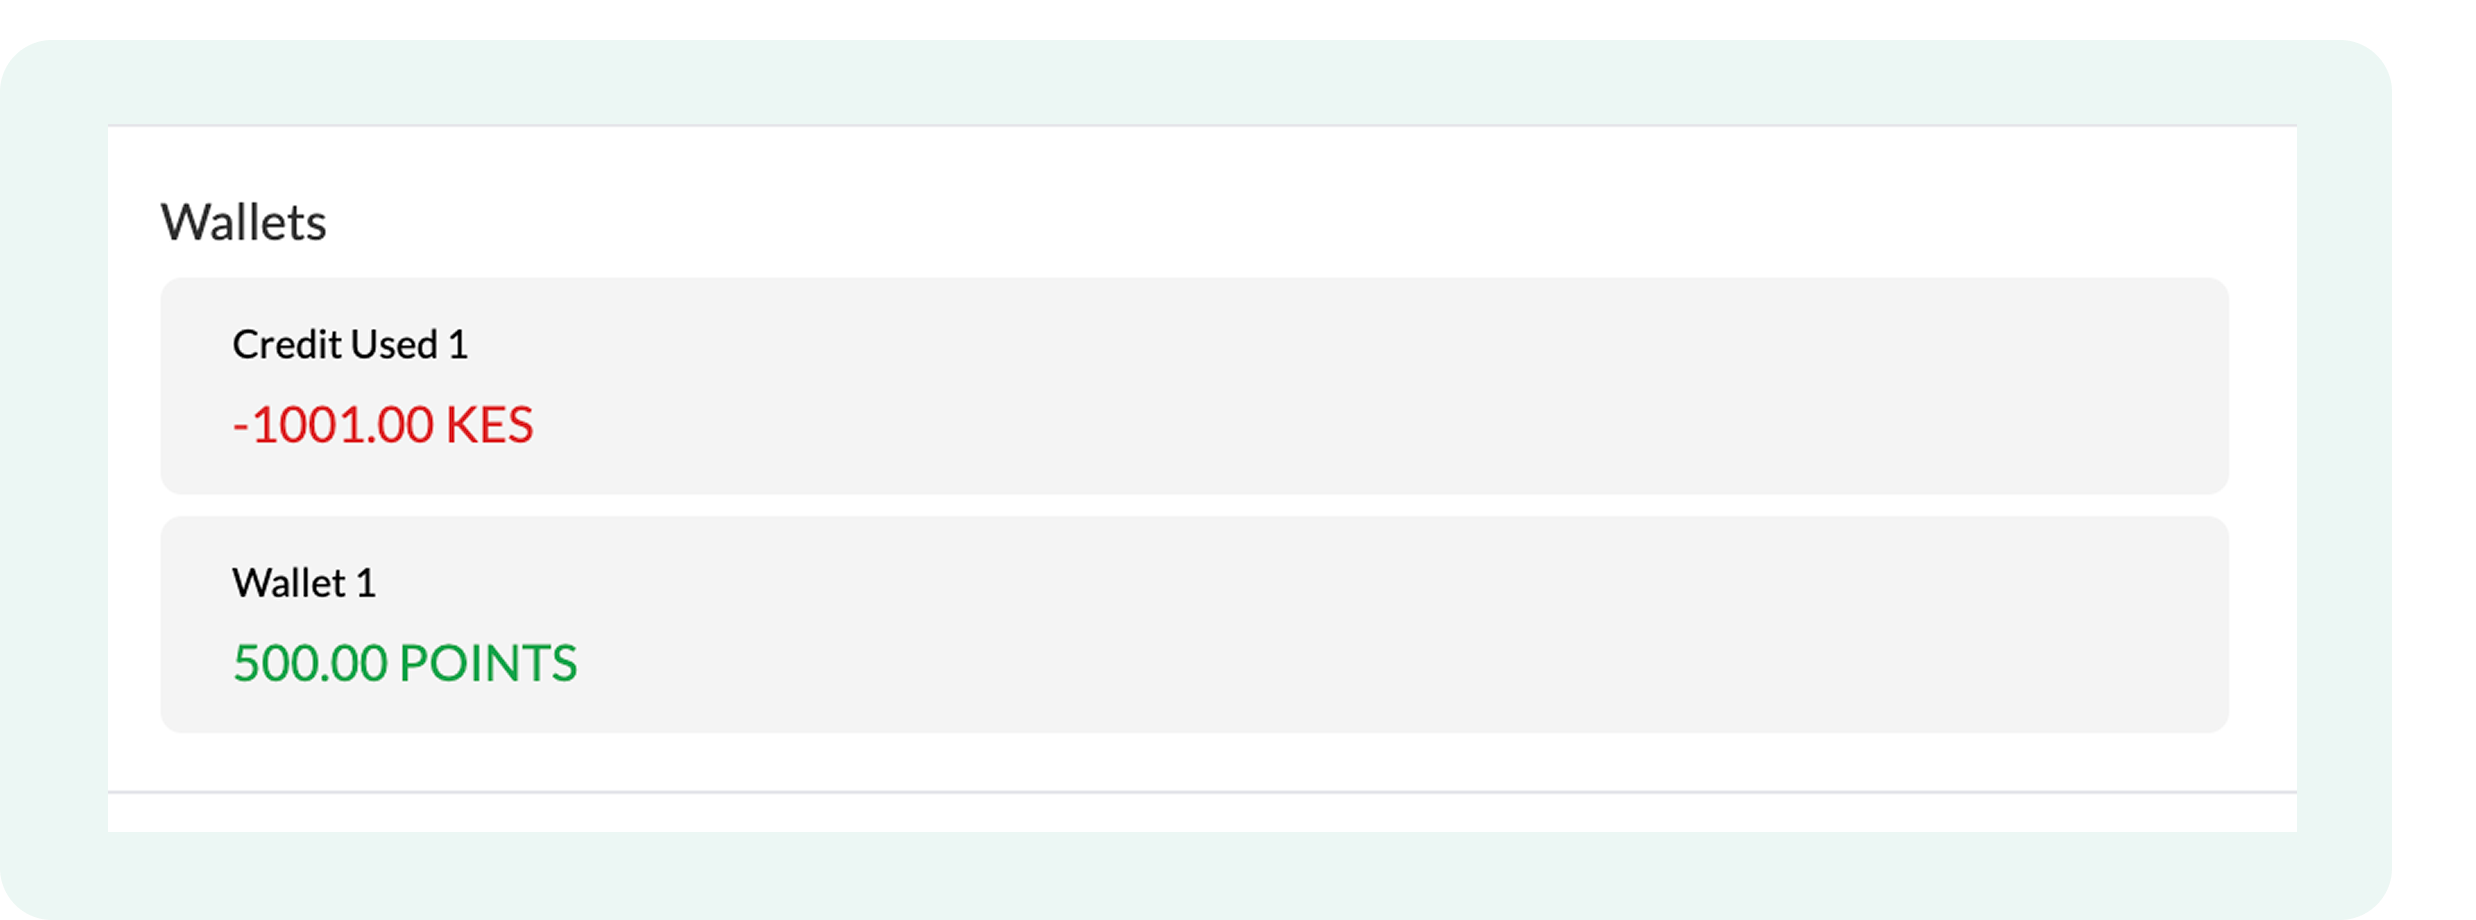
Merchants can contact Flowcart support to assign or deduct money/points in wallets.
Chat features
Interact directly with customers via chat for real-time communication
To access Chat:
- Click on Chat to open a chat window and start chatting with the customer .
📌Read: How to manage Feed [chat]?
.png)
- Click on the three dots next to a ticket to access additional options, such as:
- Copying the user ID
- Viewing detailed data
- Removing the user
.png)
The Add/Refund option is a complex process requiring backend customization. Avoid using it directly, and contact the Flowcart support team for assistance.
Managing Tags and Data Columns
Merchants can enable efficient user organization, customization, and data management using two ways:
- Tags: Help categorize and group users based on roles, attributes, or use cases (e.g., admin, agent, VIP). Tags simplify user filtering, searching, and segmentation for quick access or tailored interactions.
- Data Columns: Allow storing additional user-specific information, such as birthdays, preferences, or other custom data. These columns ensure that personalized data is collected and managed efficiently.
Together, tags and data columns support better user categorization, advanced functionality (e.g., custom flows), and personalized experiences while maintaining a structured and scalable user database.
How to configure it?
In Manage Users, you can manage tags and data columns as follows:
For Tags:
- Go to Settings next to Upload and Add User
- Click Edit Tags
.png)
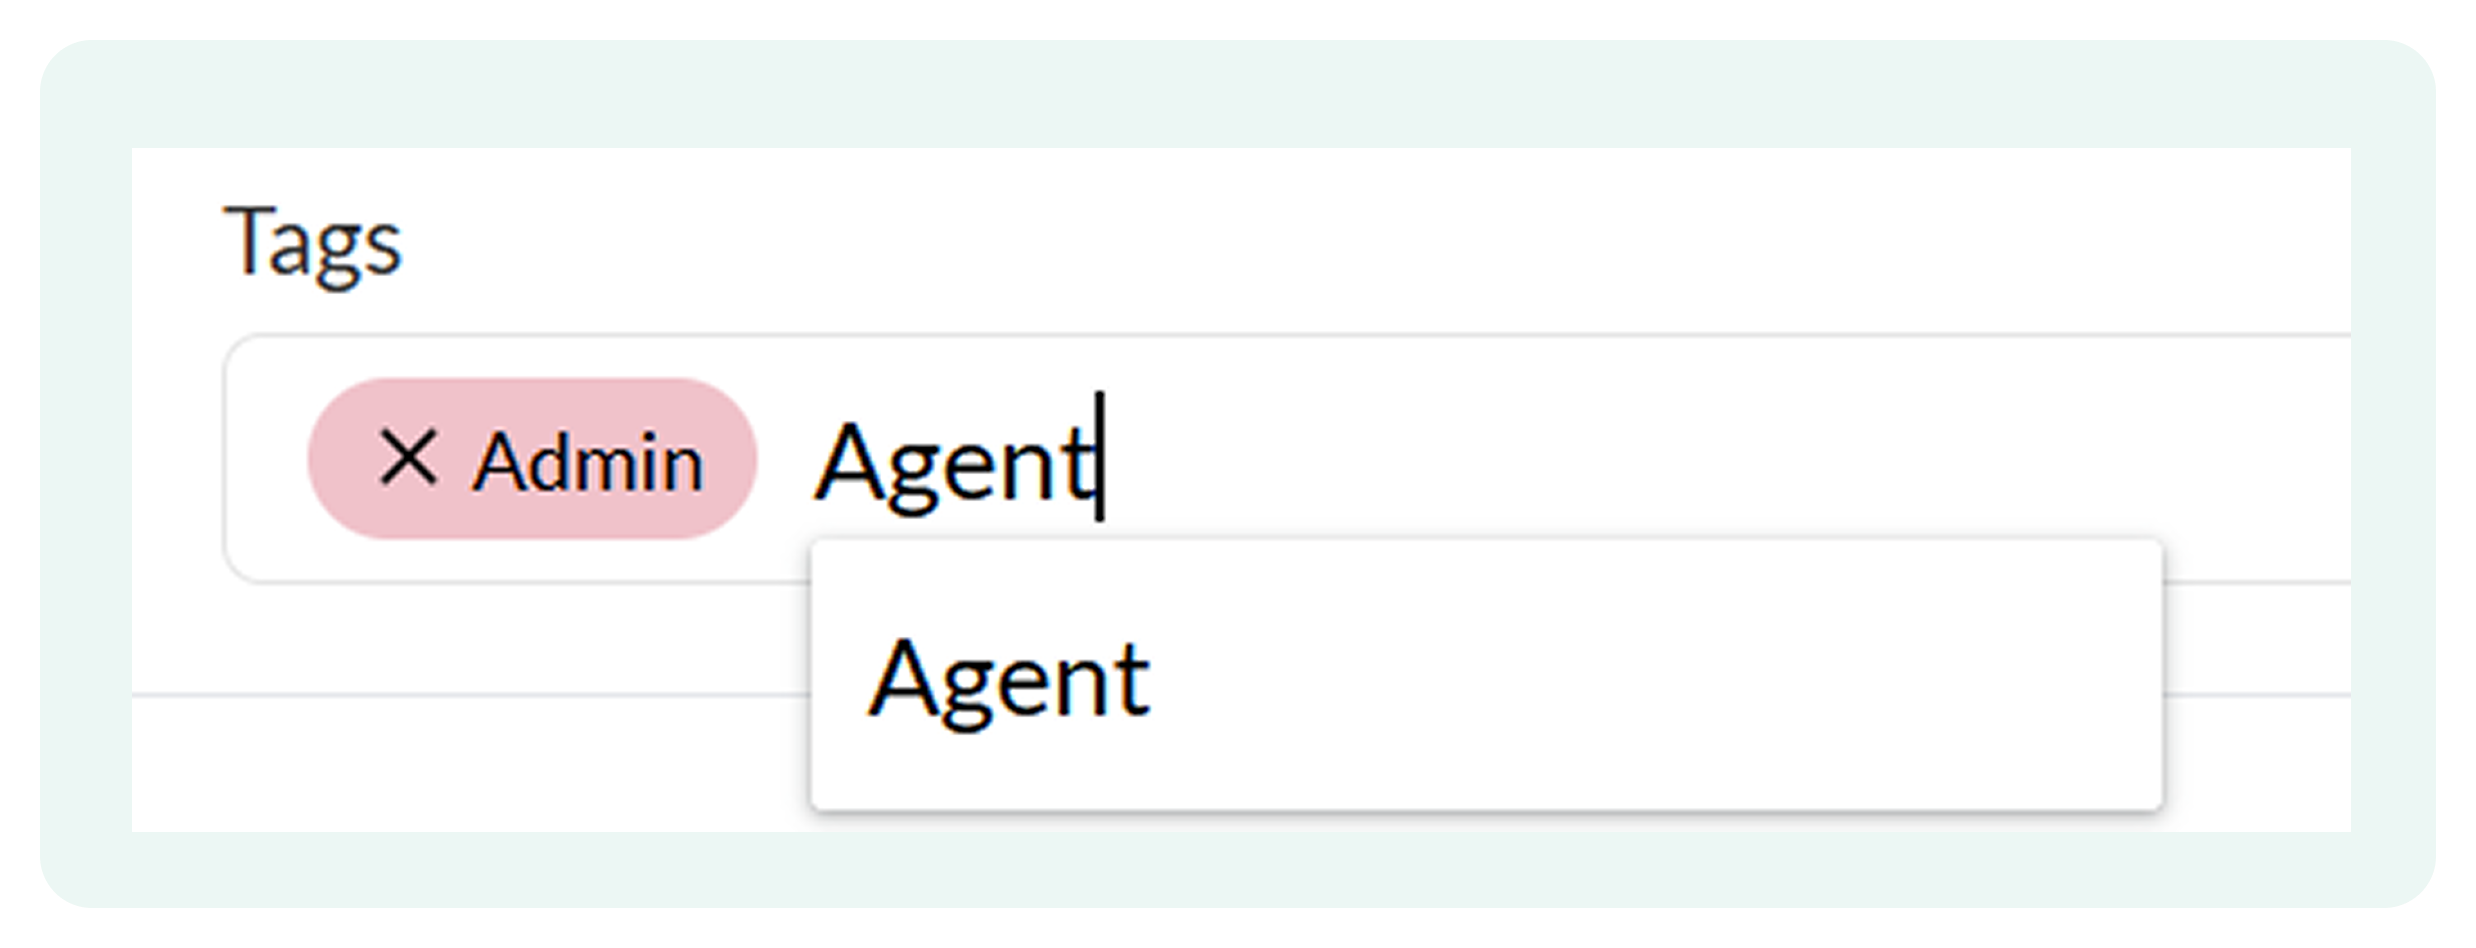
A dialogue box like this will open on the screen:
.png)
- To remove a tag, click the 'X' next to the tag name
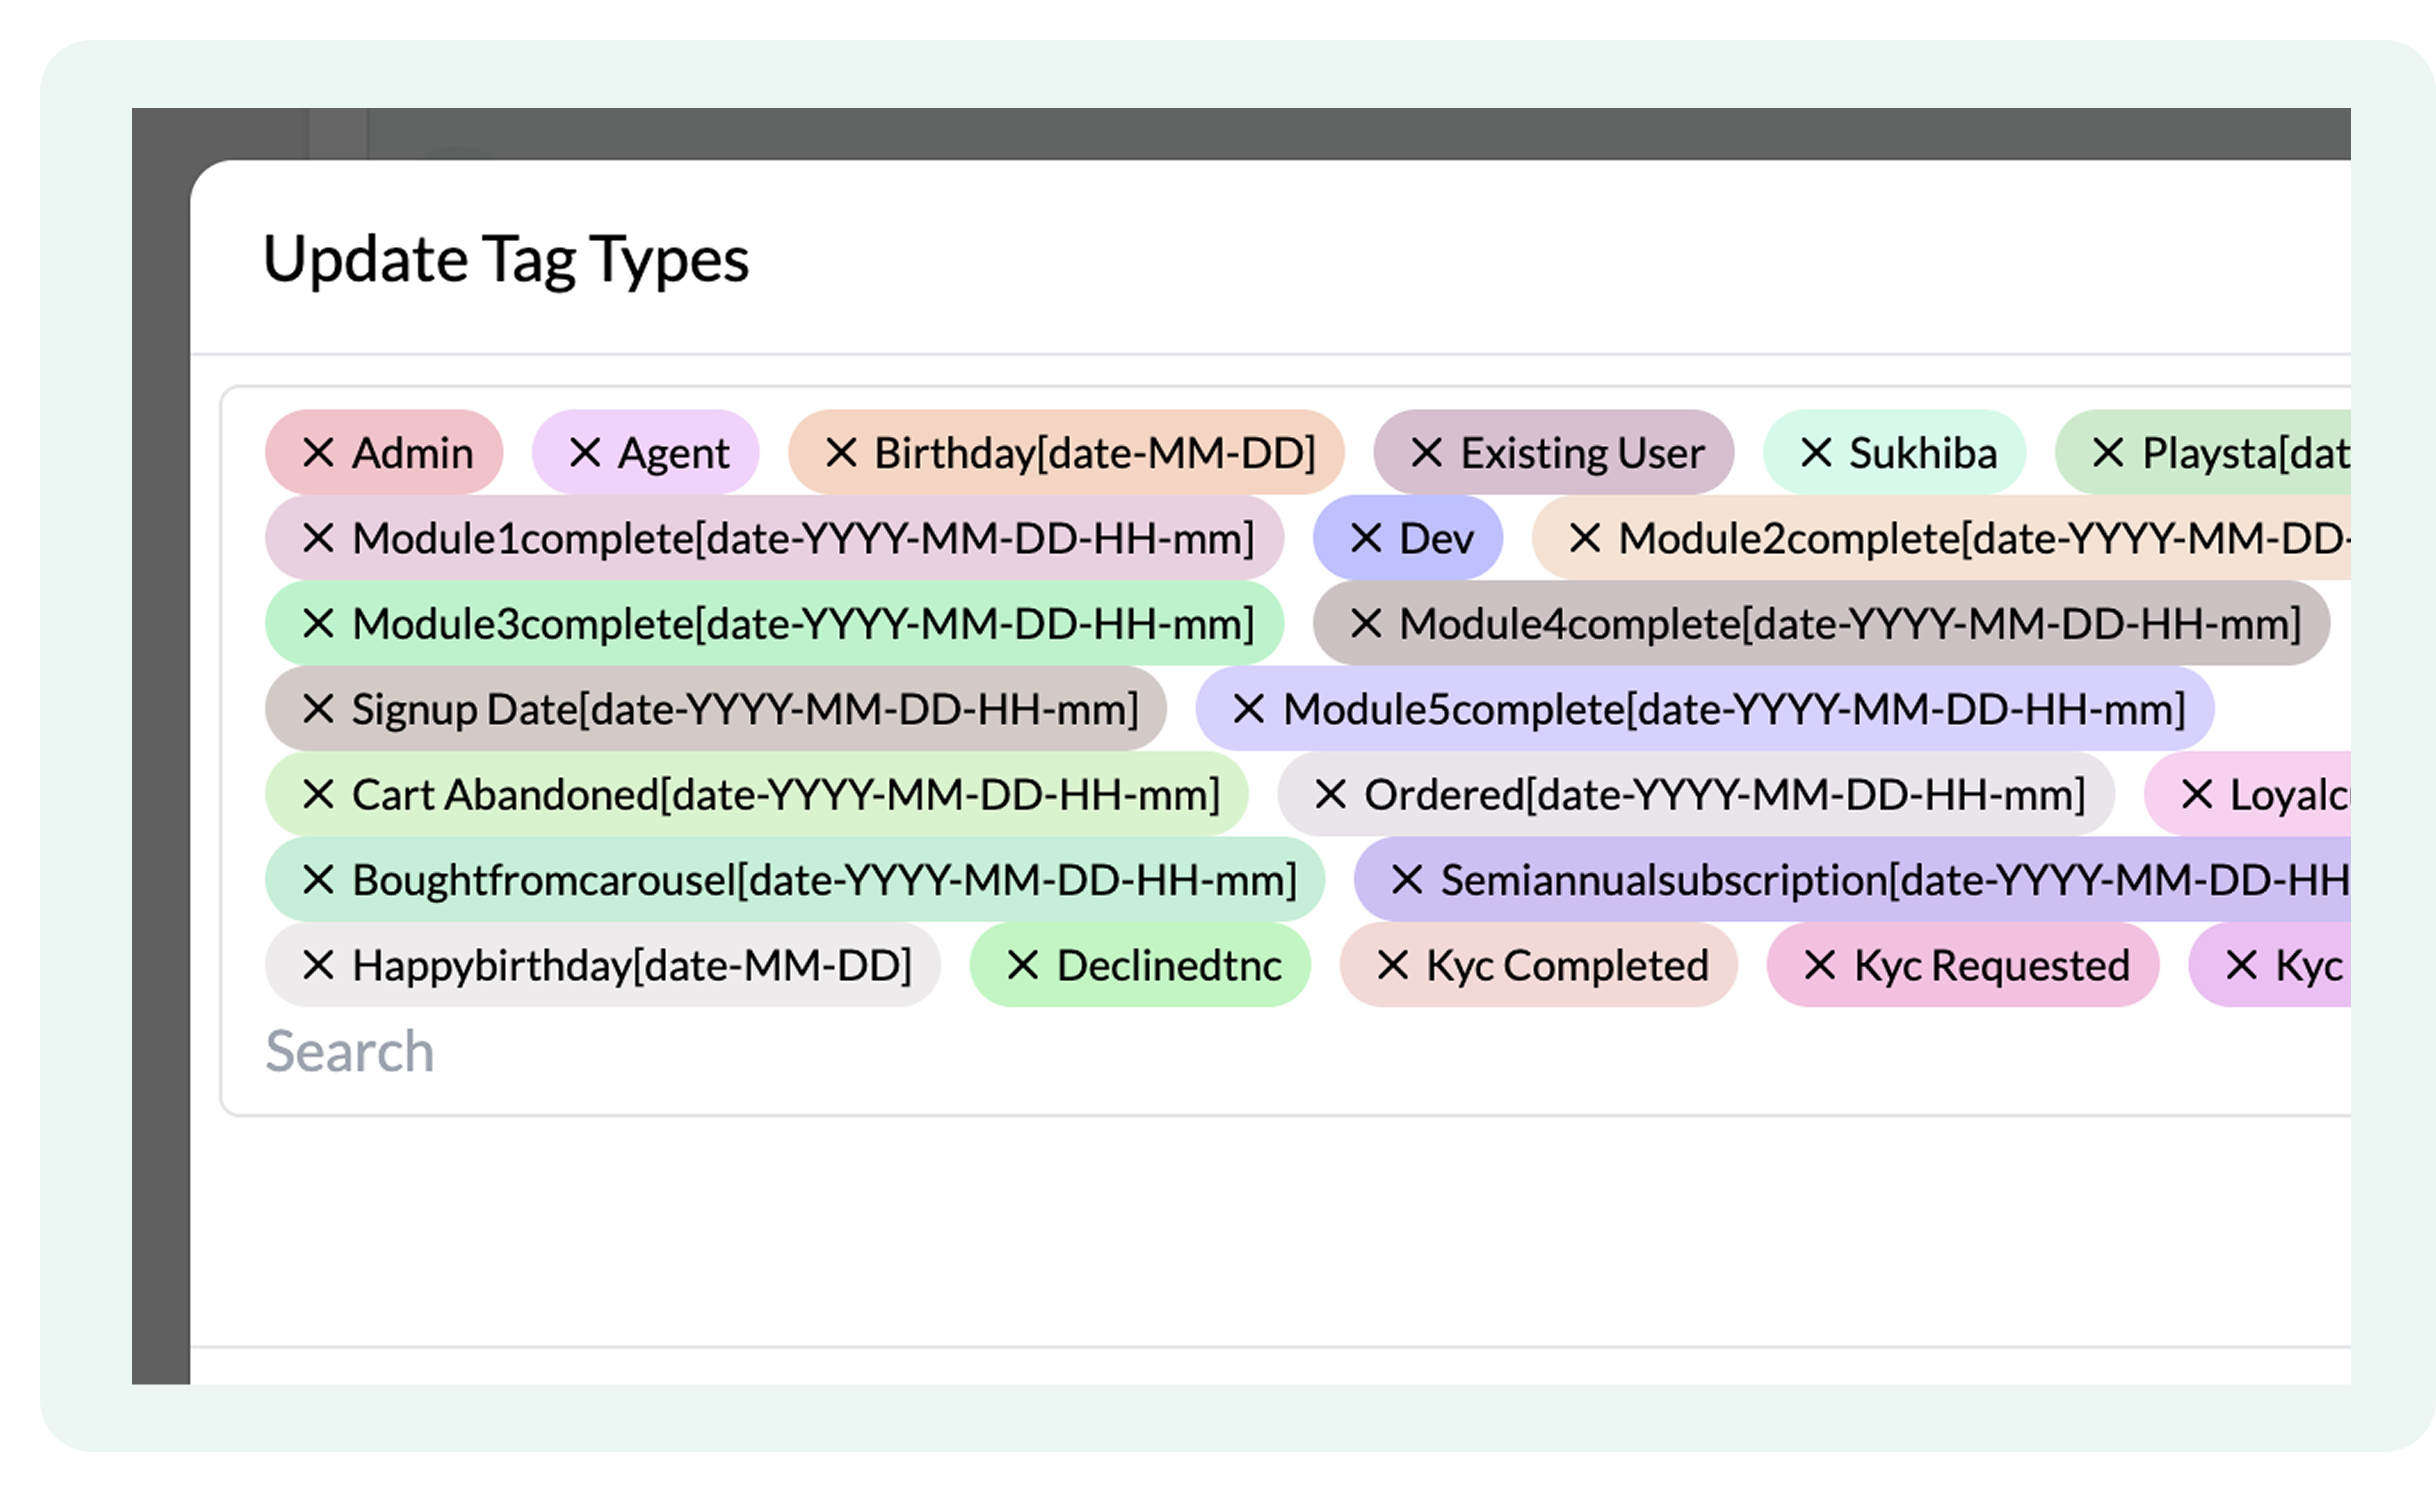
- Add New Tags by typing in the search column
.png)
- Once done, Update the changes.
For Data Columns:
- Go to Settings next to Upload and Add User
- Click Data Columns
.png)
A dialogue box like this will open on the screen:
.png)
While it is possible to define new fields to collect customer data, such as birthdays and locations, under Data Columns, there is a caveat: improperly created data columns may disrupt data organization or user flows, particularly in dynamic configurations.
Adding and Uploading Users in Manage Users
Depending on your immediate needs, you can choose between two methods for adding people to your system:
- Add Users: Use this option to manually add individual users. This is ideal for cases where you have only a few users to add and can enter details such as name, phone number, email, tags, and roles directly in the system.
- Upload Users: Use this option to bulk upload. For example, if you have a CSV file containing customer data for multiple users, you can upload it to quickly add all users to the system.
Adding users in the plugin
You can add new users in the plugin by following these steps:
- Click on Add User in the top-right corner in Manage users
.png)
A dialogue box like this will open on the screen:
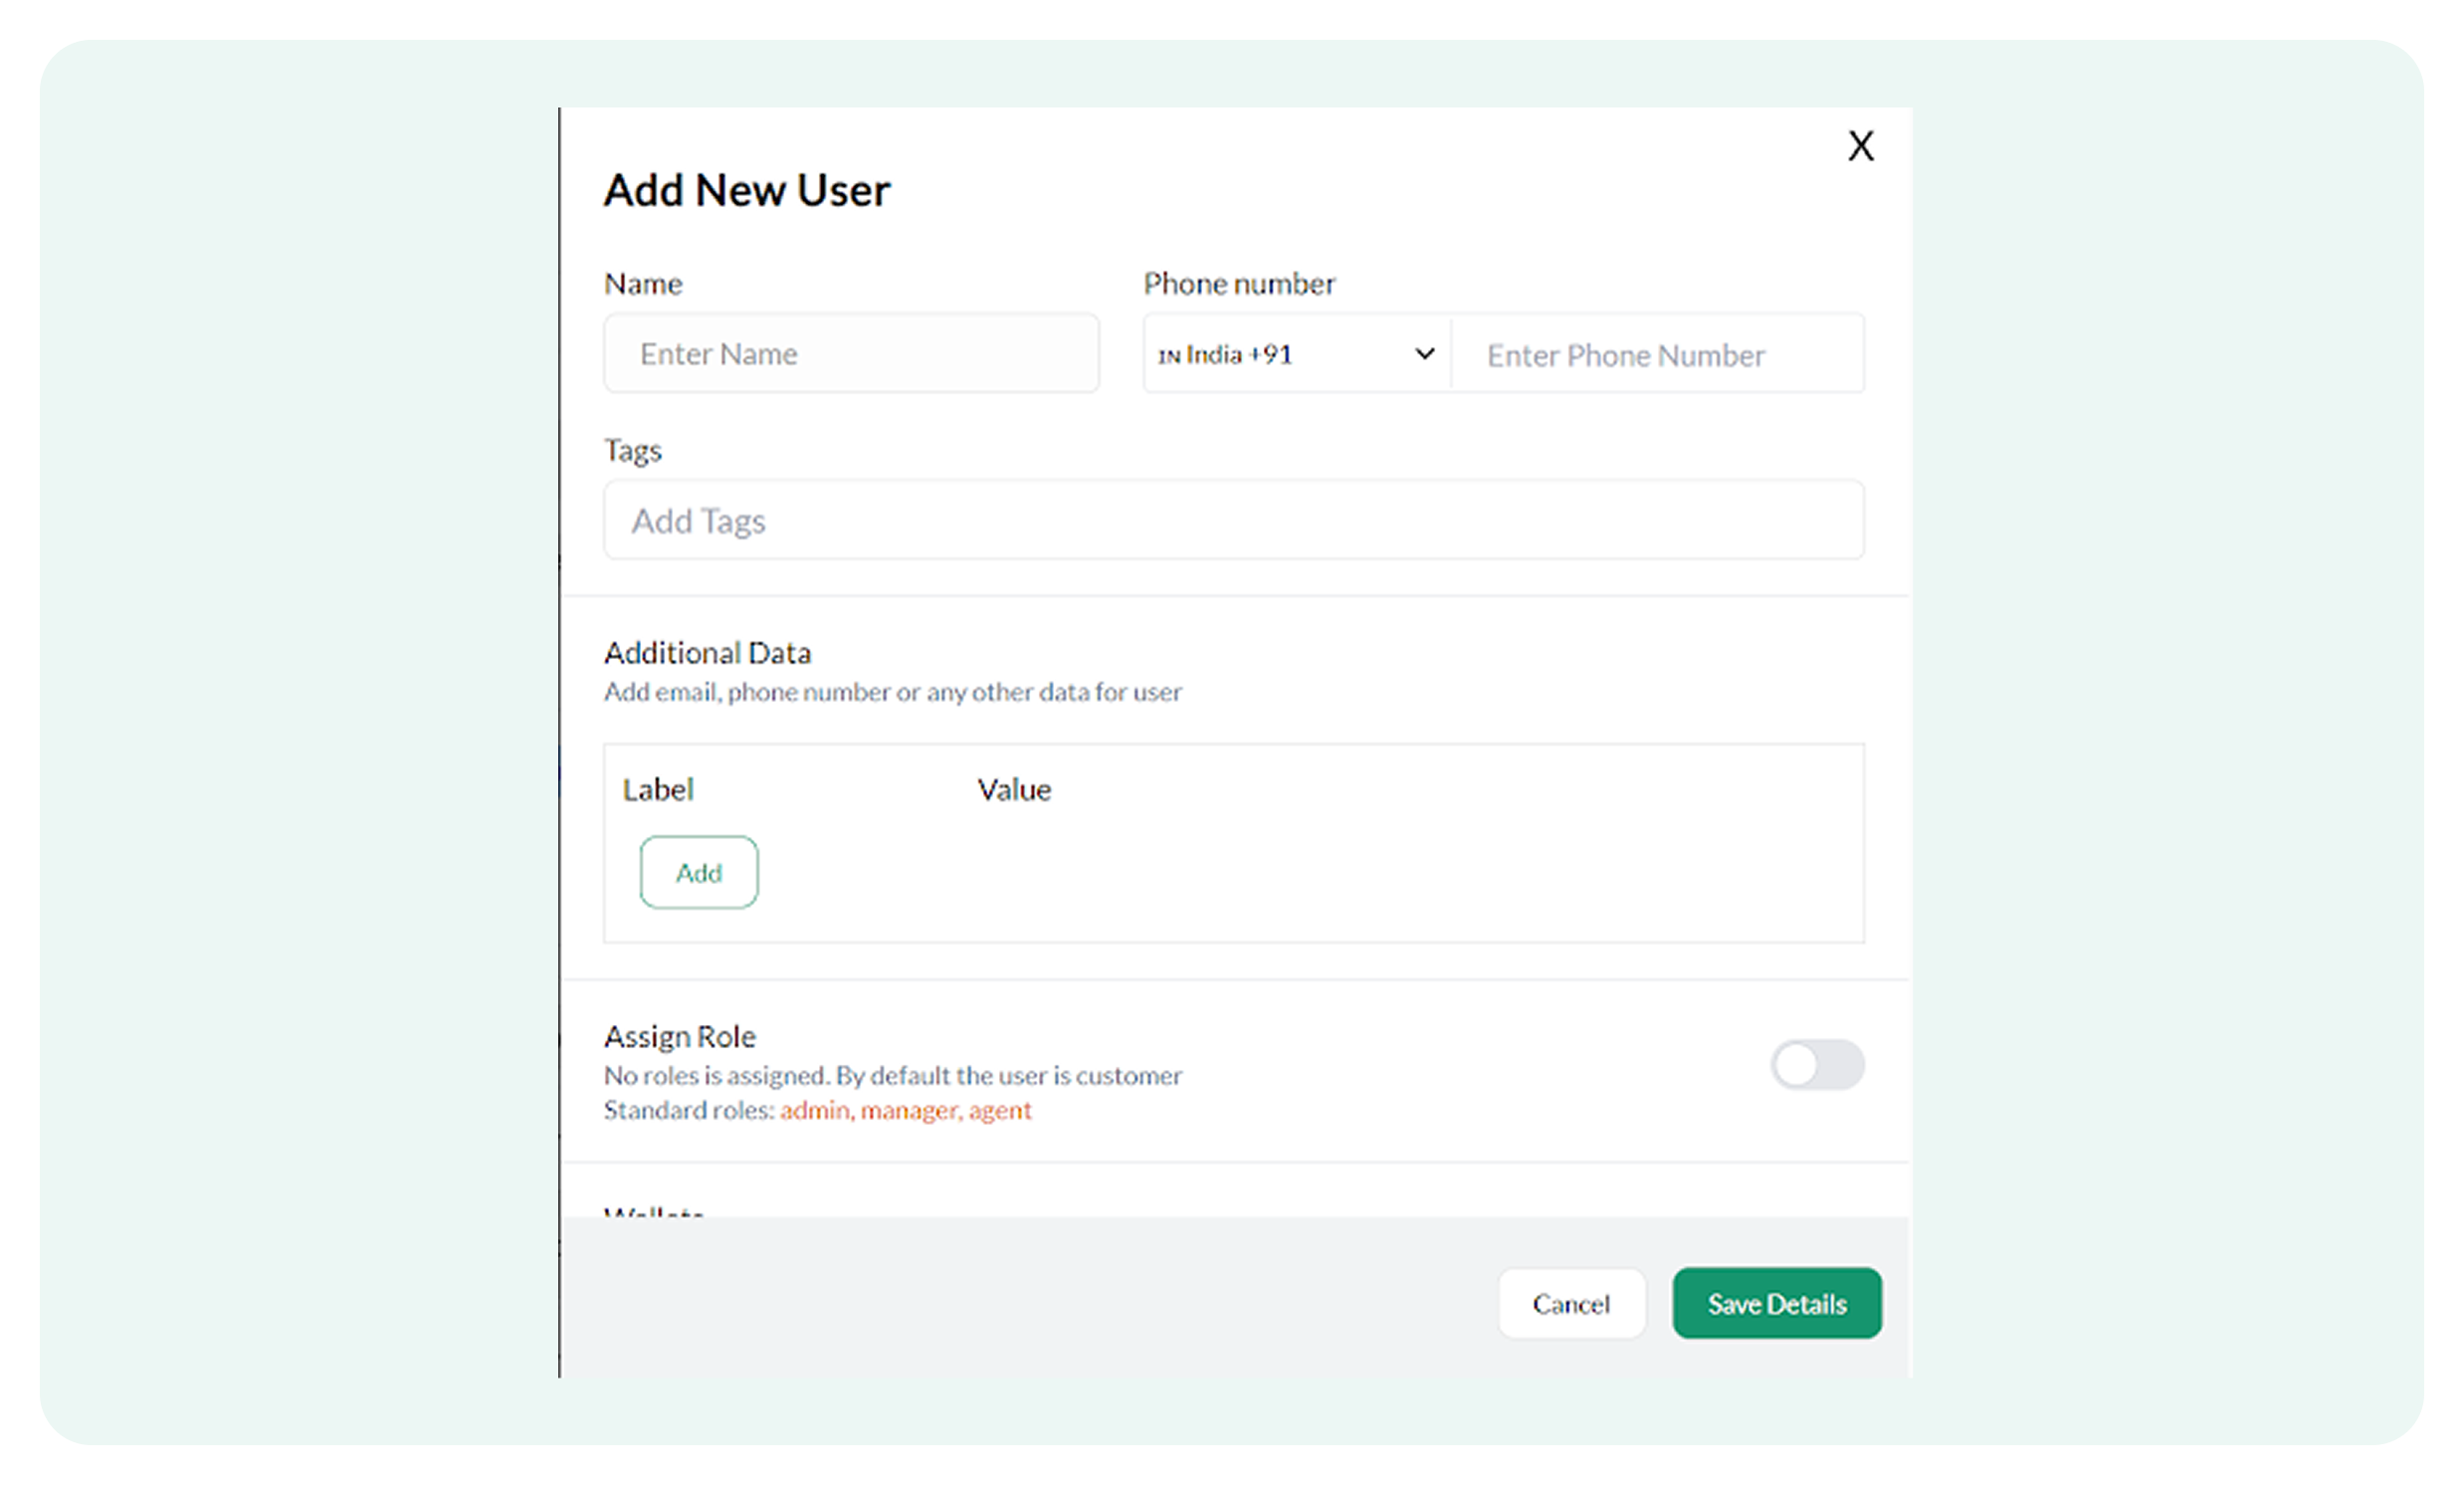
- Add the complete name of the user and their phone number
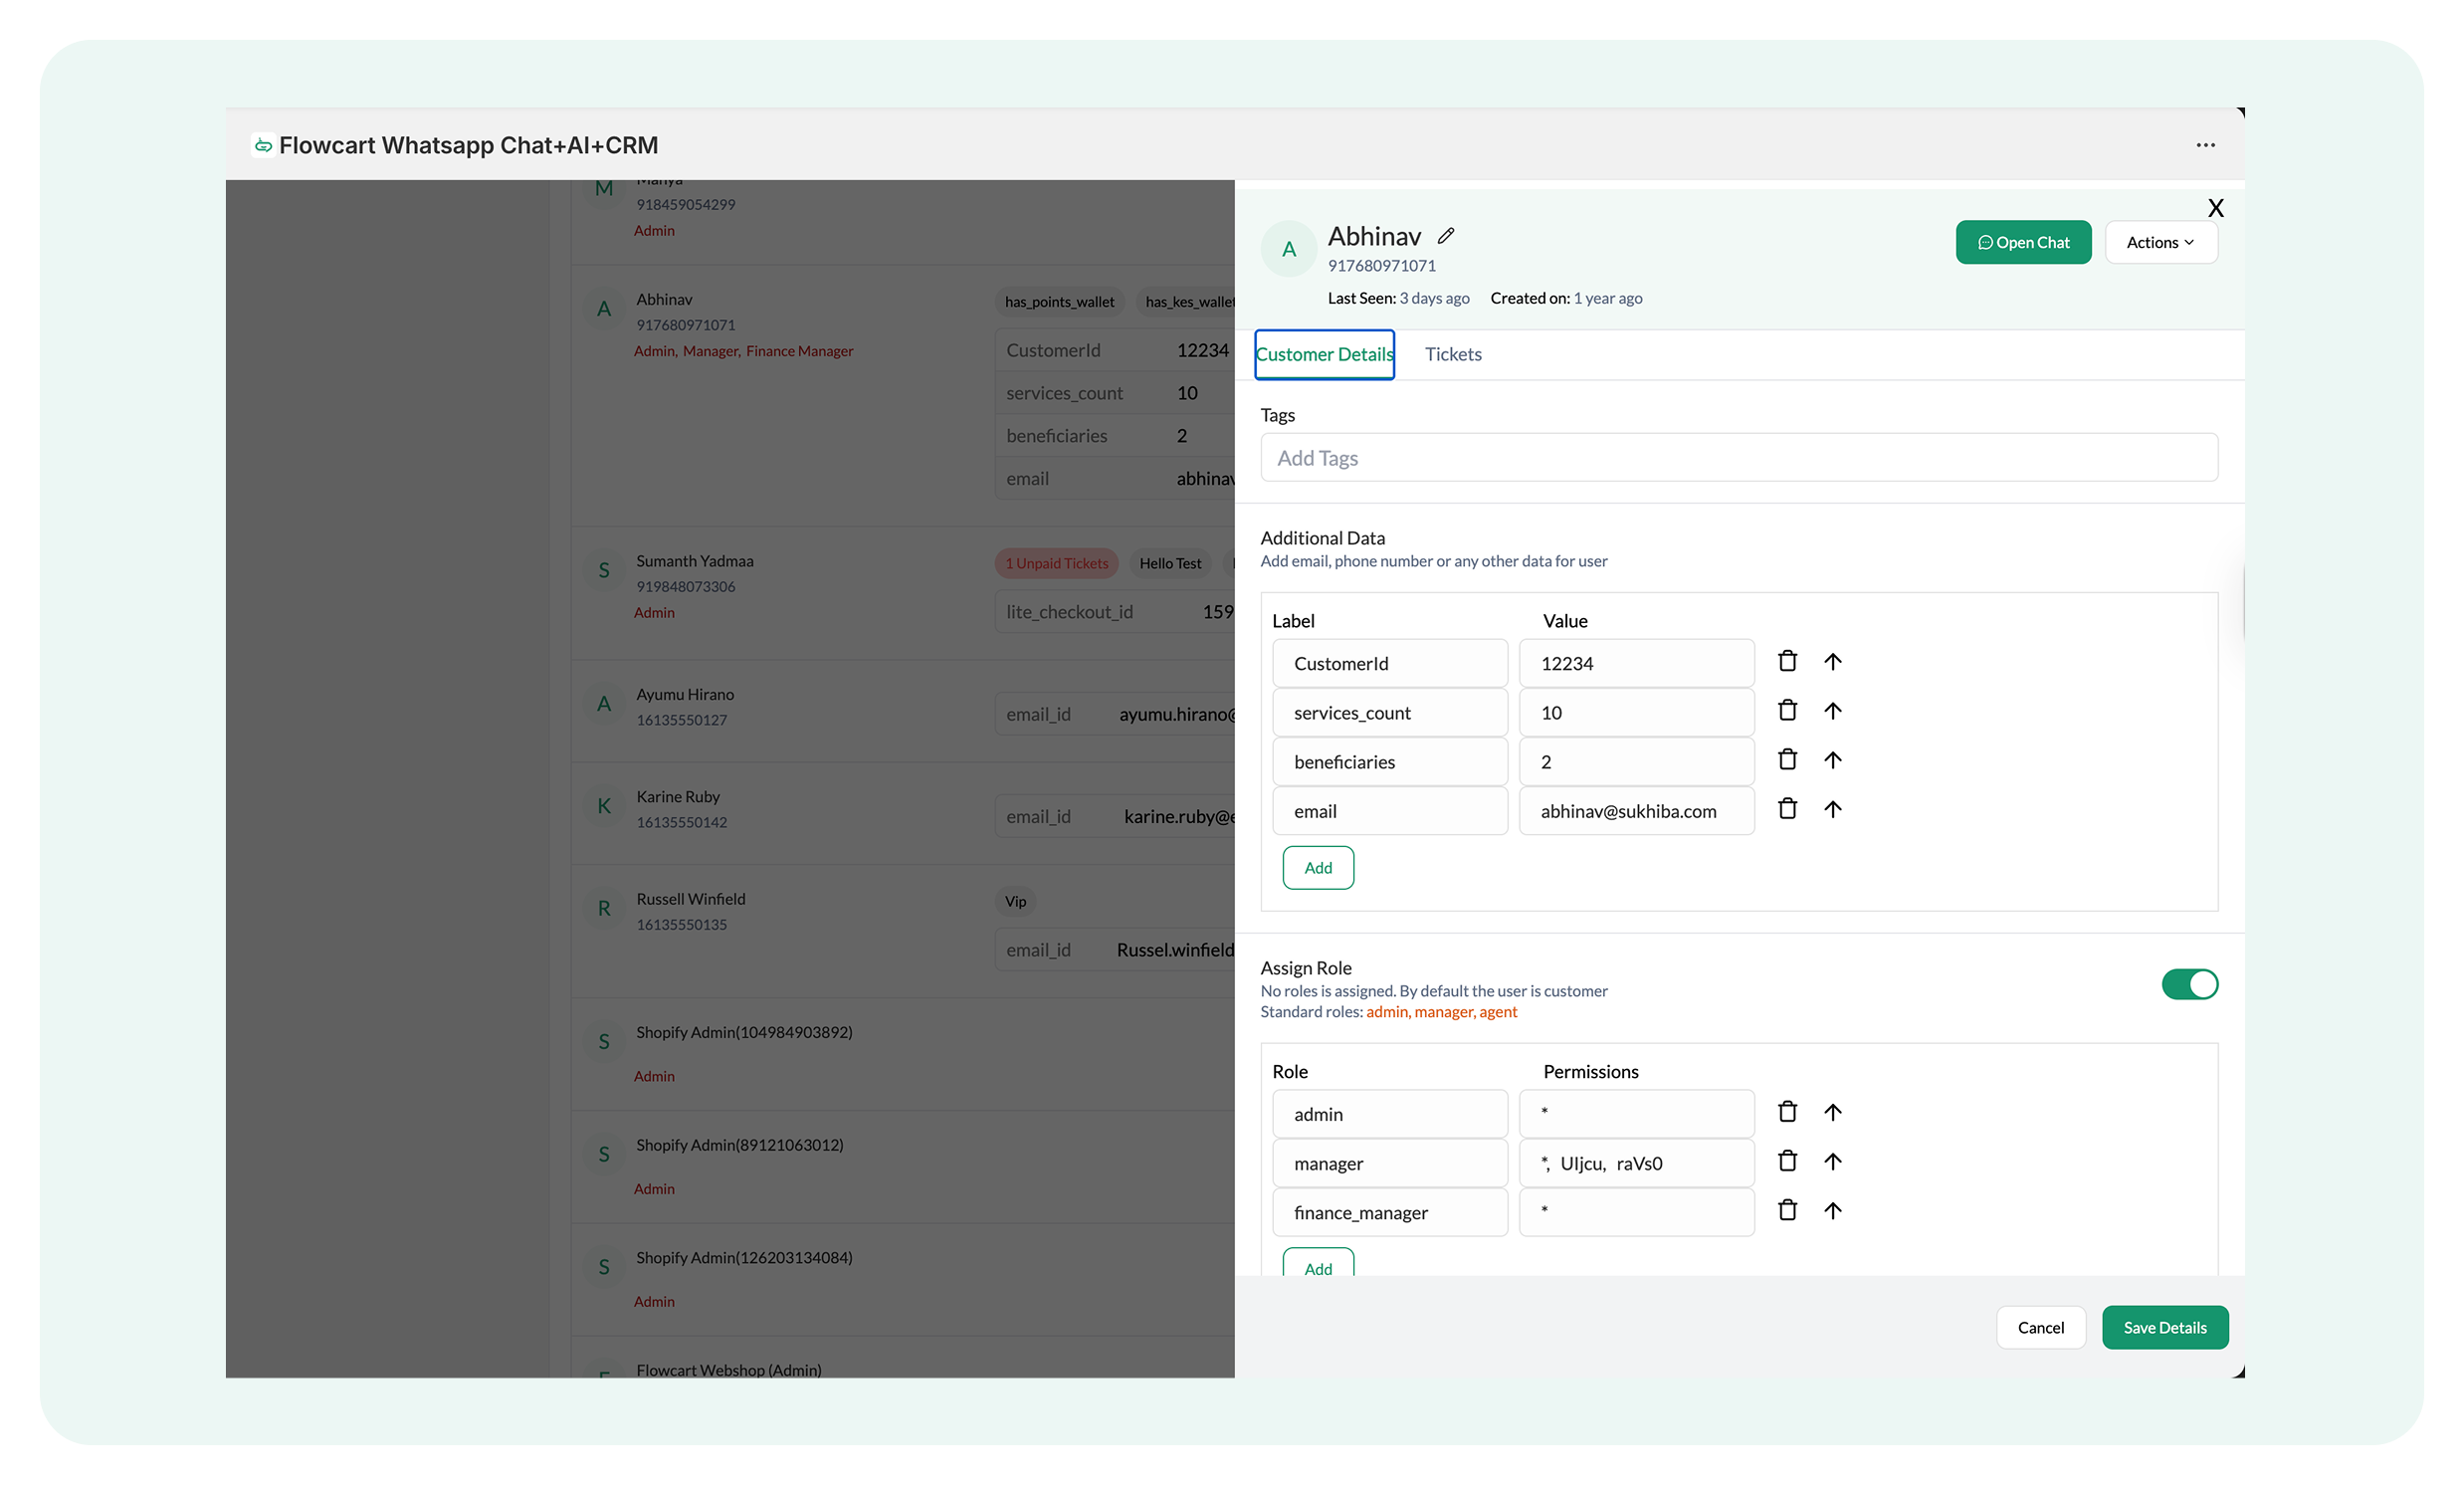
- Write the appropriate Tag for the customer (e.g., admin, agent, etc.)
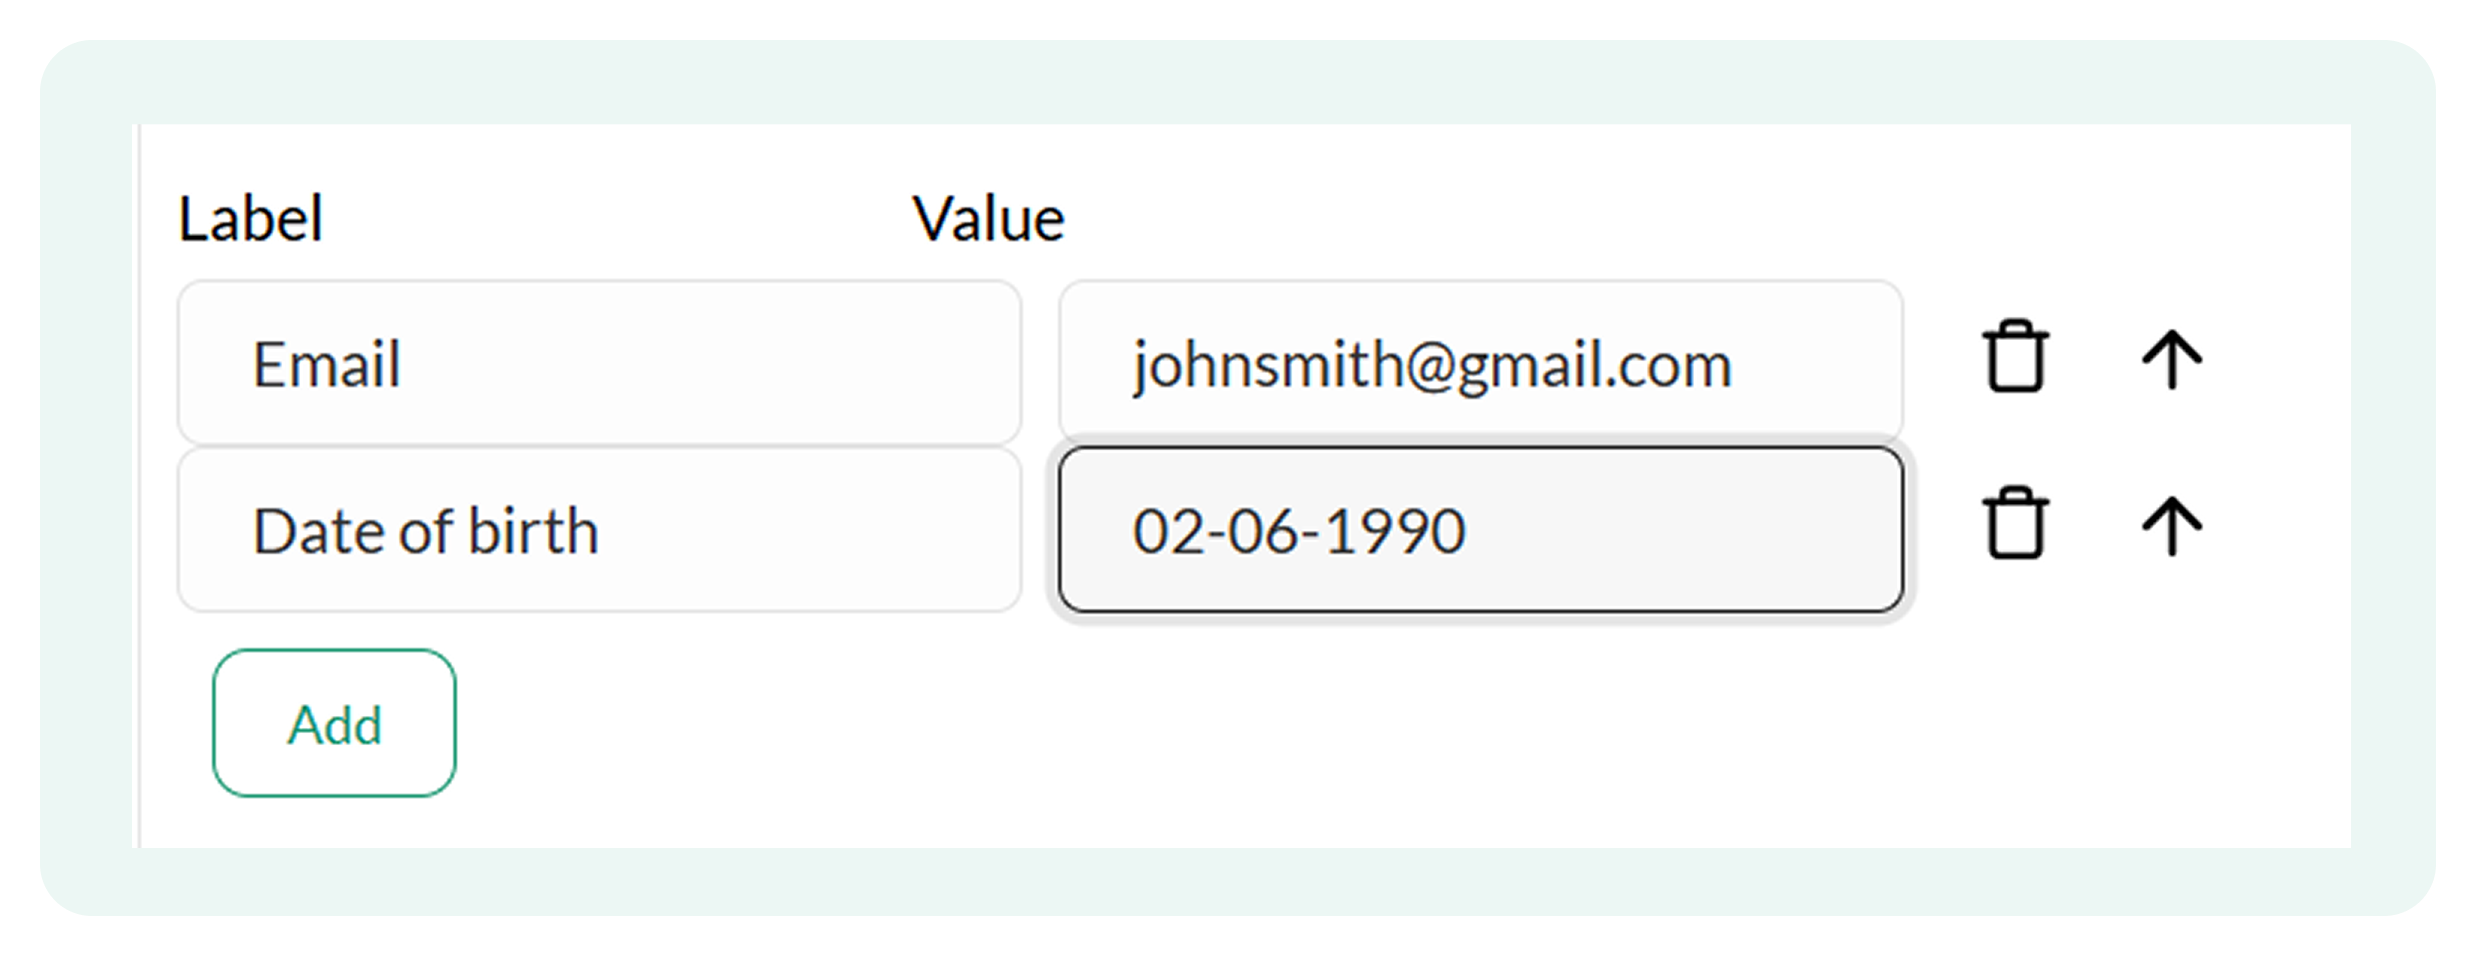
- Add Additional data by clicking on Add if required

For example, merchants can add the user’s email and date of birth:
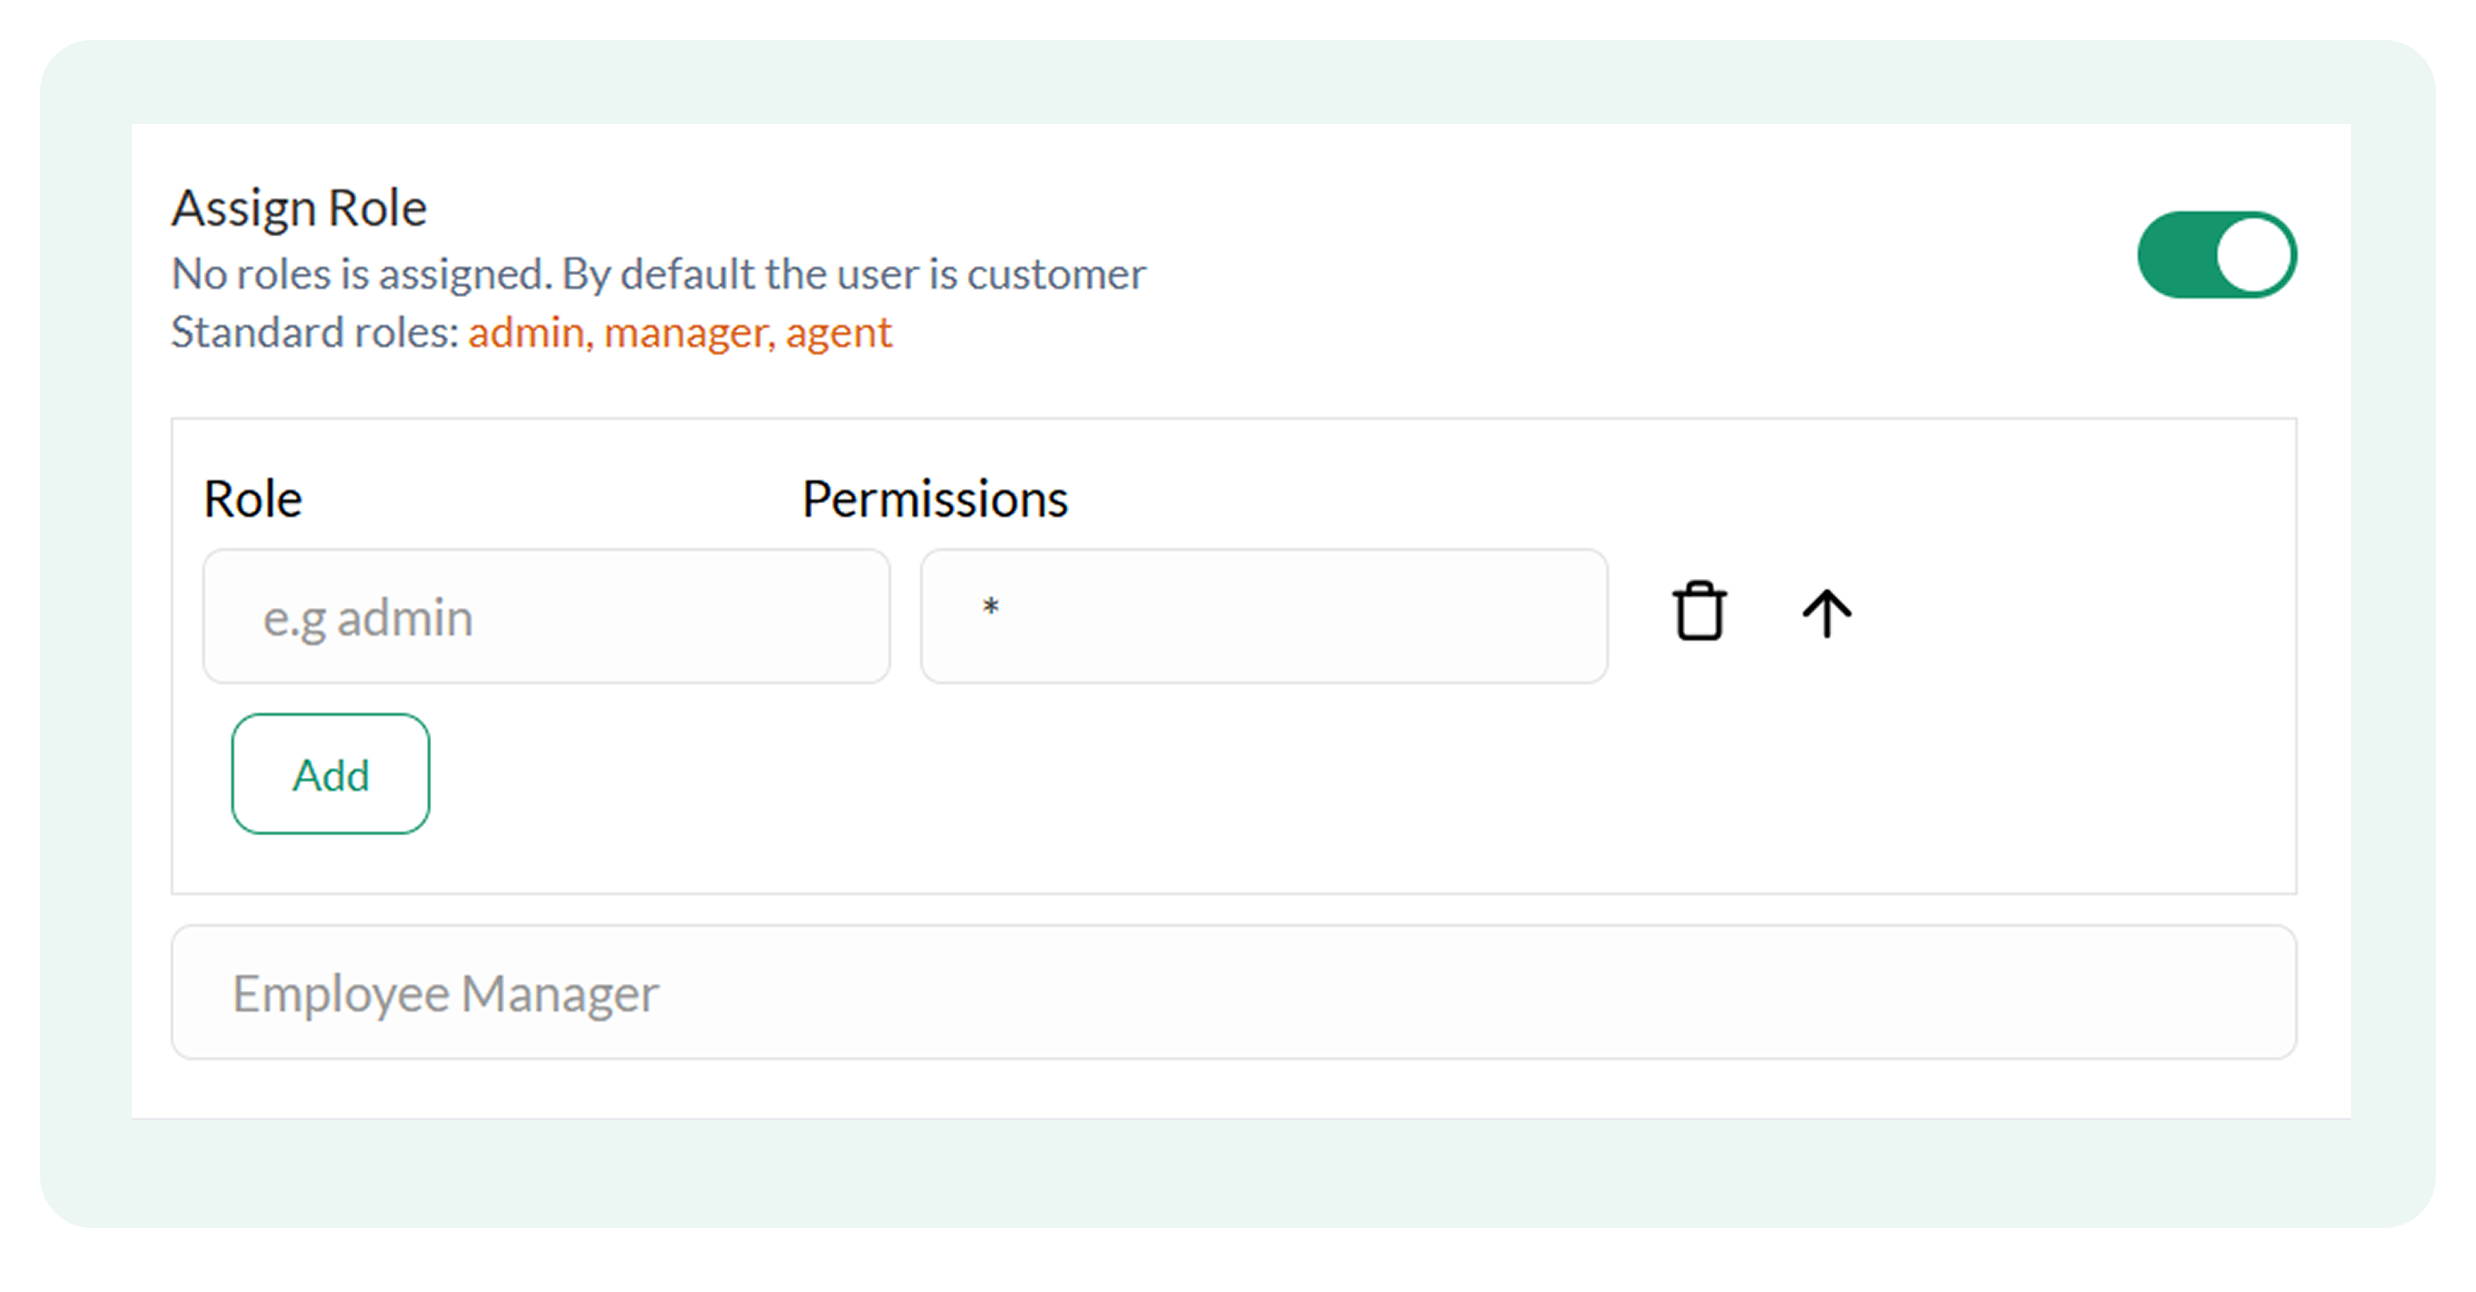
- Assign Role to the user by turning the toggle on
- Save Details once done
Only existing users can be assigned as Employee Managers.
Uploading users in the plugin
If you need to bulk upload multiple users simultaneously:
- Click on Upload Users in the top-right corner of the interface
.png)
A dialogue box like this will appear on the screen:
.png)
- Click on Download and get the sample file to ensure the data you prepare aligns with the required format
This is how the format structure can look in the sample file:
.png)
The sample file also comes with instructions to help you add information in the correct format:
.png)
Users should always refer to the sample file instructions for proper data formatting when using the upload feature to avoid errors.
Once the data is organized in the given format, click on Upload File and Upload the data in the plugin:
.png)
Manage Users
The Manage Users interface is the central hub for organizing your customer relationships in the Flowcart Shopify plugin. It provides the tools to scale your operations while keeping your data clean and secure.
Navigating Manage Users
To access Manage Users on the Flowcart Shopify plugin:
- Log in to the Flowcart Whatsapp Chat+AI+CRM dashboard
- In the main navigation menu, find Manage Users
.png)
Auto-Sync Your Shopify Collections to WhatsApp
Broad interest is often the hardest thing to convert because it lacks a clear direction. While a search bar requires a customer to have a specific word in mind, the Shopify Collections Browse flow meets them halfway by offering curated starting points within the chat.
This keeps the chat's momentum alive, turning a vague interest into a focused shopping session by showing the customer exactly where the value is in your store right now.
The sections below explain how to sync your Shopify categories and set up a structured browsing experience for your WhatsApp storefront.
What you’ll need
To get the Shopify Collections Browse flow running on WhatsApp, make sure the following are in place:
- The Flowcart Shopify Plugin installed and active on your store
- The collections browse flow activated within the plugin settings
- Organized shopify collections that are ready to be displayed to your customers
Activating the Collections Browse flow
To activate the Shopify collections browse flow:
- Go to Flows in the Flowcart Shopify Plugin and select Flowcart Flows
.png)
- Select the Shopify section
- Click Activate on the Shopify collections browse flow
What it looks like in practice
Once activated, here is how the browsing experience works for your customers:
- The interaction begins as soon as a customer sends a simple greeting like "Hi" in the chat
- An automated welcome message triggers instantly to acknowledge the customer
- Customers can type "Shopify Collections" to see what’s available
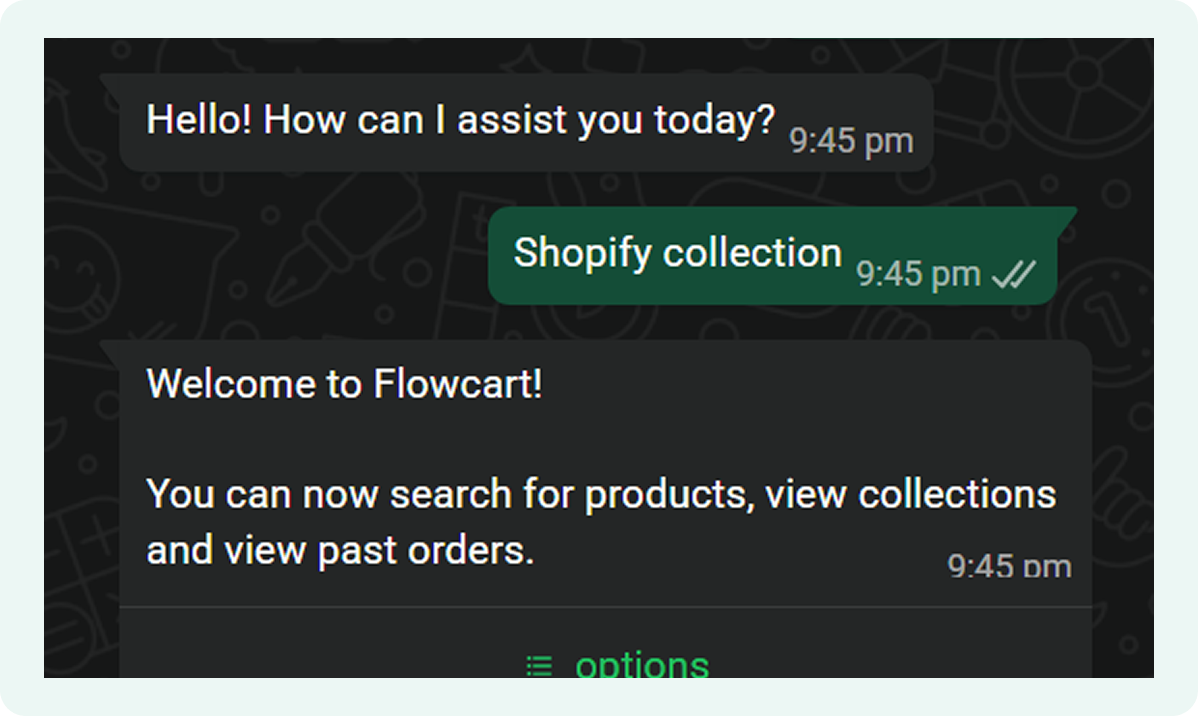
- The system responds with a clear set of options to guide the next step
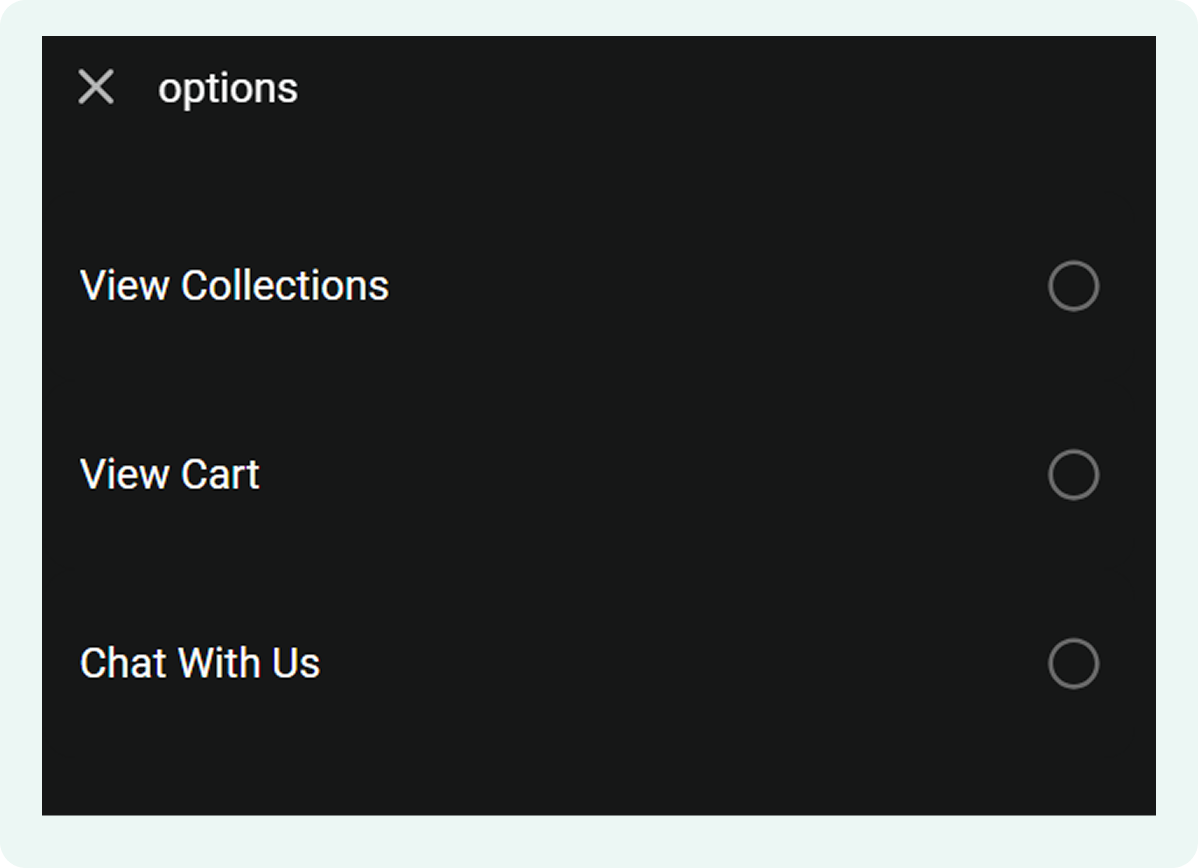
- Upon clicking "View Collections," the customer is asked to confirm their choice to ensure they find exactly what they need

- The system sends another automated message in the chat, acknowledging the choice and providing options for the next step
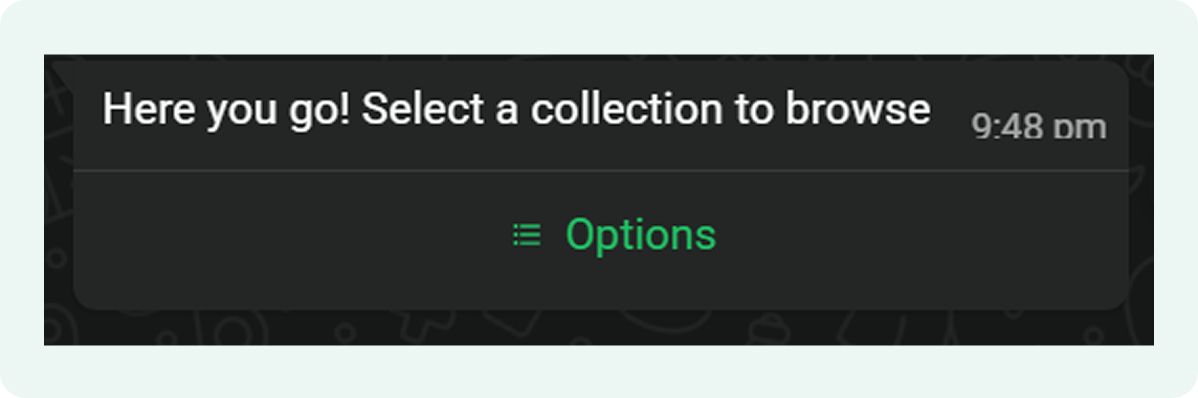
- Once confirmed, a list of your specific Shopify categories appears directly in the chat window
The options displayed will automatically adapt to match the categories in your Shopify store.
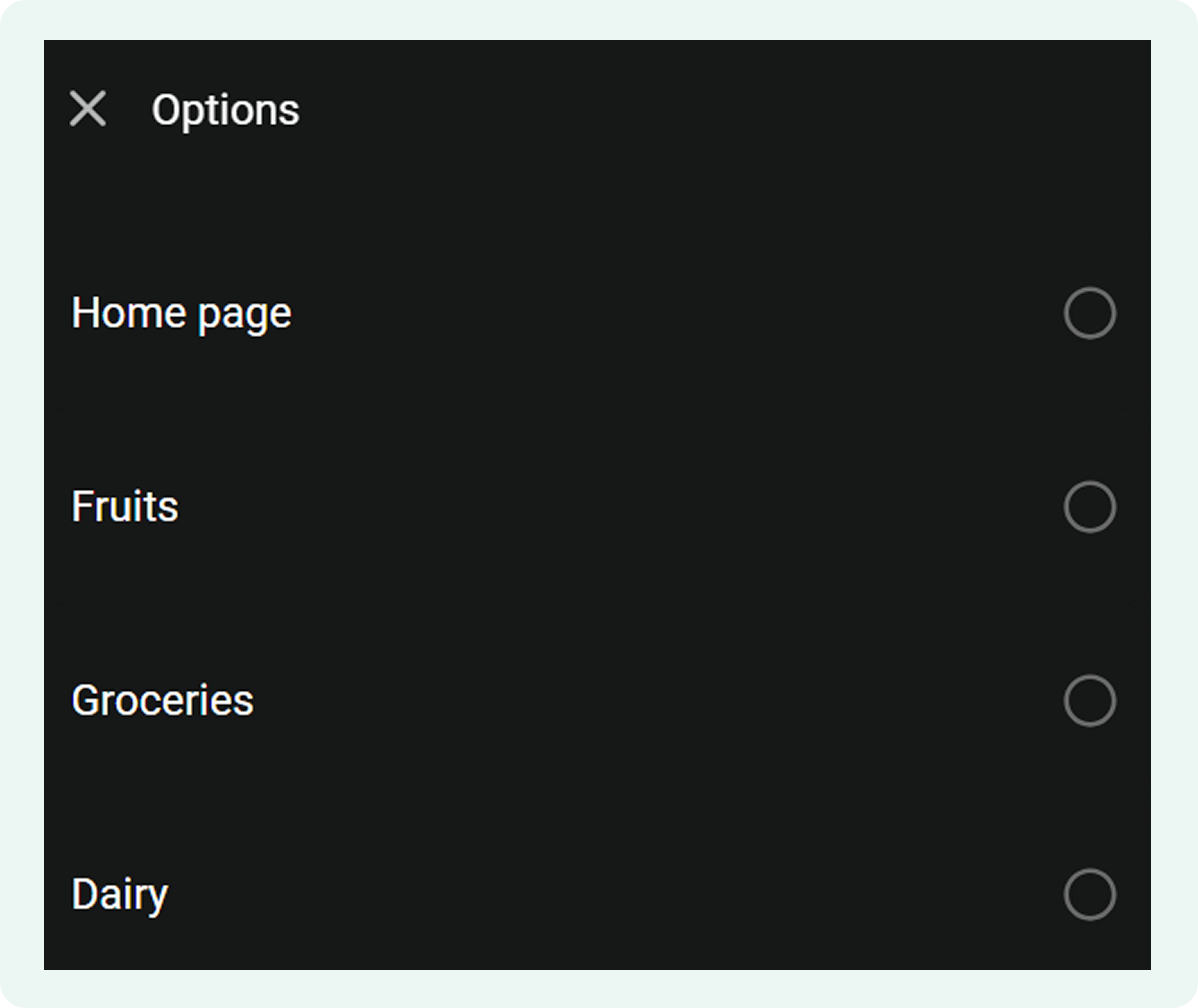
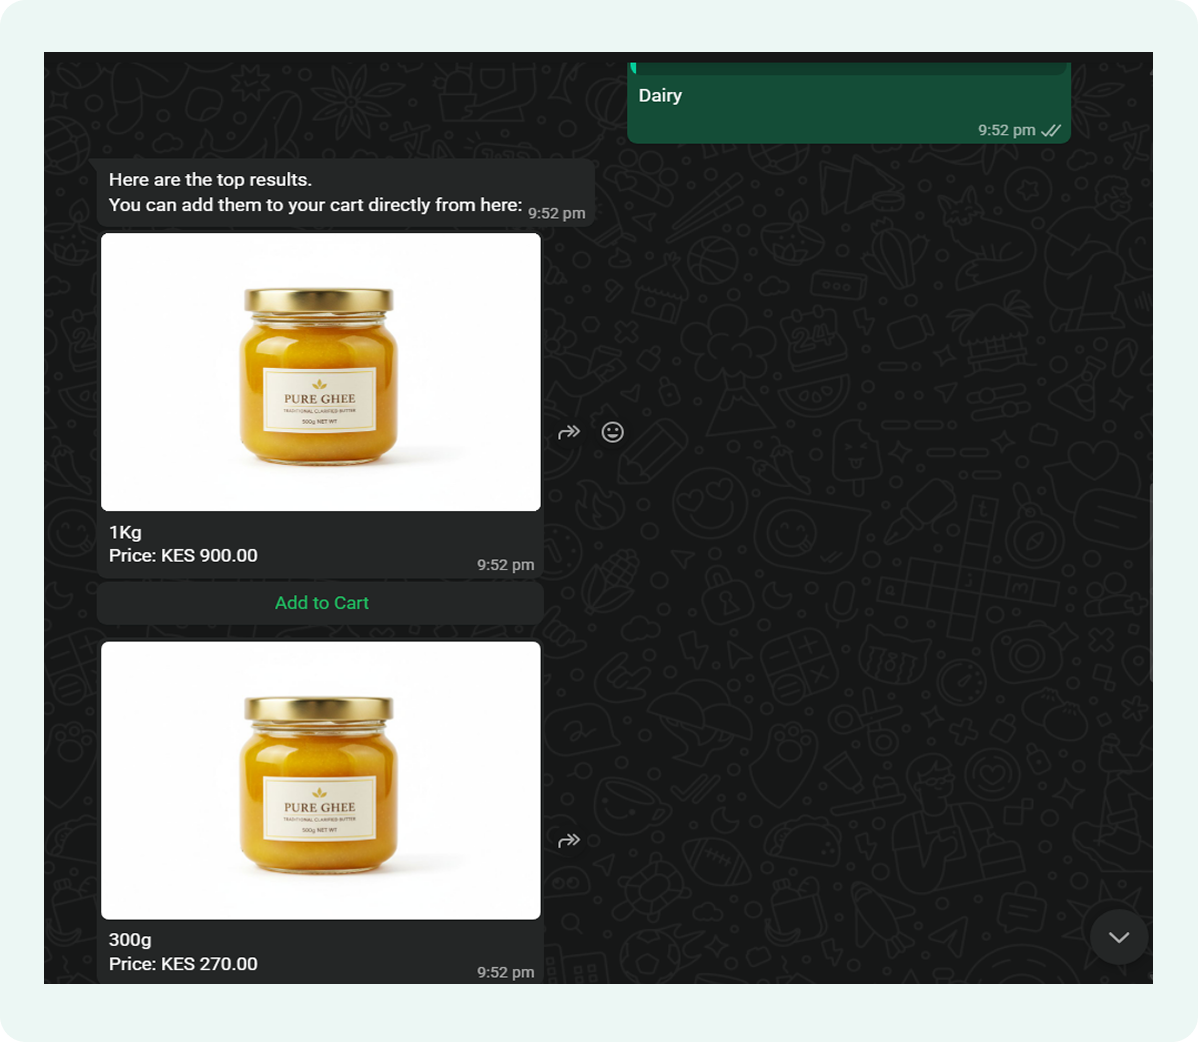
- The customer simply taps the collection they are interested in, for example, "Dairy"
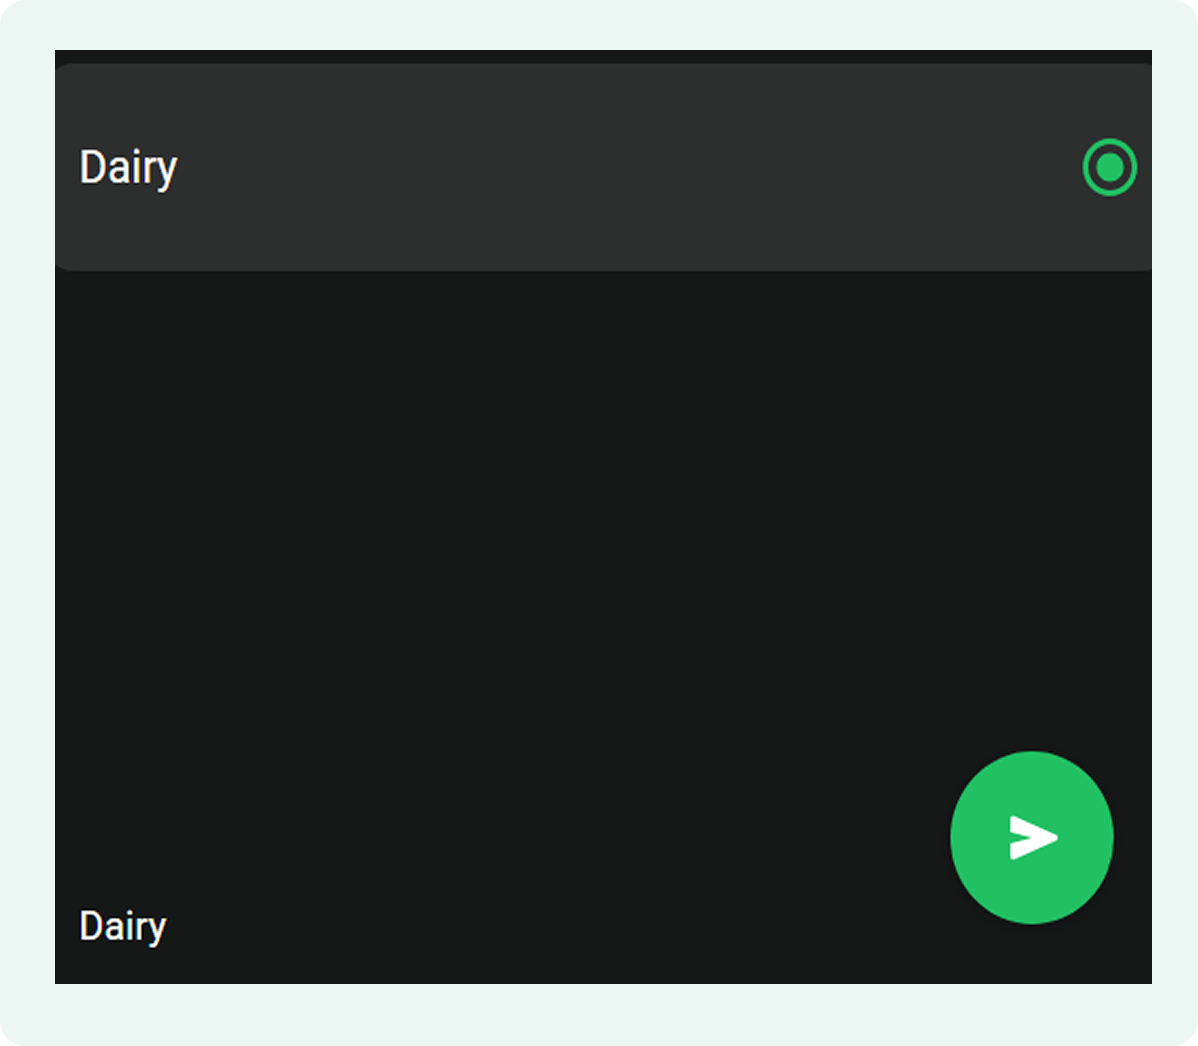
The customer can now swipe through all the products in that collection, seeing images and details without ever leaving WhatsApp
The system also gives customers an option to create a cart from inside the chat, by clicking “Add to Cart”
Troubleshooting when collections aren't displaying
If your customers can't see your categories or the product lists are empty, it is usually a sync settings issue. Here is how to fix the most common issues:
- Ensure the collections you want to show are synced into the Flowcart Shopify Plugin. If a collection is hidden or set to "Draft," it won't appear in the WhatsApp menu.
- Double-check that the Shopify Collections Browse flow is activated. If you’ve recently renamed collections in Shopify, it may take a few moments for the new titles to sync to your chat menu.
- Review "empty" collections. If a customer selects a category and sees no products, check that the products within that collection are actually in stock.
Capture WhatsApp Opt-ins and Convert First-Time Visitors with a Welcome Discount
Most first-time visitors are just window shopping: they browse, linger, and disappear without leaving contact info. Once that tab closes, the opportunity to re-engage them usually vanishes.
Capturing WhatsApp opt-ins changes this by allowing merchants to send high-energy broadcasts, improve retargeting, and segment their audience effectively. The First-Time WhatsApp User Discount automates this process by offering an immediate incentive for new visitors to start a conversation.
The sections below explain how to activate this discount in the Flowcart Shopify Plugin and configure the automated opt-in flow.
What You’ll Need
To set up the first-time WhatsApp user discount, make sure the following are in place:
- The Flowcart Shopify Plugin installed and active on the store
- The first-time WhatsApp user discount activated in the plugin
- Visitors able to share a valid WhatsApp phone number and confirm chat initiation
Activating the First-Time WhatsApp Popover/Discount
To activate the welcome discount:
- Go to Flows in the Flowcart Shopify Plugin and select Flowcart Flows
- Select the Shopify section
- Click Activate on the first-time WhatsApp user discount
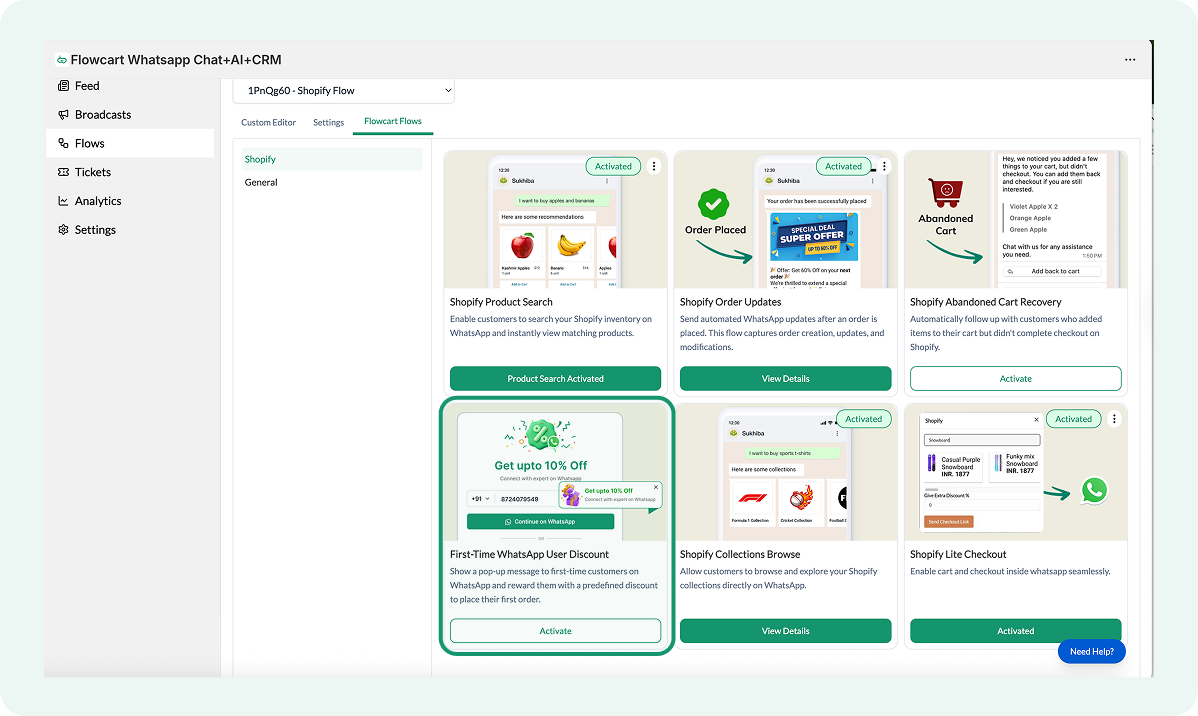
It would look like this:

Configuring discount type and discount value
To adjust the discount type and the discount value in the flow:
- Click on the dropdown menu in the field titled Discount Type
- Select the type of discount merchant wants to offer
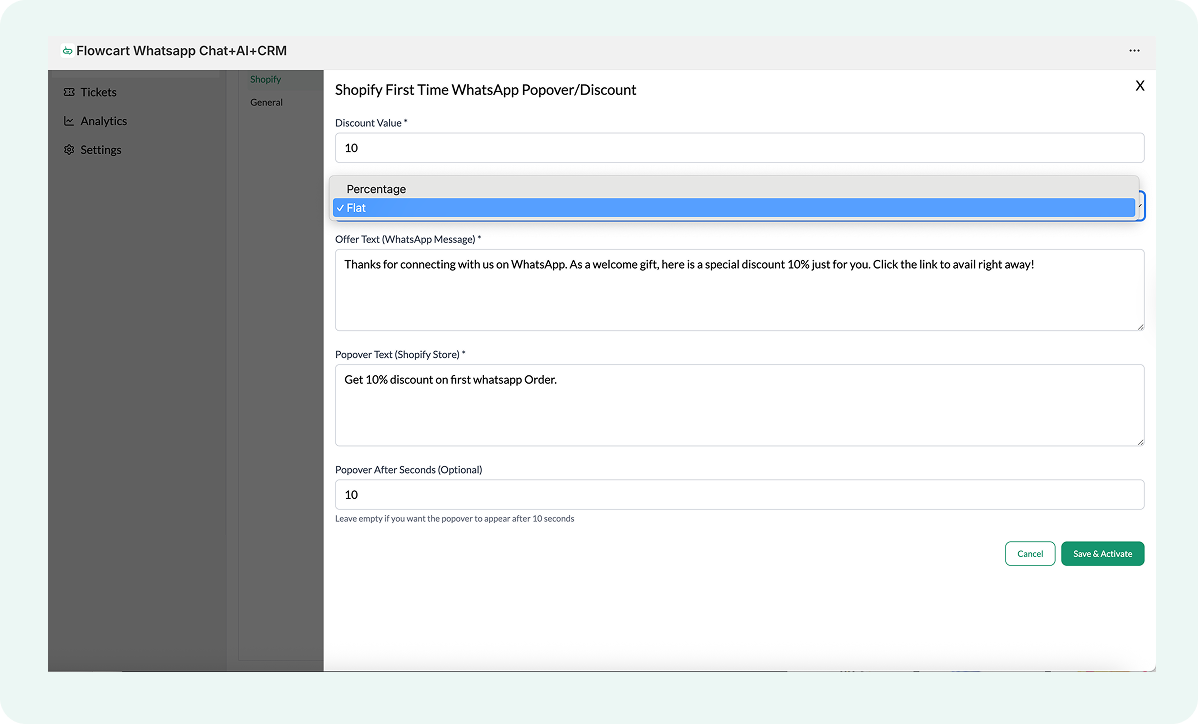
For a flat discount, select Flat, and for a percentage discount, select Percentage.
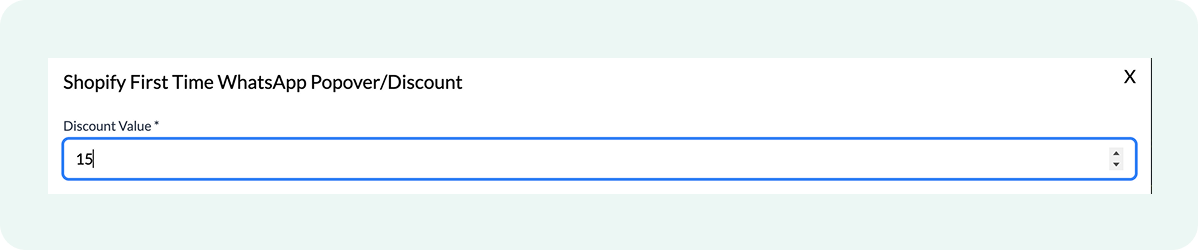
- Write the discount value depending on the type of discount selected
For example, Discount type = Percentage, and Discount value = 15
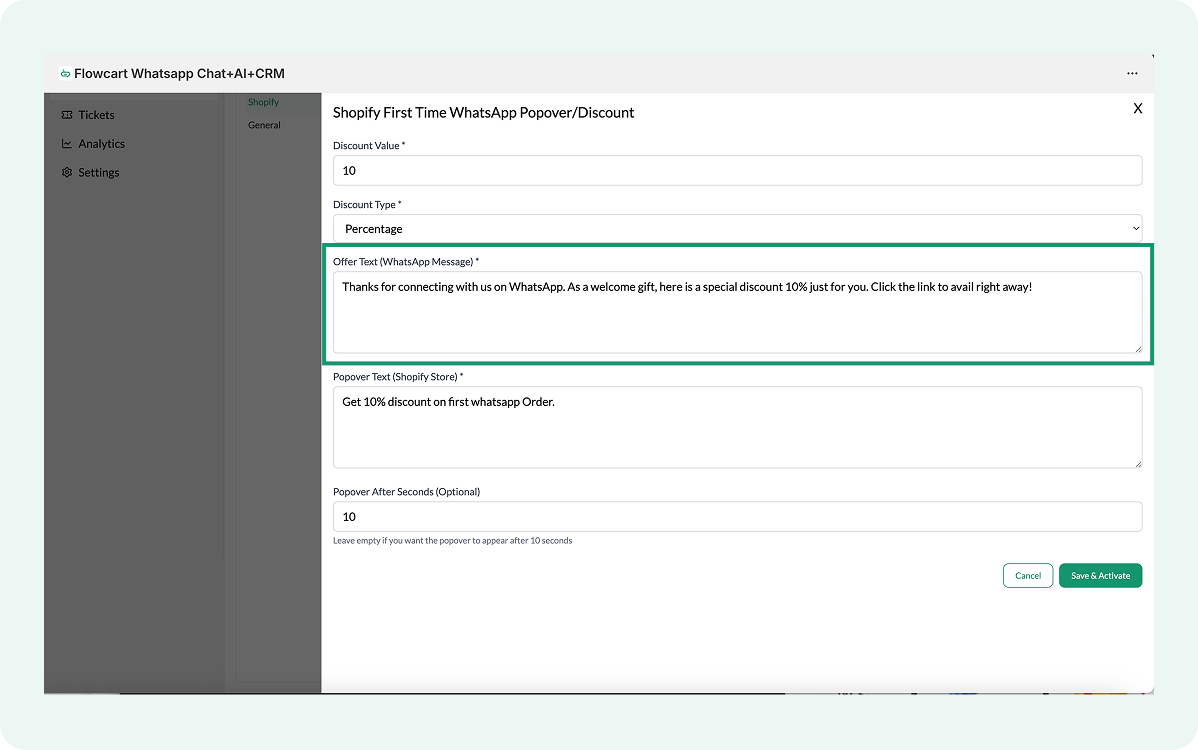
Writing the WhatsApp offer message
To either rewrite or edit the existing WhatsApp message copy:
- Go to the WhatsApp message field below the discount type field
- Click in it to edit/rewrite the text message
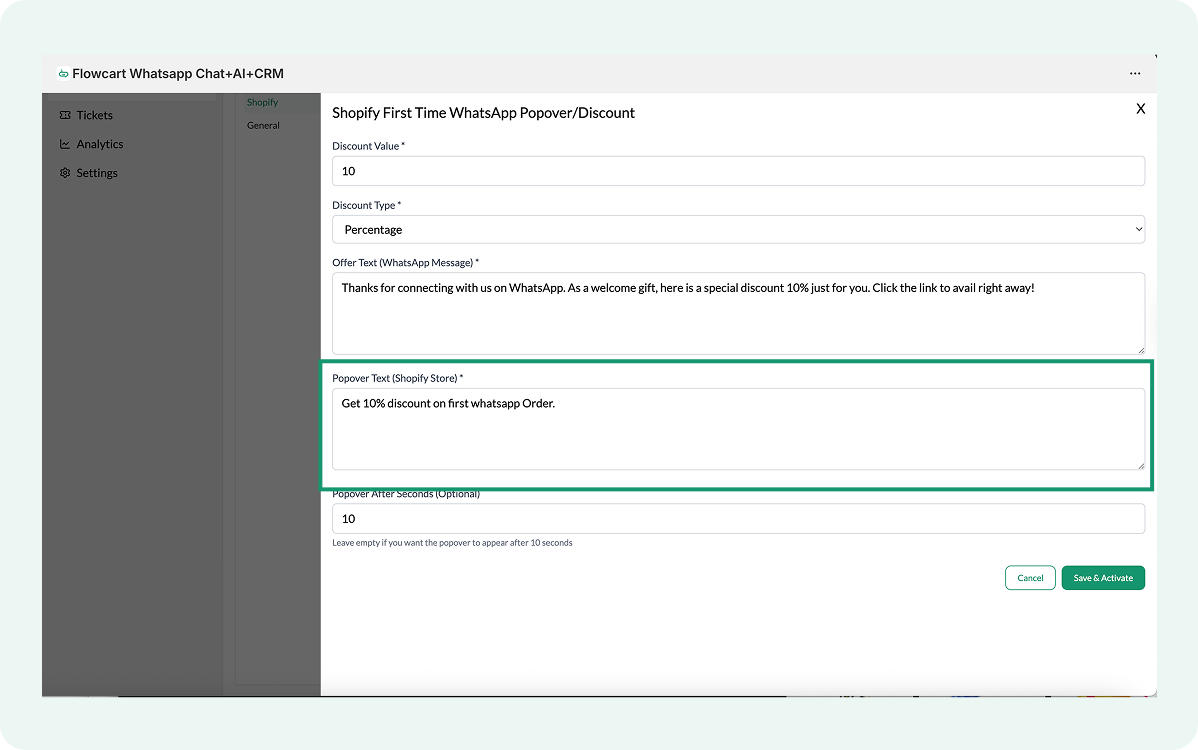
Customizing the popover copy
To decide the popover copy that should appear on the WhatsApp widget:
- Click on the Popover text field below the message field
- Edit the text as desired
Setting popover display delay and trigger timing
To schedule the popover timing:
- Go to the last field in the Flowcart Shopify Plugin interface
- Click on the field to edit and schedule the popover
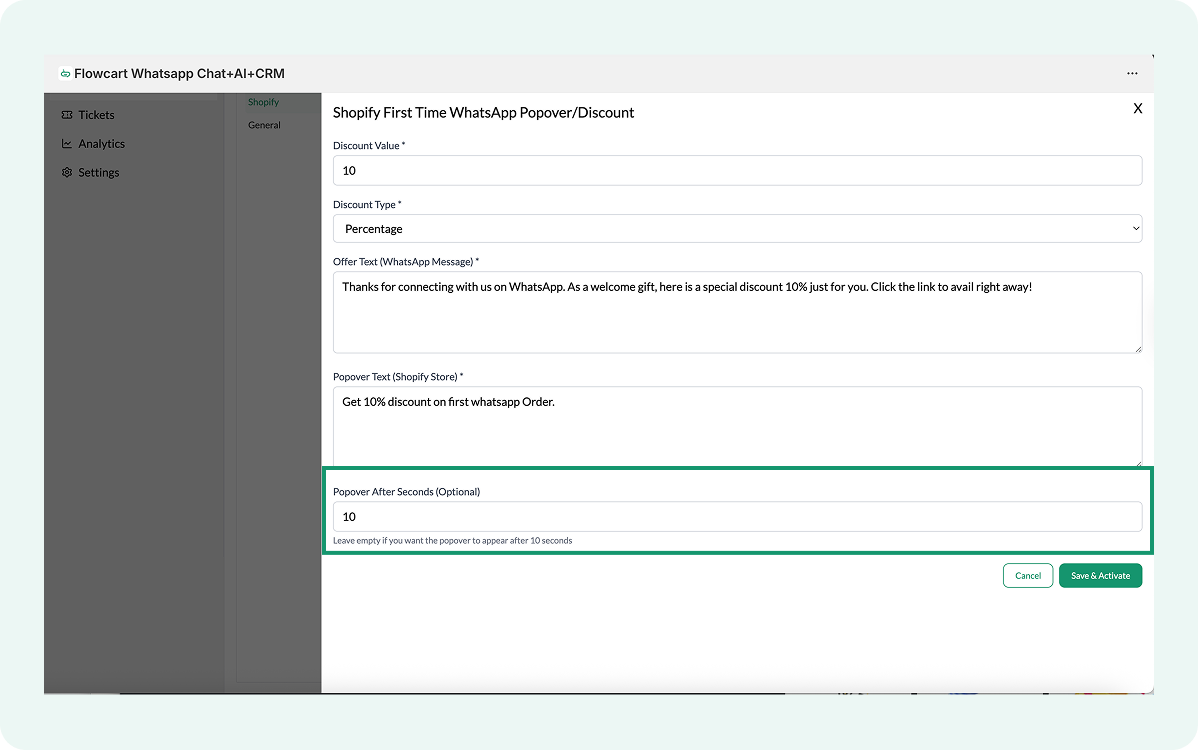
- Save and activate the changes
When the customer clicks on the WhatsApp widget, it will open a consent form, asking for their number, therefore, following a thorough opt-in process:
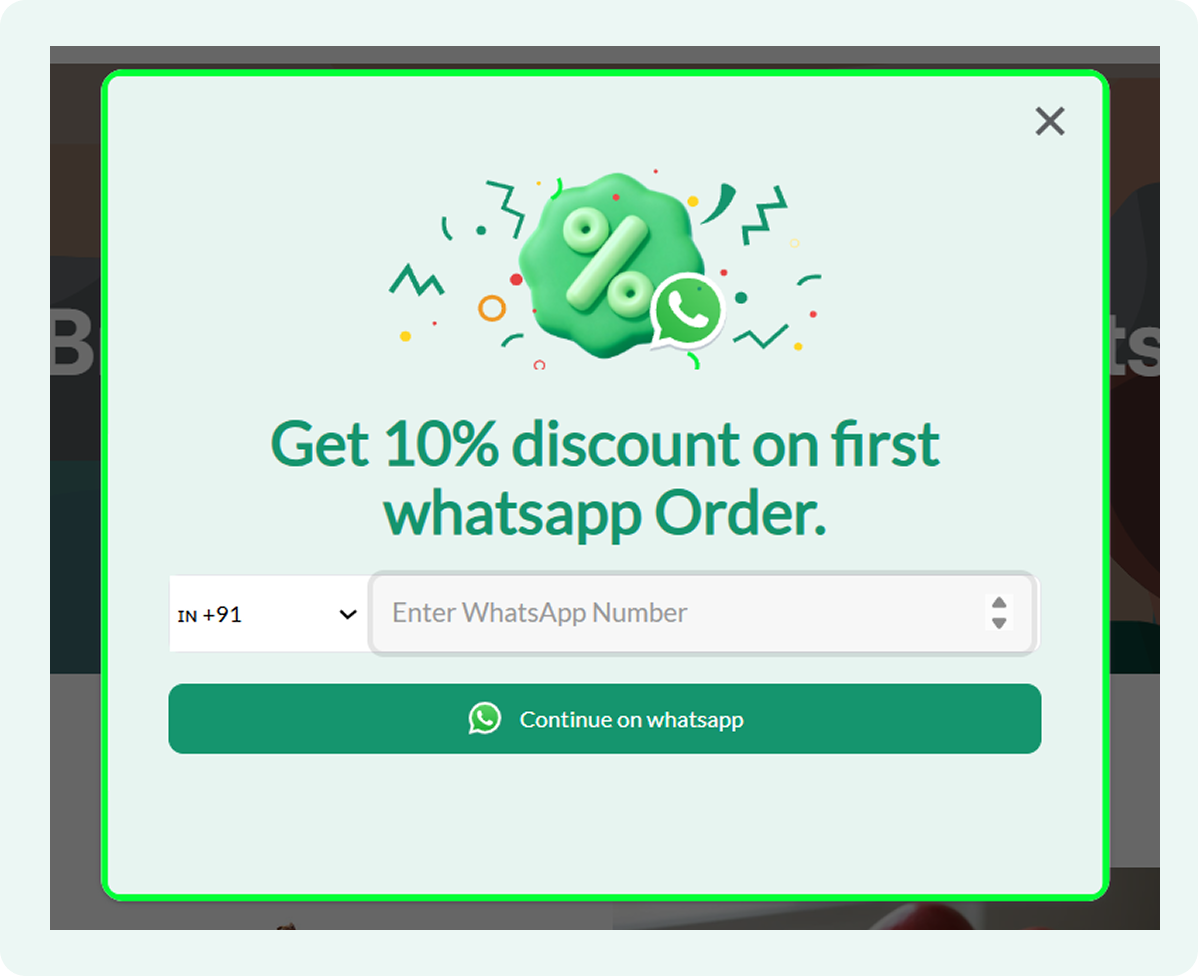
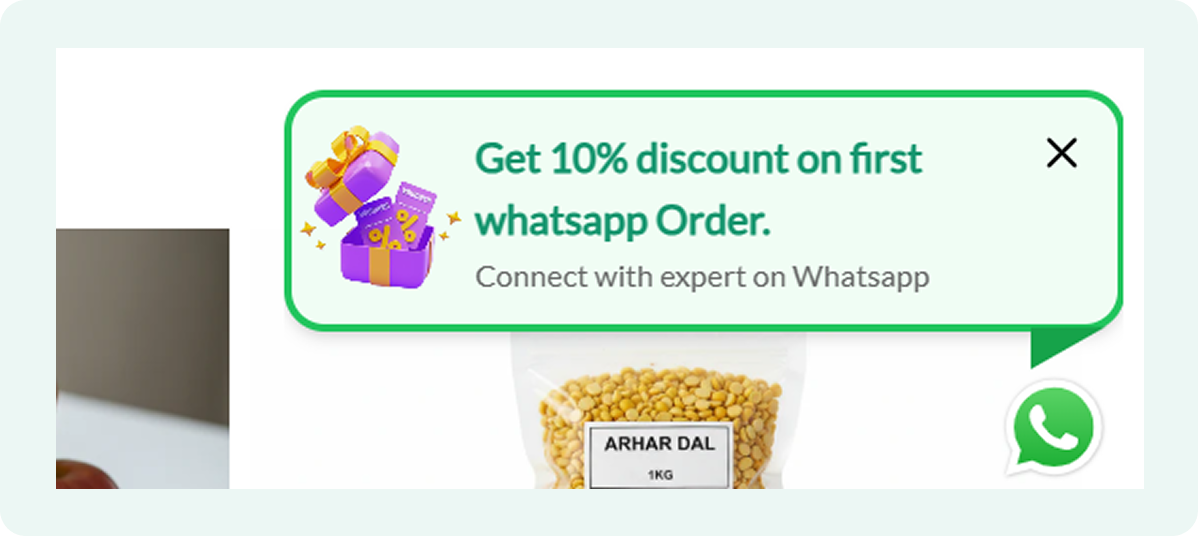
This is how the WhatsApp popover text copy will appear on the store’s website:
This is how the message will appear in their WhatsApp chat window:
Once the customer selects Get Discount, the system redirects them to the merchant’s storefront and auto-populates the discount code in their shopping cart:

Troubleshooting WhatsApp user discount
If the popover isn’t appearing or numbers aren't being added to the list, it’s usually down to a quick setting tweak. Most of the time, it’s either a timing delay that’s a bit too long or a simple toggle that hasn't been flipped yet. Checking these few spots usually gets everything back on track.
- Check the delay settings first. If the timer is set too high, a visitor might leave the page before the message can trigger.
- Make sure the Flowcart Shopify Plugin is installed and active. If the link between the plugin, store, and WhatsApp is interrupted, the process won't complete. A quick refresh of the connection usually fixes this.
- Remember that the popover is designed for new visitors. If you are testing it yourself and have already interacted with the widget, it might not show up again. Try checking the store in an "Incognito" or "Private" browser window to see it as a first-time visitor would.
Automate Shopify Order Updates Flow on WhatsApp
WISMO, or “Where is my order?”, is one of the most common reasons customers reach out after checkout. When shoppers don’t know what’s happening with their order, they start looking for answers.
Many of these queries stem from missing or delayed updates rather than real delivery issues. By sending proactive order updates on WhatsApp, merchants reduce the need for customers to ask in the first place. This aligns with customer preference as well: 54% of shoppers prefer receiving delivery updates on WhatsApp over email or SMS.
The sections below explain how to activate the Shopify order updates flow in the Flowcart Shopify Plugin and configure messages for each order state.
What You’ll Need
To automate Shopify order updates on WhatsApp, make sure the following are set up:
- The Flowcart Shopify Plugin installed on your store
- Shopify order updates flow activated
- Customers with a valid WhatsApp phone number who have opted in to receive messages
Activating the Order Updates flow
The steps below explain how to activate the flow and configure the messages sent at each order stage.
- Go to Flows in the Flowcart Shopify Plugin and select Flowcart Flows
- Select the Shopify section
- Click on Activate to enable the order updates flow


Configuring the created order state
This order state triggers when the Flowcart Shopify Plugin creates a new order. The flow sends a WhatsApp message that confirms the order, reassures the customer that processing has started, and prepares them for subsequent order updates.
- Locate the handler next to the order_state== 'created' condition
- Click on the handler and select the edit button
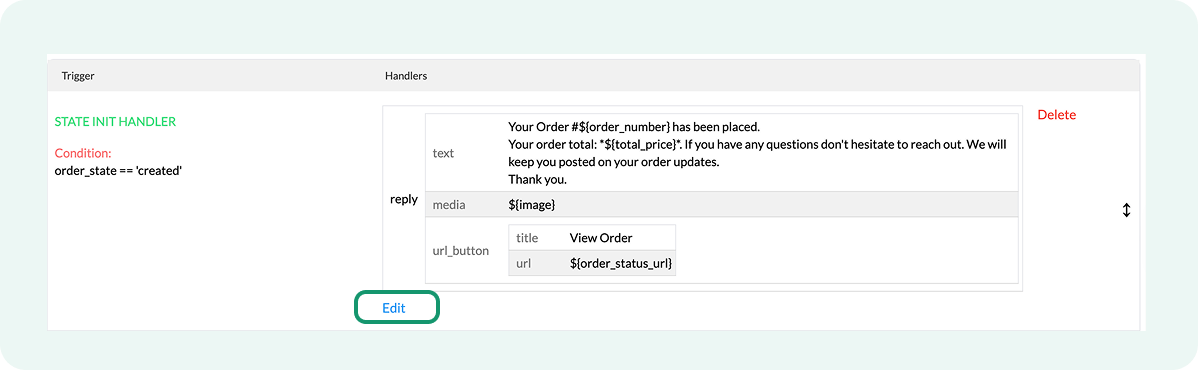
It would look like this:
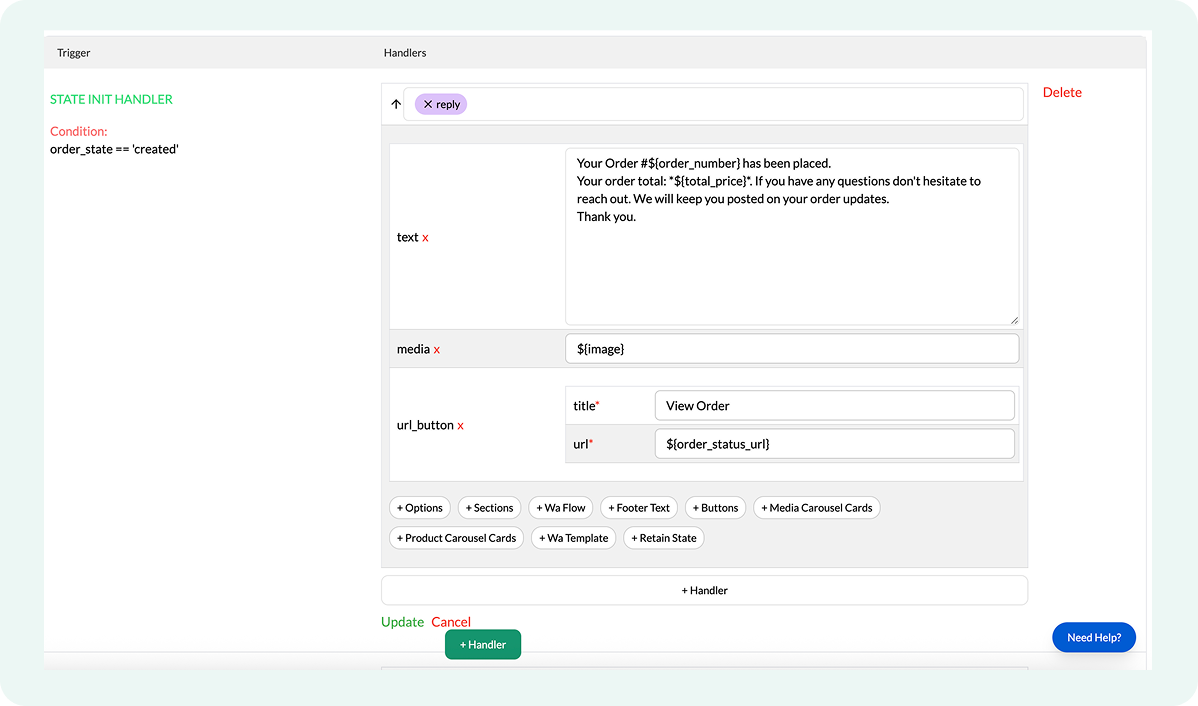
- Click inside the message text box to update the copy

- Confirm that the View Order button title is present in the url_button field
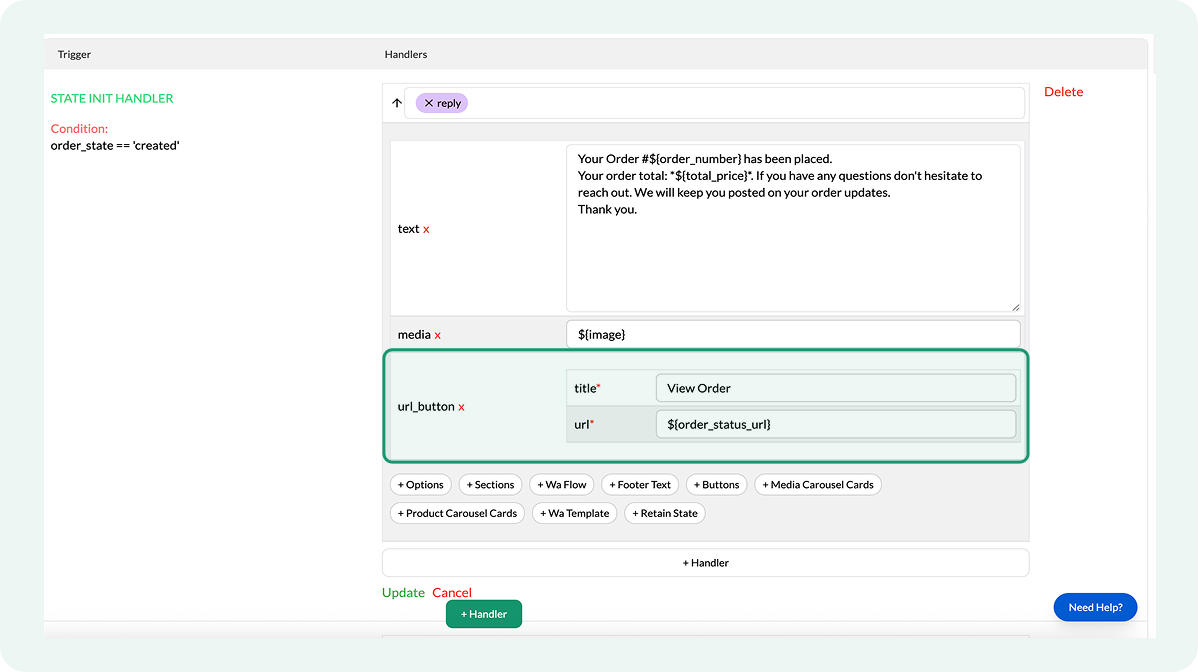
- Save changes by selecting Update
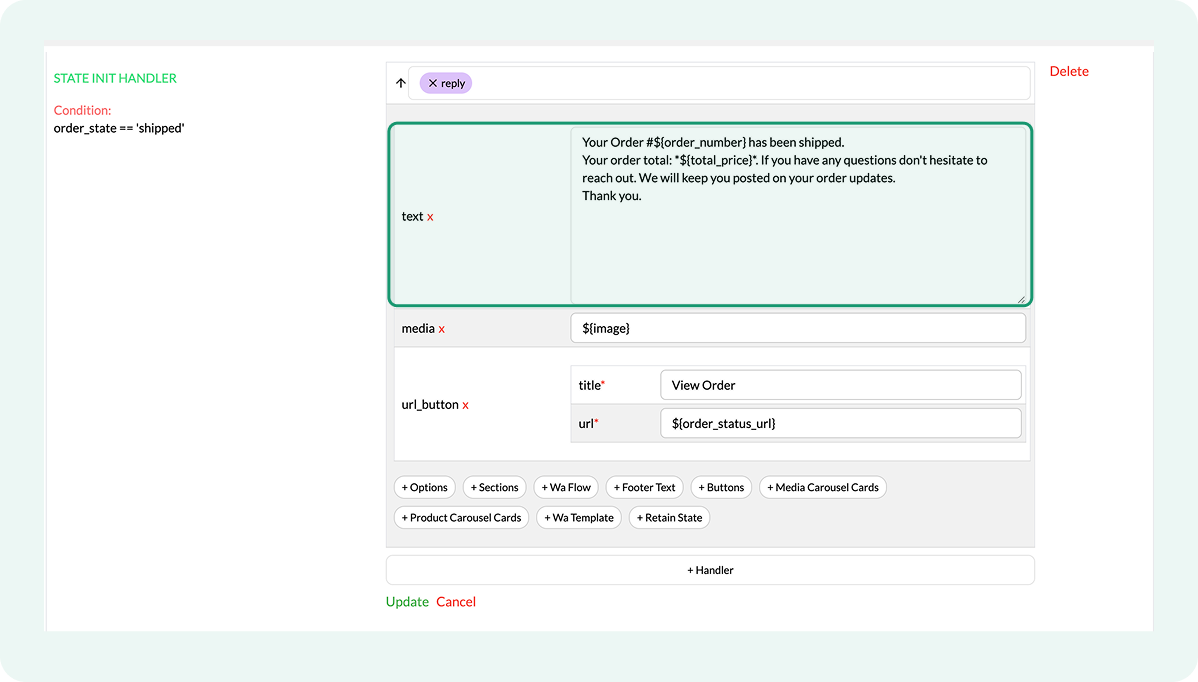
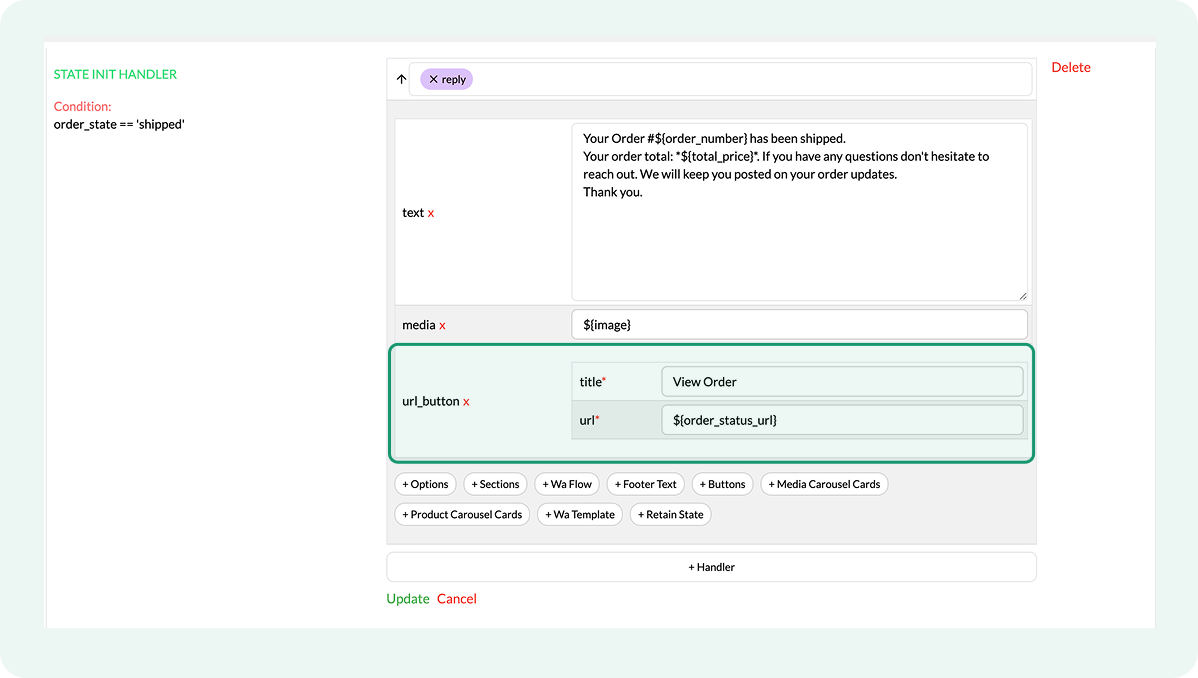
Configuring the shipped order state
This order state triggers when Shopify marks an order as shipped. The message confirms that fulfillment is complete and that the package has been handed off to the carrier. It acts as a handover notice, letting the customer know that delivery is now managed by the shipping provider.
- Locate the handler next to order_state == 'shipped' condition
- Click on the handler and select edit button
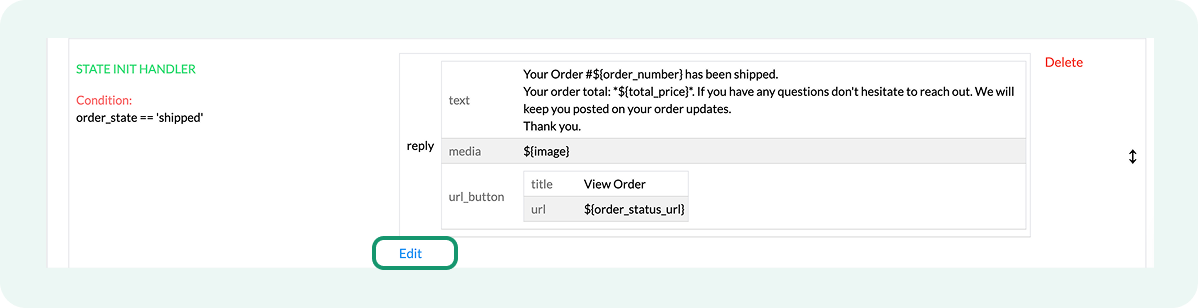
It would look like this:
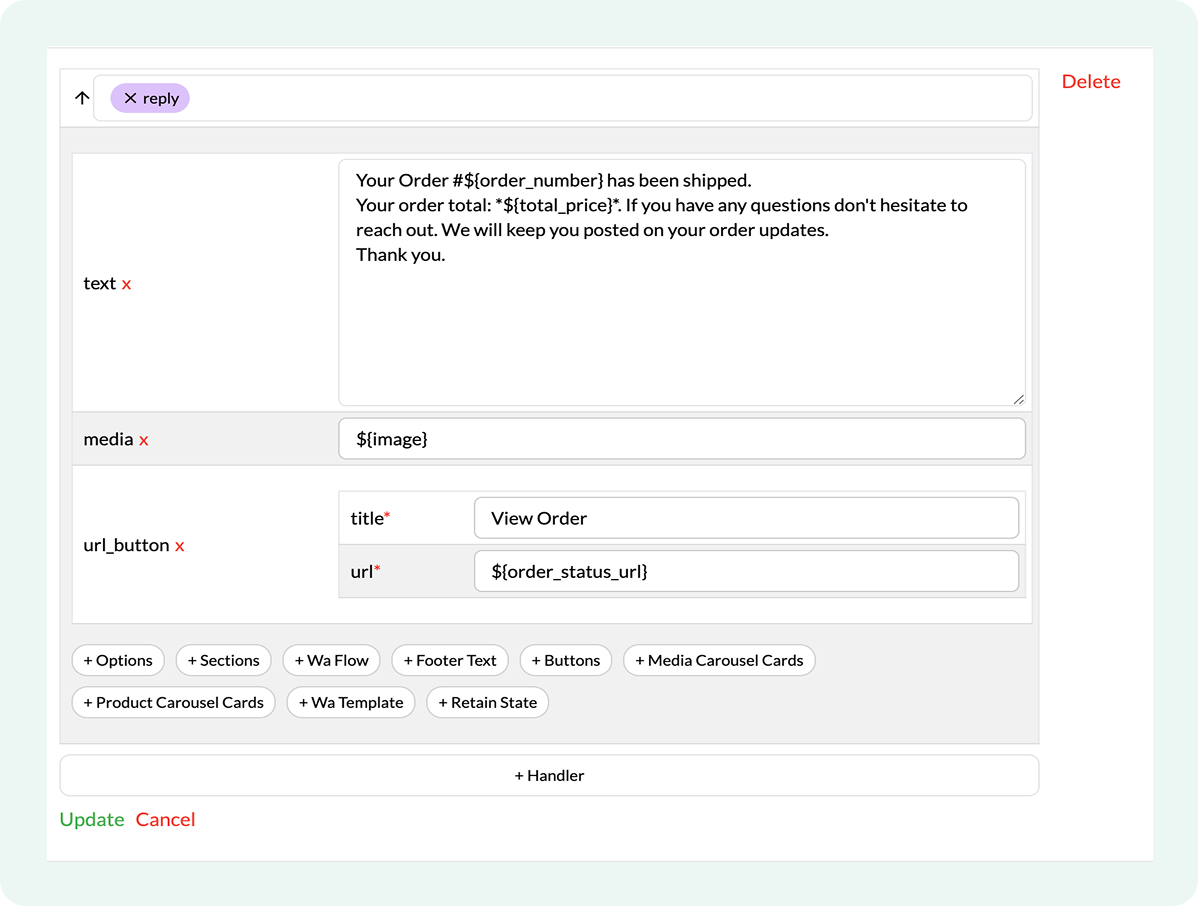
- Click inside the message text box to update the copy
- Confirm that the View Order button title is present in the url_button field
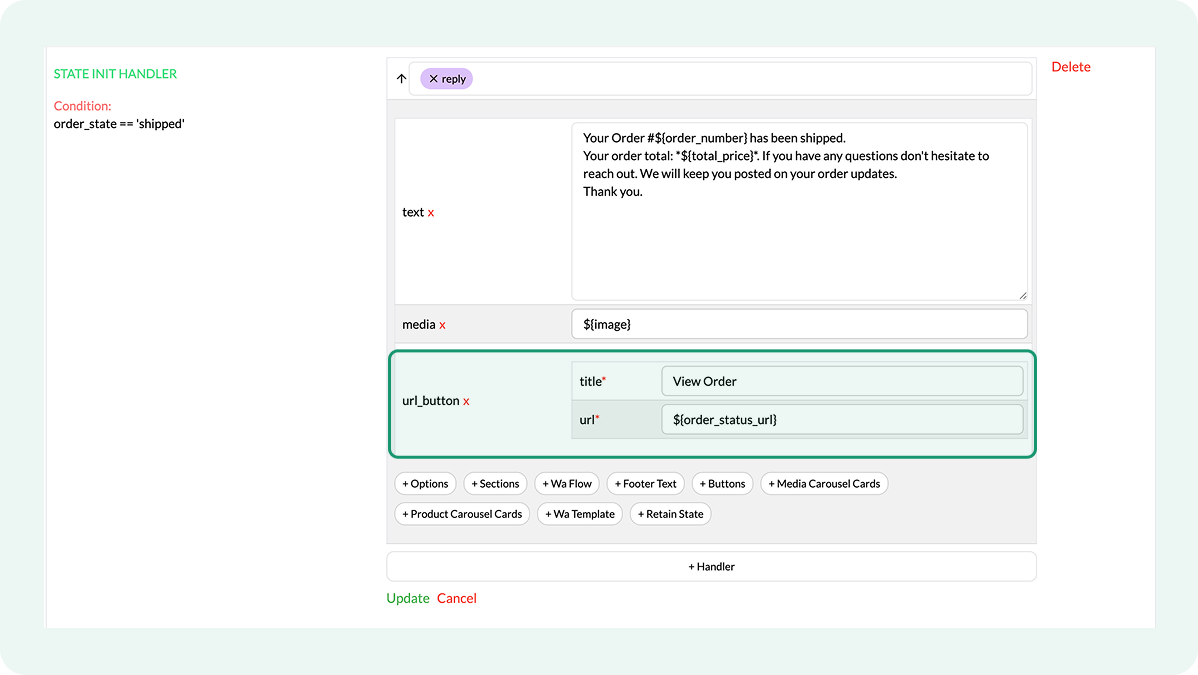
- Save changes by selecting Update
Configuring the in_transit order state
This order state runs after shipping confirmation, once the carrier has picked up the package and delivery is in progress. It covers the waiting period before delivery and handles delays, tracking checks, or delivery questions.
- Locate the handler next to order_state == 'in_transit' condition
- Click on the handler and select the edit button
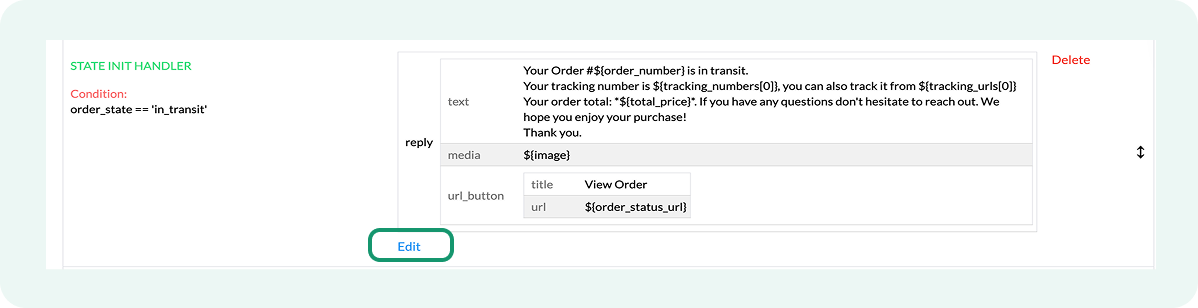
It would look like this:
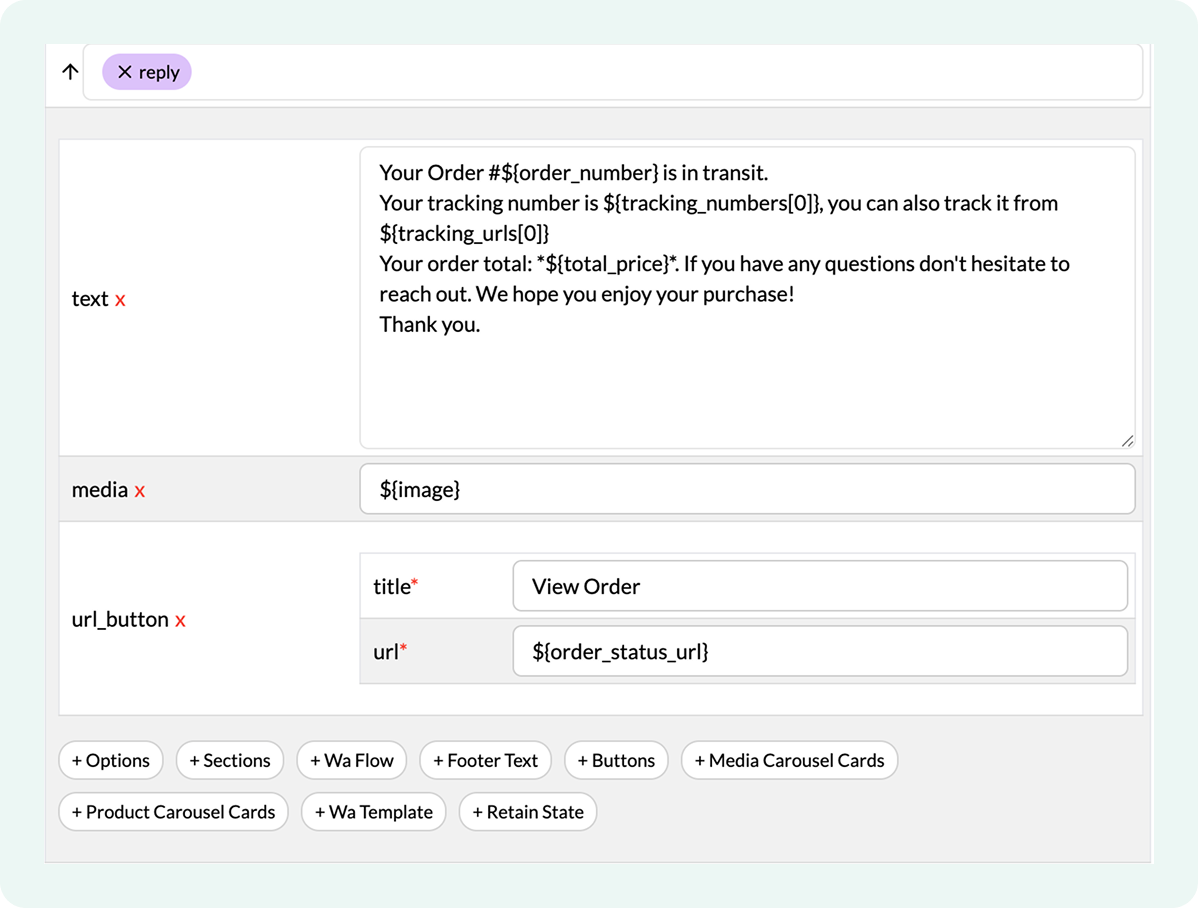
- Click inside the message text box to update the copy
- Confirm that the View Order button title is present in the url_button field
- Save changes by selecting Update
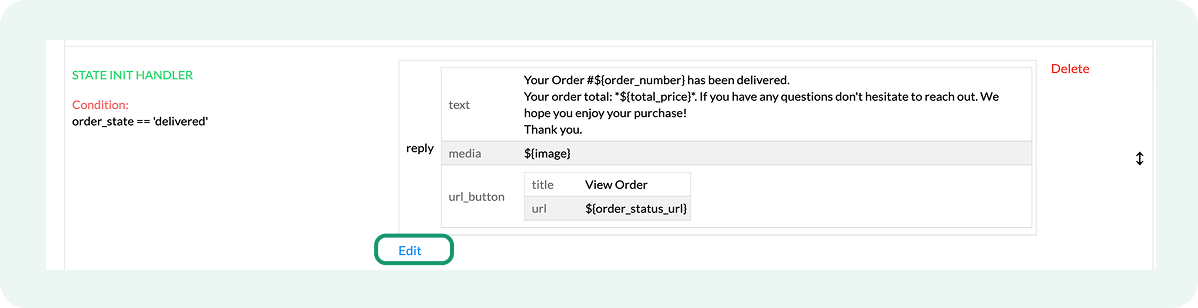
Configuring the delivered order stage
This order stage triggers when Shopify marks an order as delivered. The message confirms successful delivery and closes the order update sequence.
- Locate the handler next to order_state == 'delivered' condition
- Click on the handler and select the edit button
It would look like this:
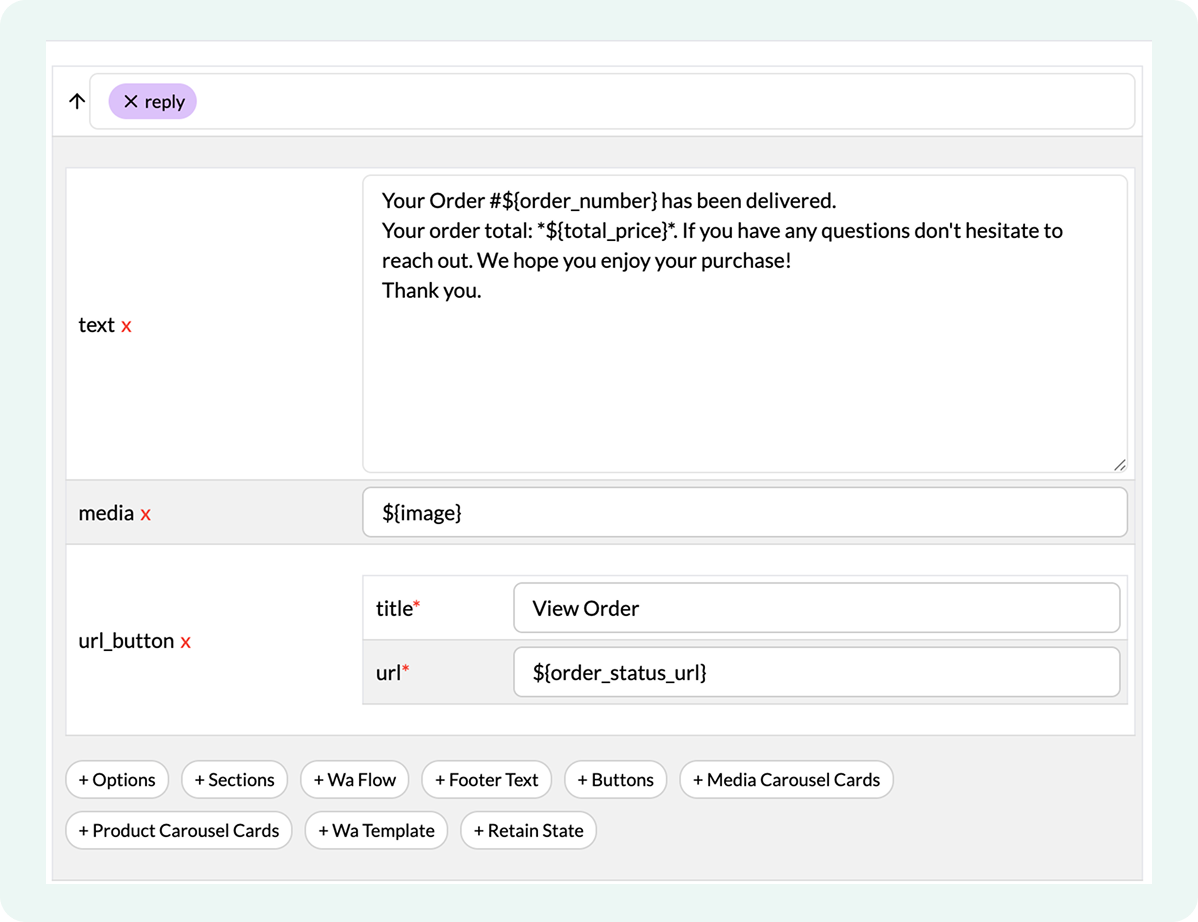
- Click inside the message text box to update the copy
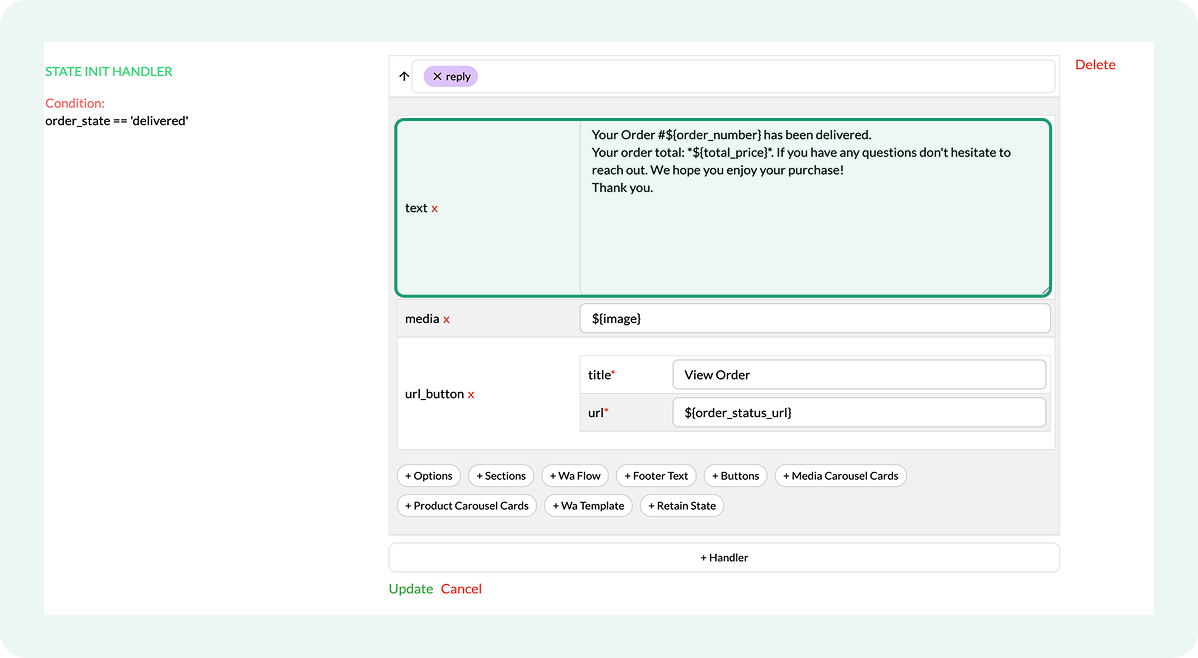
- Confirm that the View Order button title is present in the url_button field
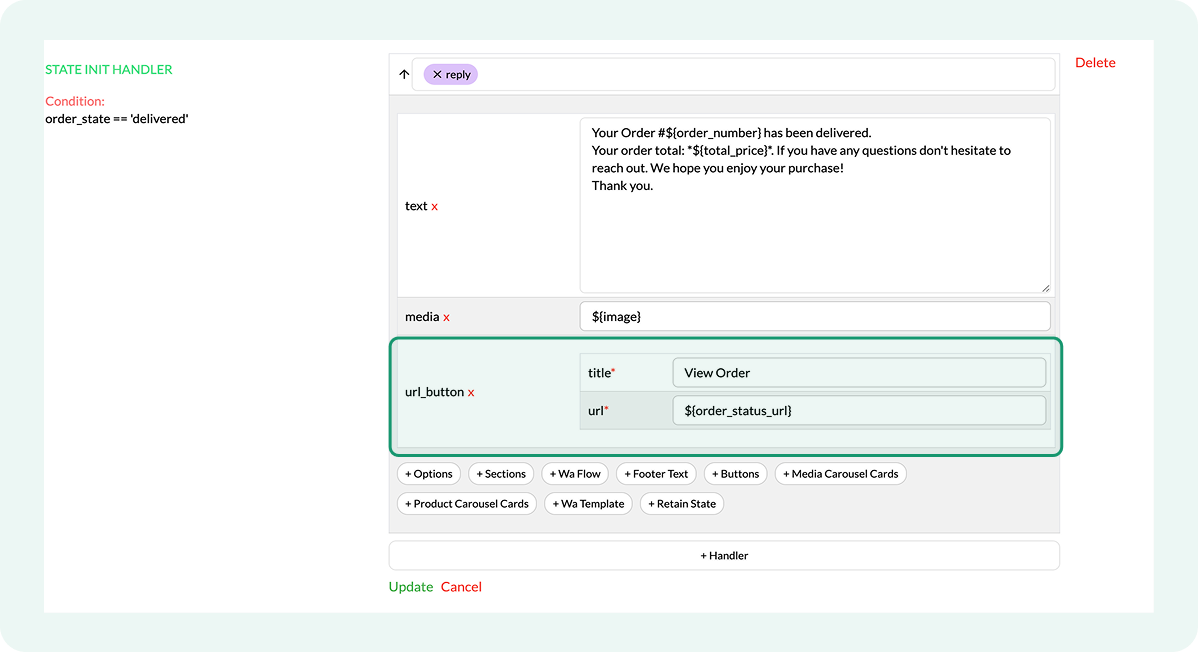
- Save changes by selecting Update
Configuring the cancelled order state
This order state triggers when a customer cancels an order. The message confirms the cancellation was successful and outlines next steps, such as refund processing or support follow-up.
- Locate the handler next to order_state == 'cancelled' condition
- Click on the handler and select the edit button
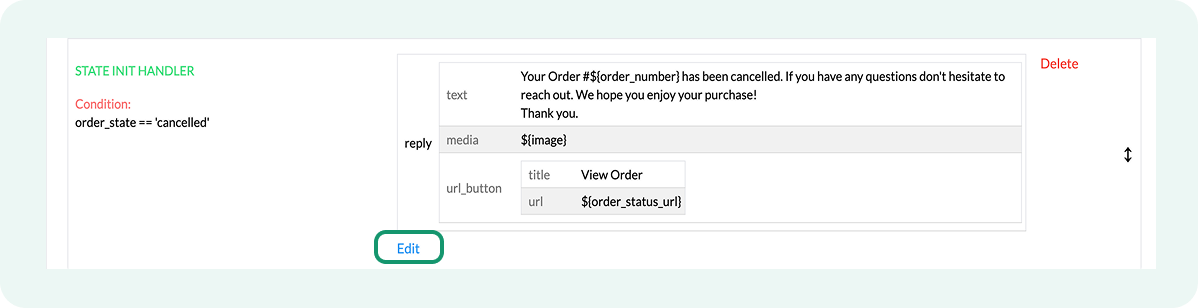
It would look like this:
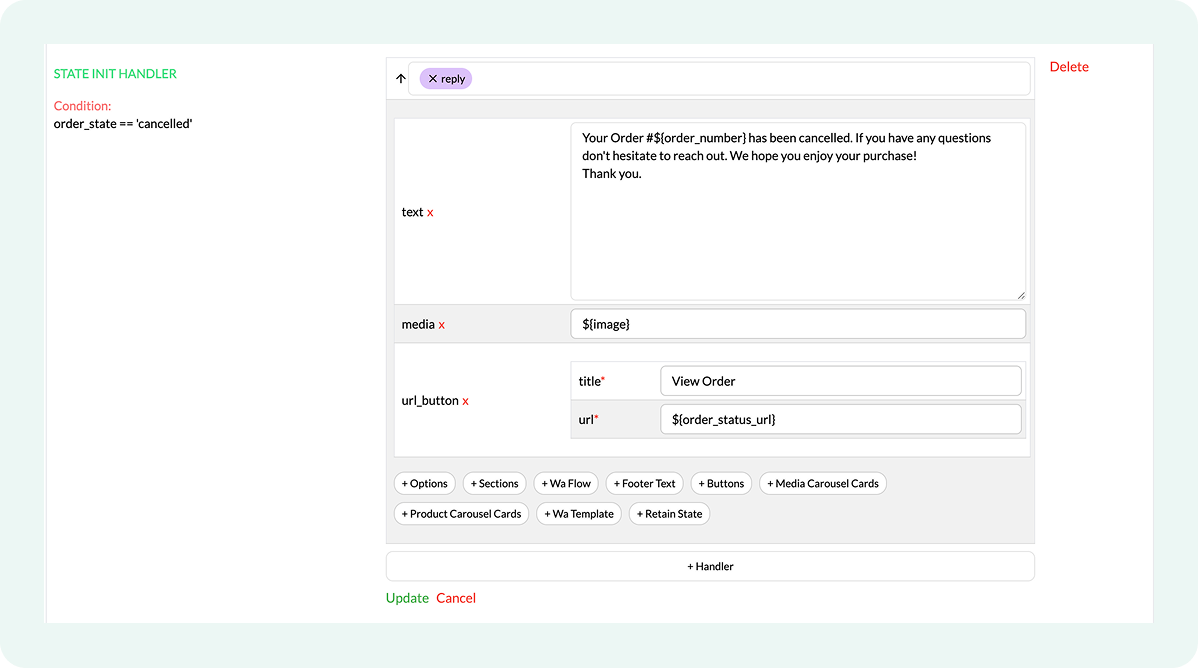
- Click inside the message text box to update the copy
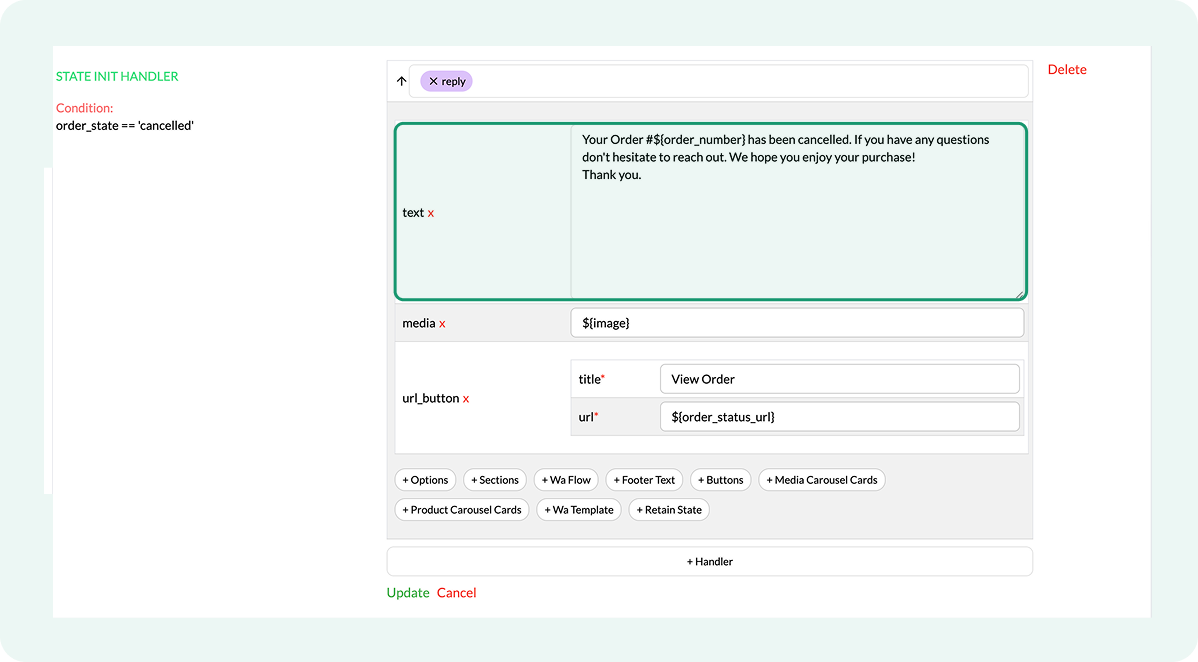
- Confirm that the View Order button title is present in the url_button field
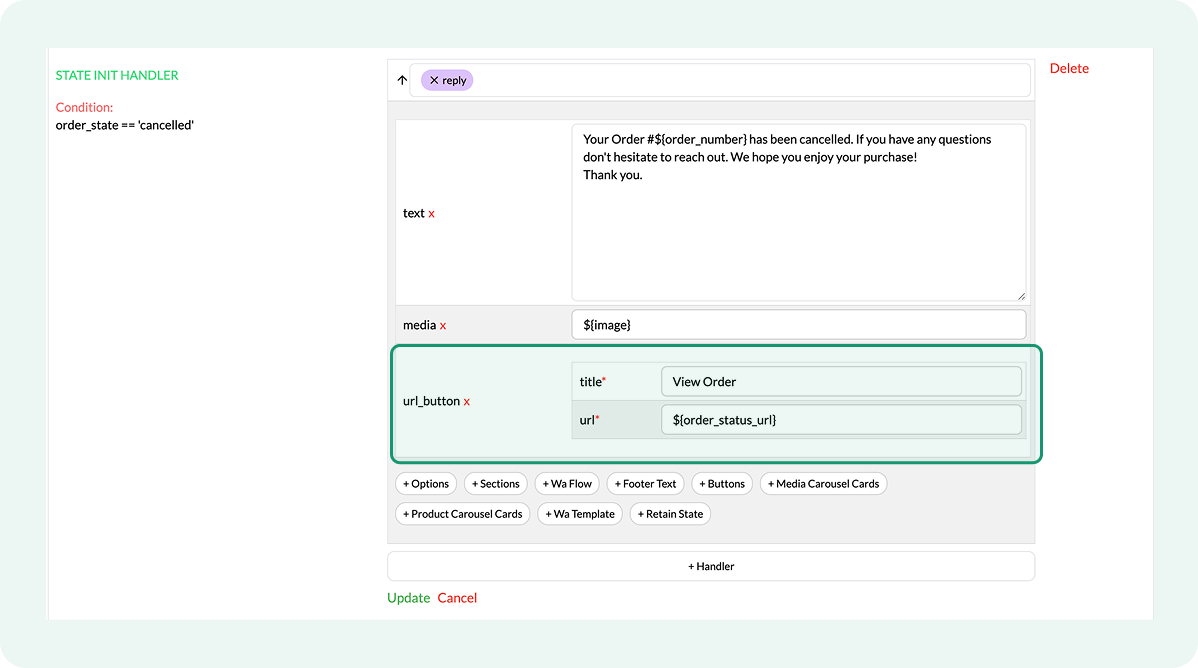
- Save changes by selecting Update
Troubleshooting Shopify Order Update flows
If Shopify order updates are not being sent via WhatsApp, review the checks below to identify and resolve the issue.
- Confirm that the order status in the Flowcart Shopify Plugin matches the flow condition. Shopify order updates trigger only when Shopify order events match the conditions defined in the flow. A mismatch between the order’s actual status and the order_state condition in the handler is the most common reason an update does not send.
- Verify that the flow is activated. The flow must be saved and activated for changes to take effect. An inactive flow does not listen for Shopify order events.
- Confirm that the Flowcart Shopify Plugin captures a valid customer phone number. The Flowcart Shopify Plugin sends WhatsApp updates only when an order includes a valid phone number. Orders placed without a phone number or required opt-in cannot receive updates.
- Review time-related settings. Messages scheduled outside business hours may be deferred and appear as if they weren’t sent immediately.
- Check if the tracking information is missing. For shipped or in-transit updates, tracking details must be added to the order in the Flowcart Shopify Plugin. Missing tracking information can cause messages to appear incomplete or lack delivery context.
Enable Real-Time Shopify Inventory Search on WhatsApp
Sometimes a customer knows exactly what they want, but they don't want to go digging through a website to find it. The Shopify Product Search feature brings the entire Shopify storefront right into the WhatsApp conversation.
Customers can simply type what they’re looking for and get matching products within seconds. Put simply, the Shopify product search feature turns a simple chat into a personal shopping experience where the desired product is always just one message away.
The sections below explain how to activate this flow in the Flowcart Shopify Plugin and what it looks like in practice.
What You’ll Need
To get the Shopify Product Search up and running on WhatsApp, have the following ready to go:
- The Flowcart Shopify Plugin installed and active on the store
- The Shopify product search flow activated within the plugin settings
- An active Shopify product catalog synced and ready for customers to browse
Activating the product search flow
To activate product search in WhatsApp storefront:
- Go to Flows in the Flowcart Shopify Plugin and select Flowcart Flows
- Select the Shopify section
- Click Activate on the Shopify product search flow
What it looks like in practice
Once activated, here is how the search works for your customers:
- Customers type what they’re looking for (e.g., “I am looking for apples”)
- They instantly receive a matching item card with the price and available quantity
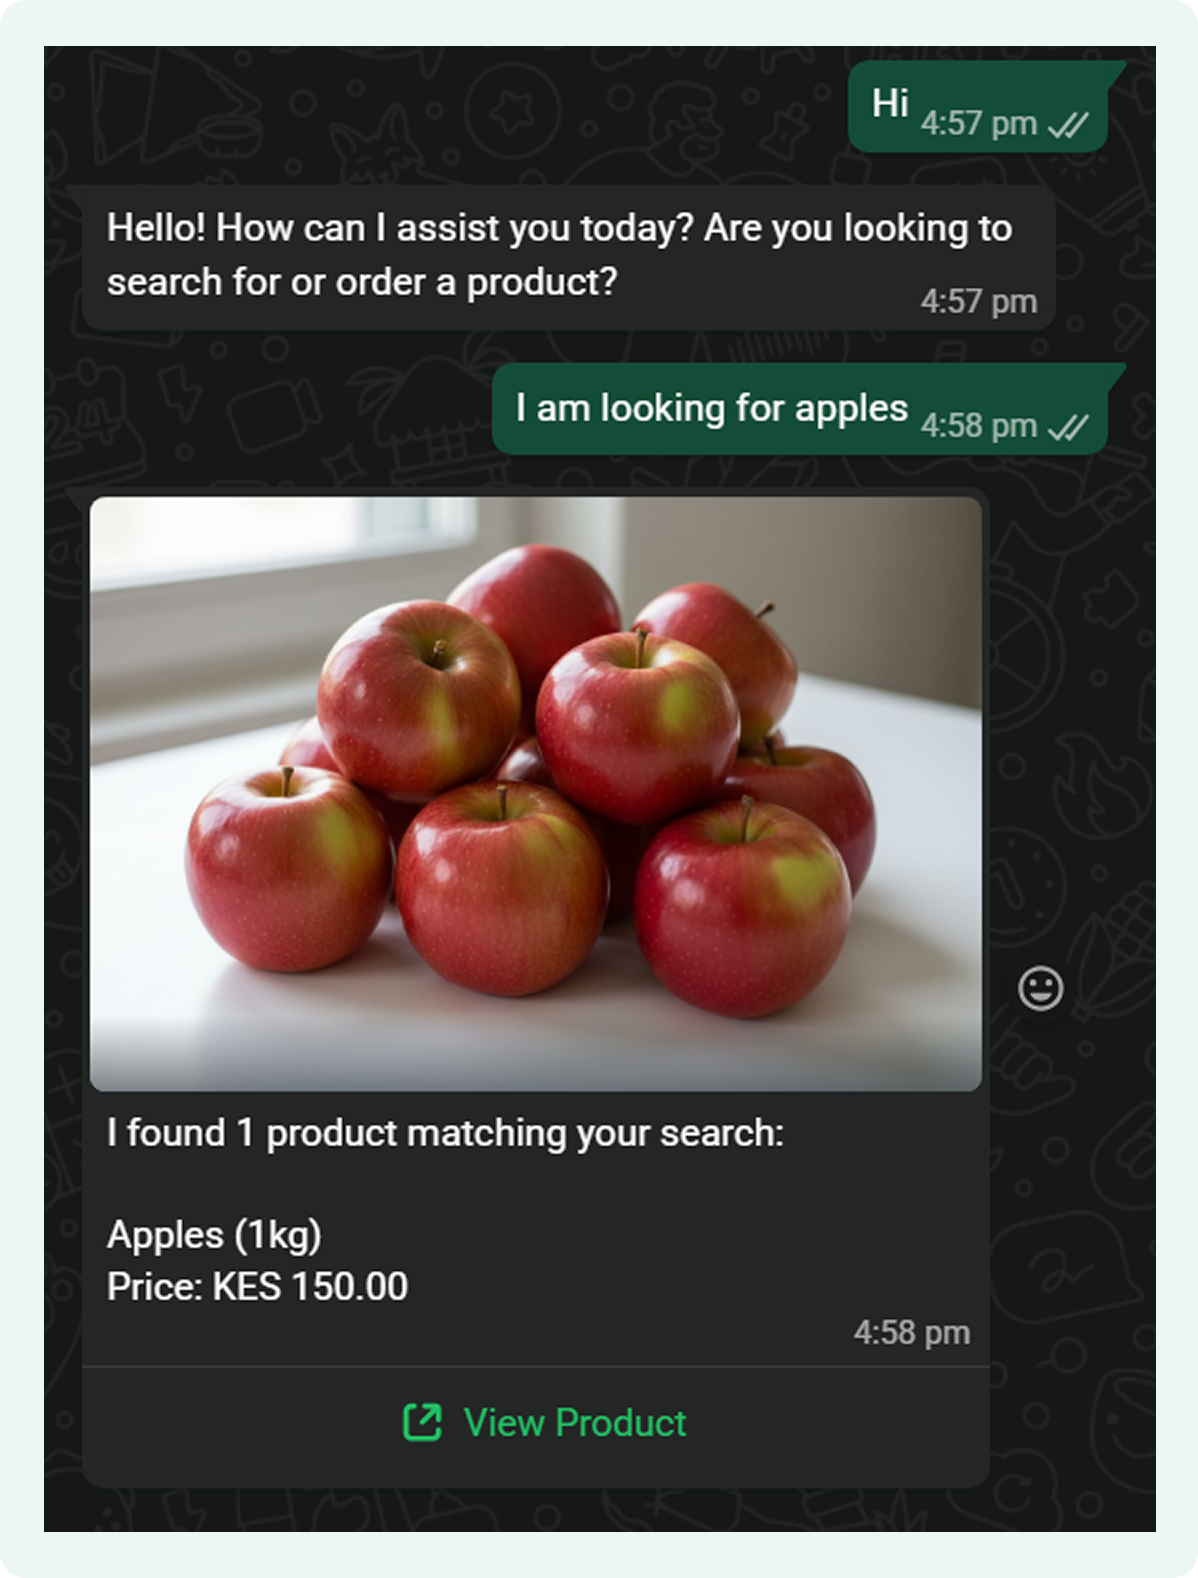
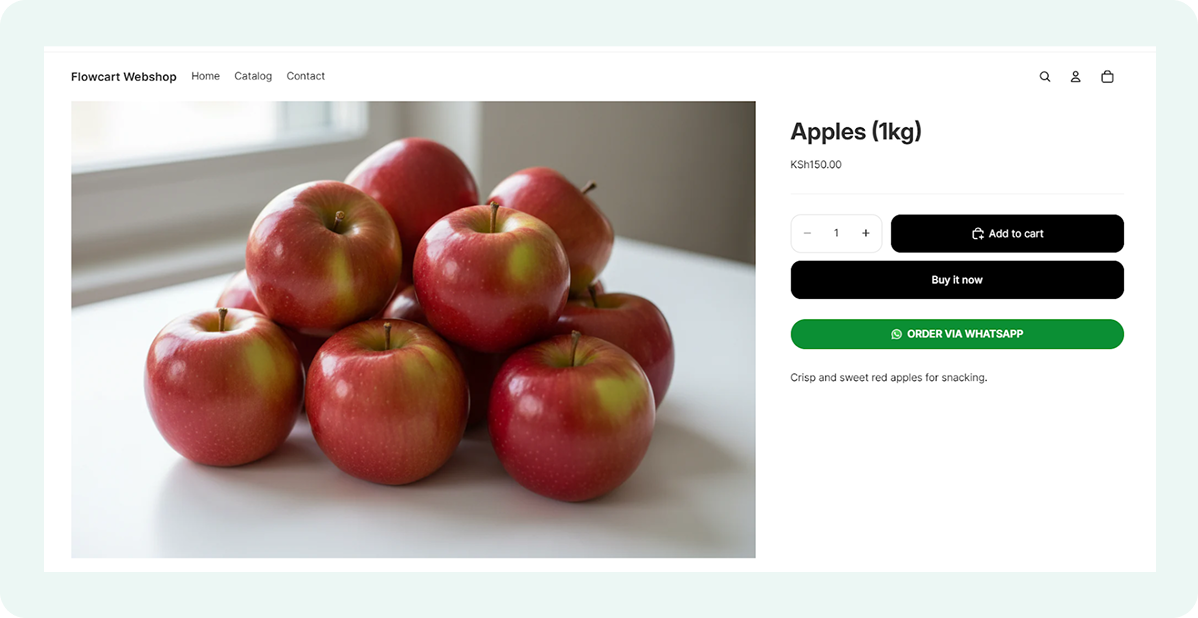
- Clicking View Product redirects them to the Shopify page to complete their order
Troubleshooting the Shopify product search flow
If your customers aren't getting the right product results or any results at all, it’s usually down to a sync issue or a simple keyword mismatch. Most of the time, a quick refresh of your settings will get your WhatsApp storefront back up and running.
- Double-check that your Shopify catalog is fully synced. If you’ve recently added new items, they might take a moment to appear. Also, ensure the Shopify product search flow is still activated.
- Check if the results match the keywords. The search works best with clear product titles. If a customer types something too vague or a term that isn't in your product tags or titles, the system might struggle to find a match.
- Review if products are showing up as "Out of Stock". If an item is sold out in your Shopify admin, it will reflect that in the WhatsApp chat.
- Ensure the "View Product" link isn’t broken. Check your store’s domain settings. If you’ve recently changed your primary URL or shifted to a new handle, the generated links might need a moment to update.
Recover Abandoned Carts with WhatsApp Checkout Reminders
Abandoned carts are the biggest "what if" in e-commerce: 7 out of 10 shoppers leave at the checkout. Most of the time, it happens because they get distracted. WhatsApp’s “3-second rule” can reverse this: 90% of WhatsApp messages are opened within three seconds, helping merchants reach customers before they’ve put their phones down.
By sending a quick, automated nudges, Flowcart merchants have recovered nearly 20% of these lost sales. They’re putting a direct checkout link back in their customers’ hands while the intent to buy is still fresh. The sections below explain how to activate the Shopify abandoned cart reminder flow and customize reminders to increase order completion rates.
What You'll Need
To set up Abandoned Cart Reminders on WhatsApp, ensure the following are in place:
- The Flowcart Shopify plugin installed on your store
- Shopify abandoned cart tracking activated
- Customers with a valid WhatsApp phone number who have opted in to receive messages
Activating the Abandoned Cart flow
Abandoned Cart Reminder flows are configured using a single click. The Flowcart Shopify Plugin monitors abandoned checkouts. It follows up on WhatsApp with a series of reminders that include the customer’s cart items and a direct checkout link.
- Go to Flows in the Flowcart Shopify Plugin and select Flowcart Flows

- Select the Shopify section
- Click on Activate to enable the cart recovery flow

This is how the activated abandoned cart recovery flow will appear on your screen:
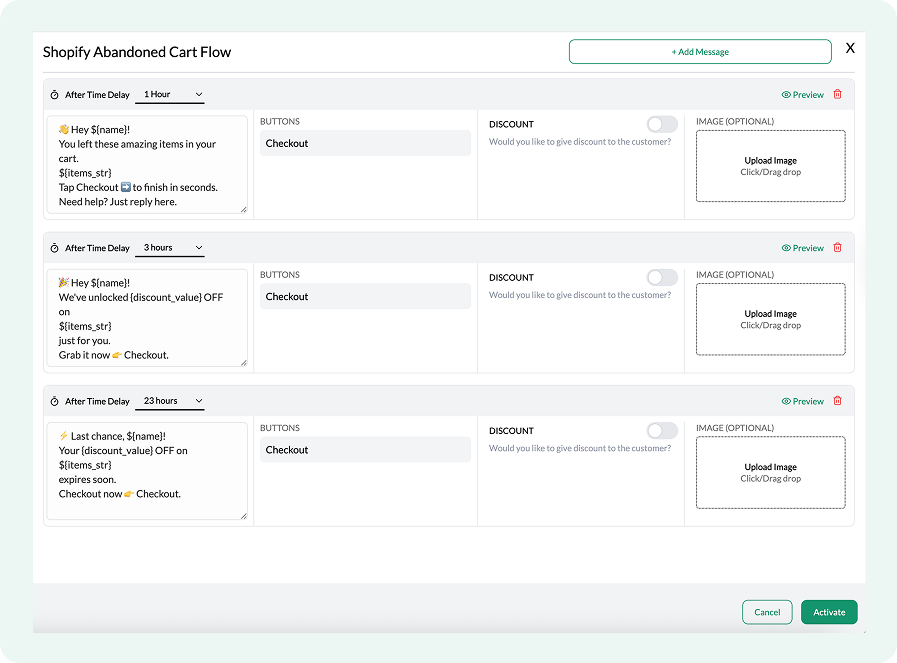
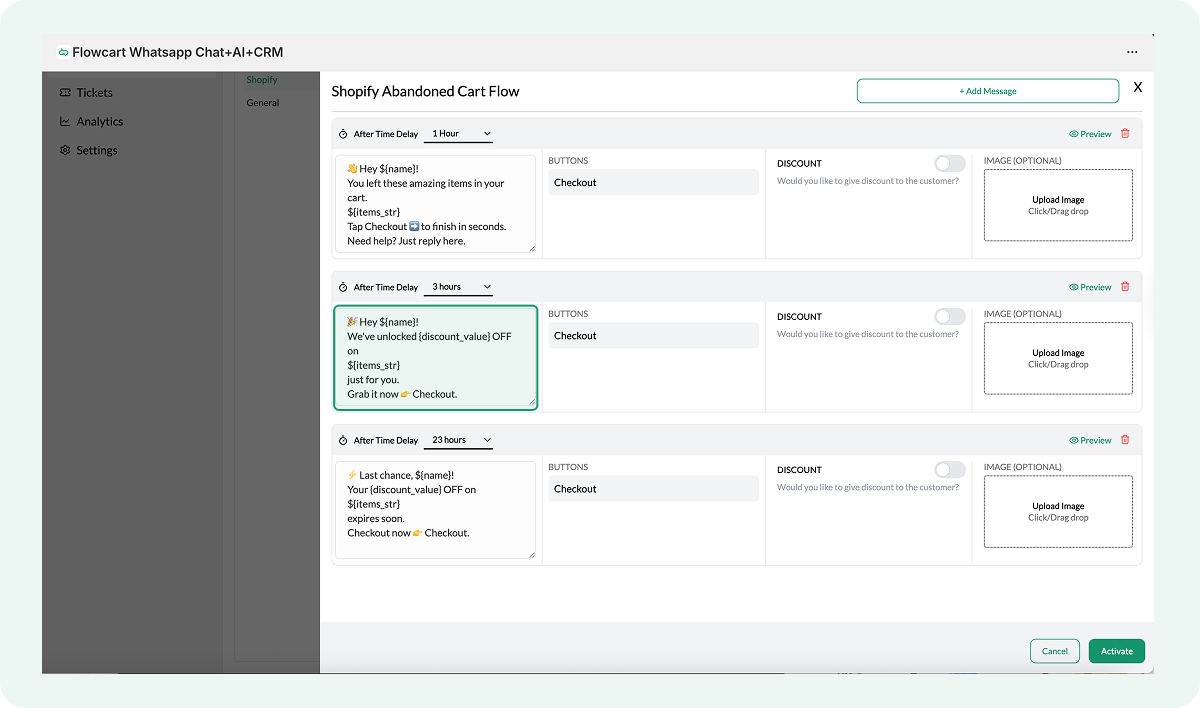
Customizing the first cart reminder
Follow these steps to review or modify the first WhatsApp reminder, which is sent shortly after a cart is abandoned and acts as a gentle nudge to bring the shopper back to checkout.
- Click the After Time Delay dropdown at the top of the message card
- Select when you want this reminder to be sent after a cart is abandoned (recommended timeline is within 1 hour)
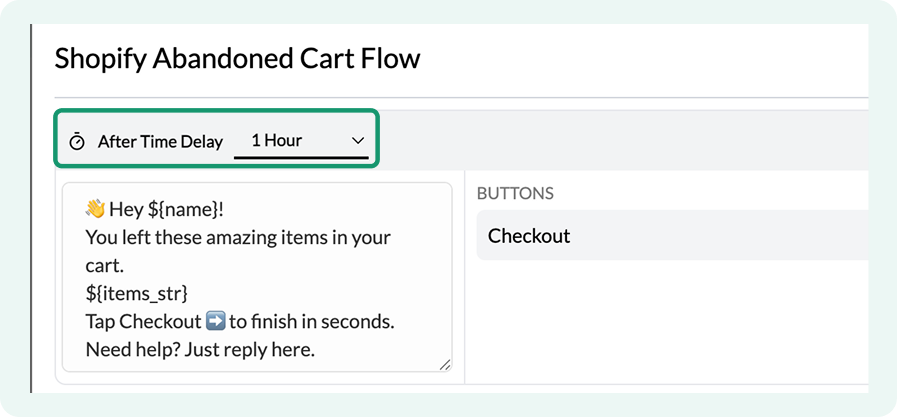
- Click inside the message text box to update the copy (For example, “Thanks for shopping.”)
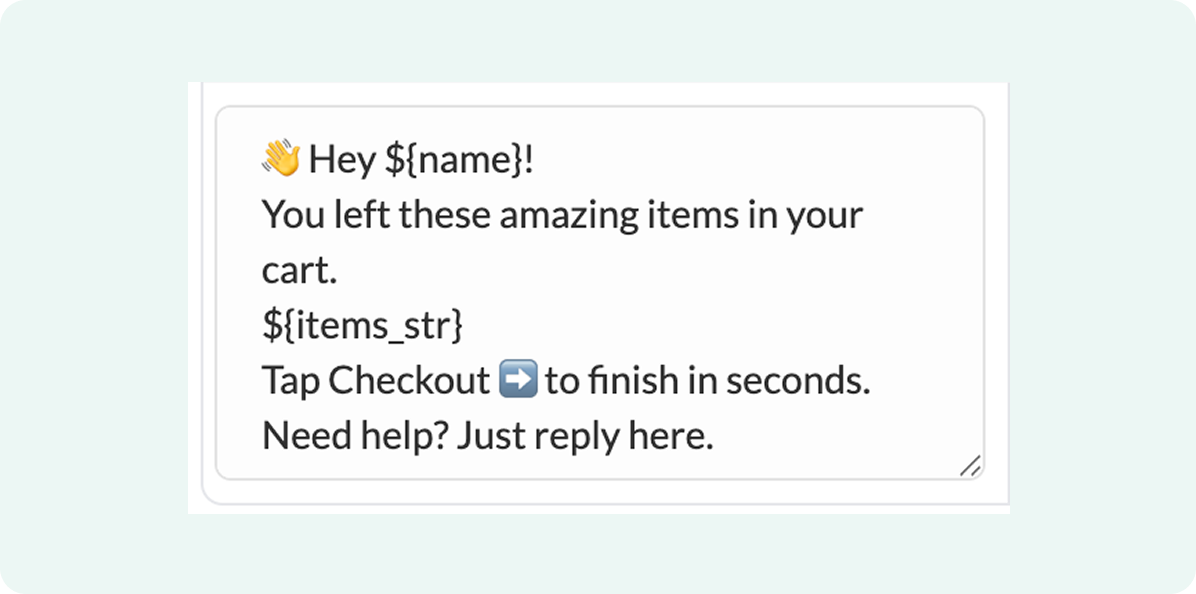
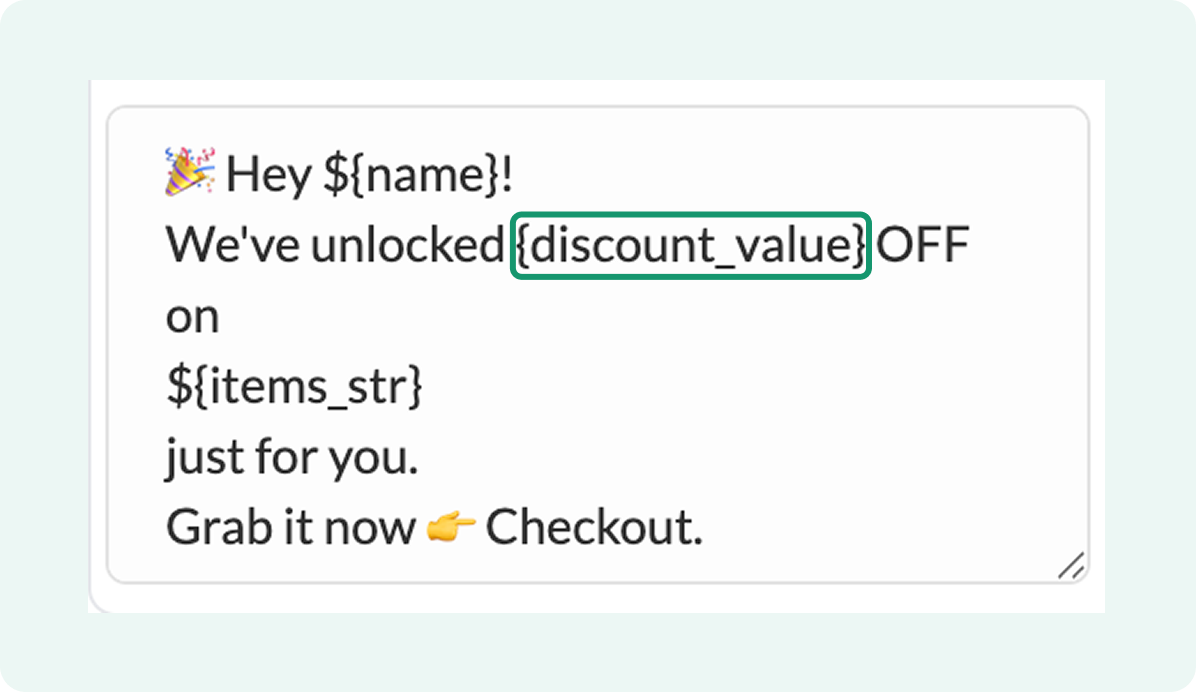
- Toggle Discount on if you want to offer an incentive in this reminder
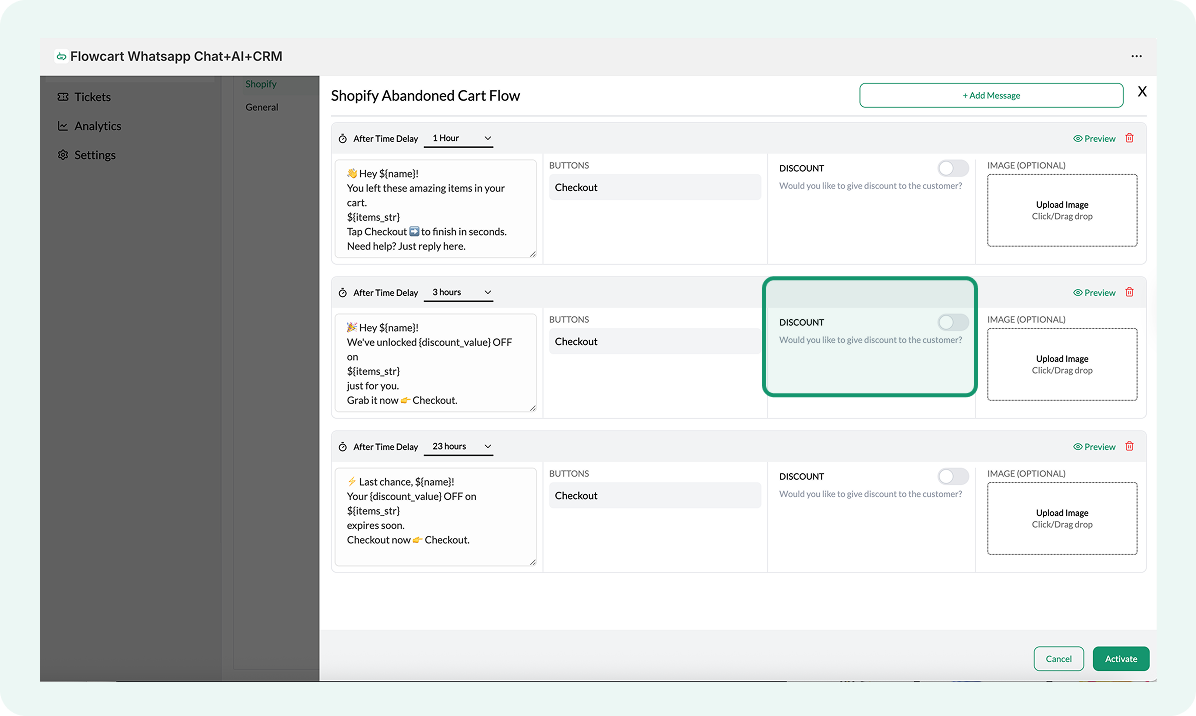
- Select a discount type. For a flat discount, select Flat, and for a percentage discount, select Percentage.
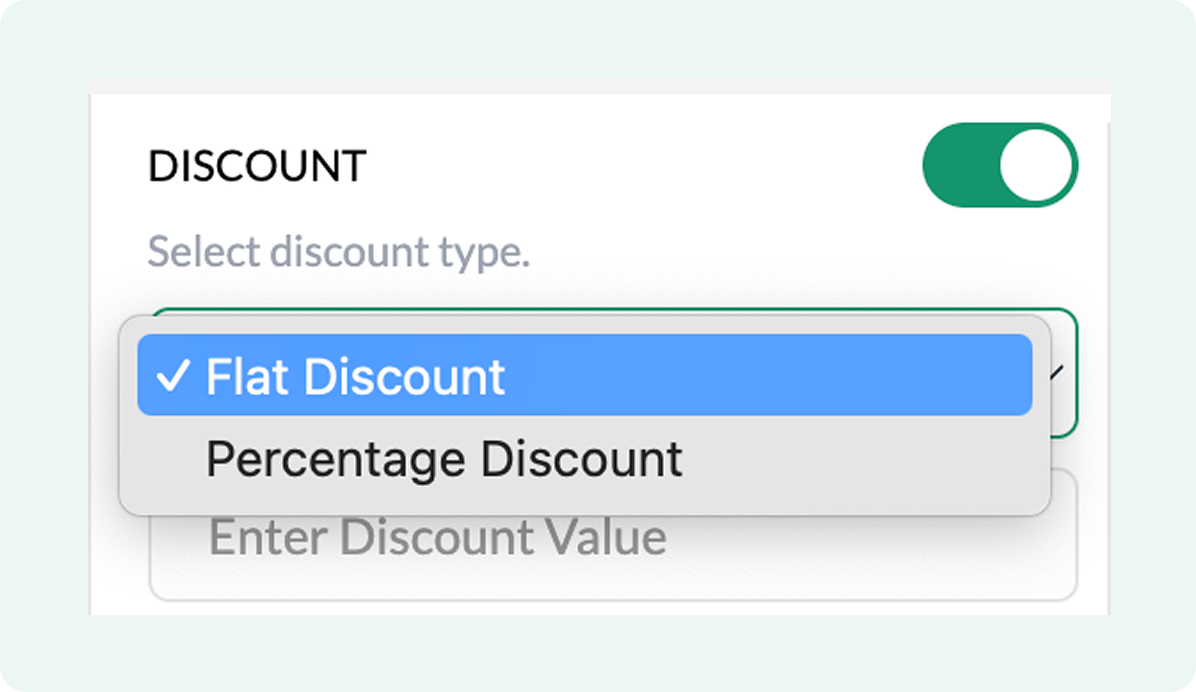
When offering a discount, include the discount value in brackets in the reminder message (e.g., 100 for flat discount).
- Click Upload Image to include a product or brand image in the message
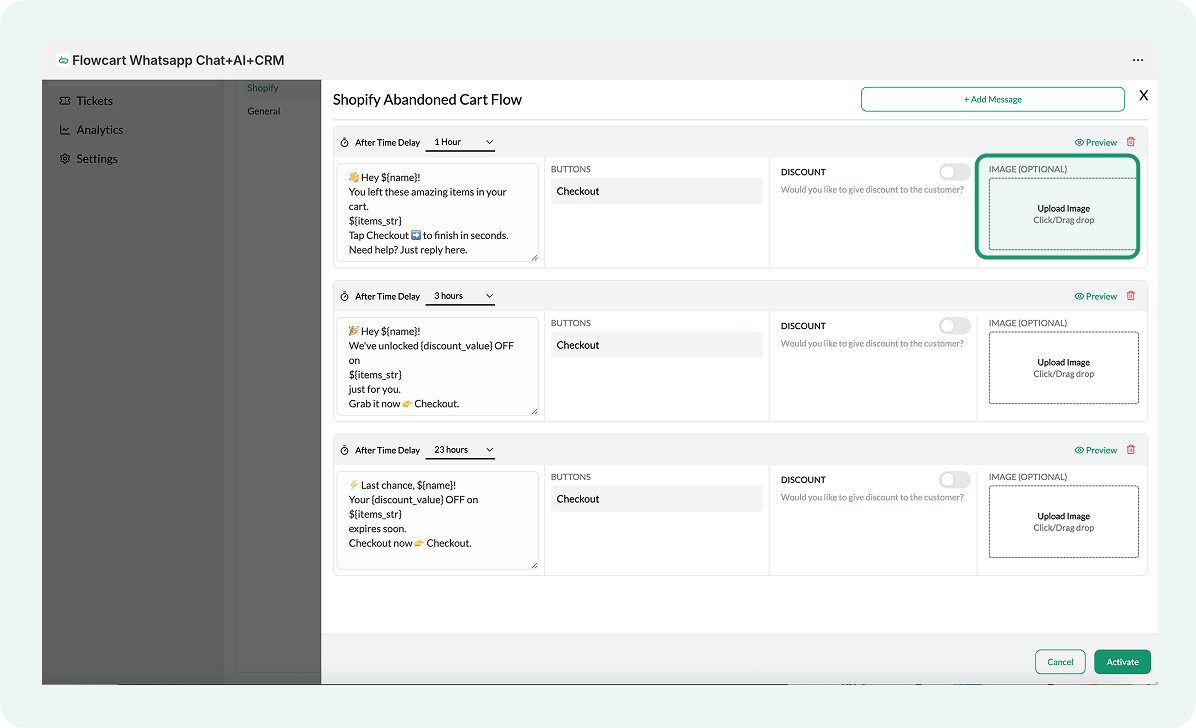
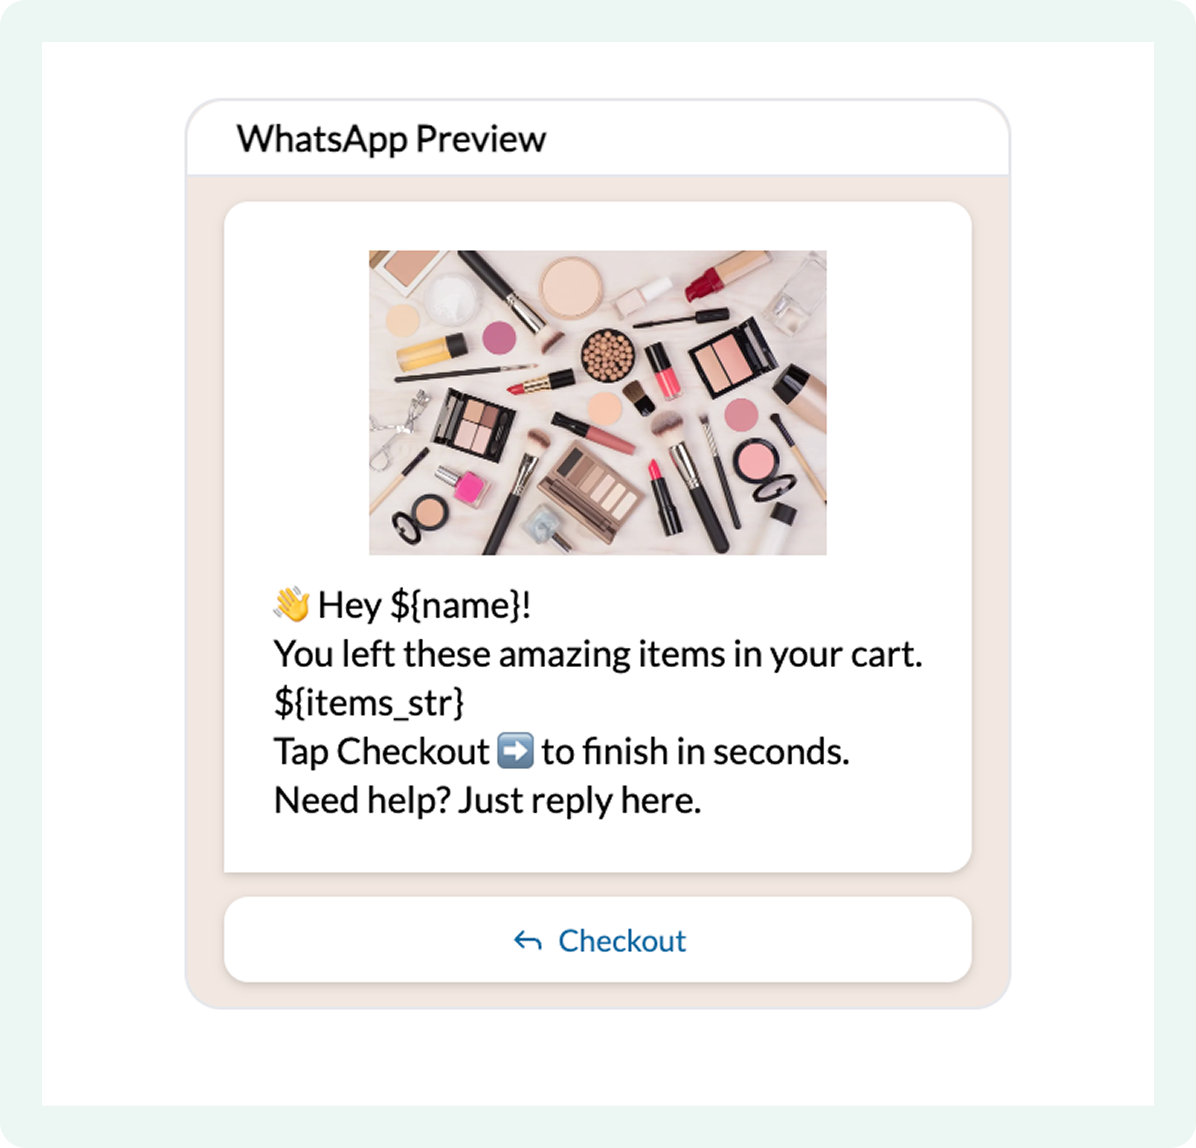
Here’s the preview of the first abandoned cart reminder on the Flowcart Shopify Plugin interface:
- Click Save to apply updates
How to customize the second cart reminder
The second cart reminder follows the initial nudge and is sent if the customer hasn’t completed checkout. This step is useful for reinforcing the reminder or adding additional context to encourage the shopper to return.
Configuration steps remain the same as the first reminder, with the differences outlined below.
- Find the second cart reminder editor just below the first one in the flow
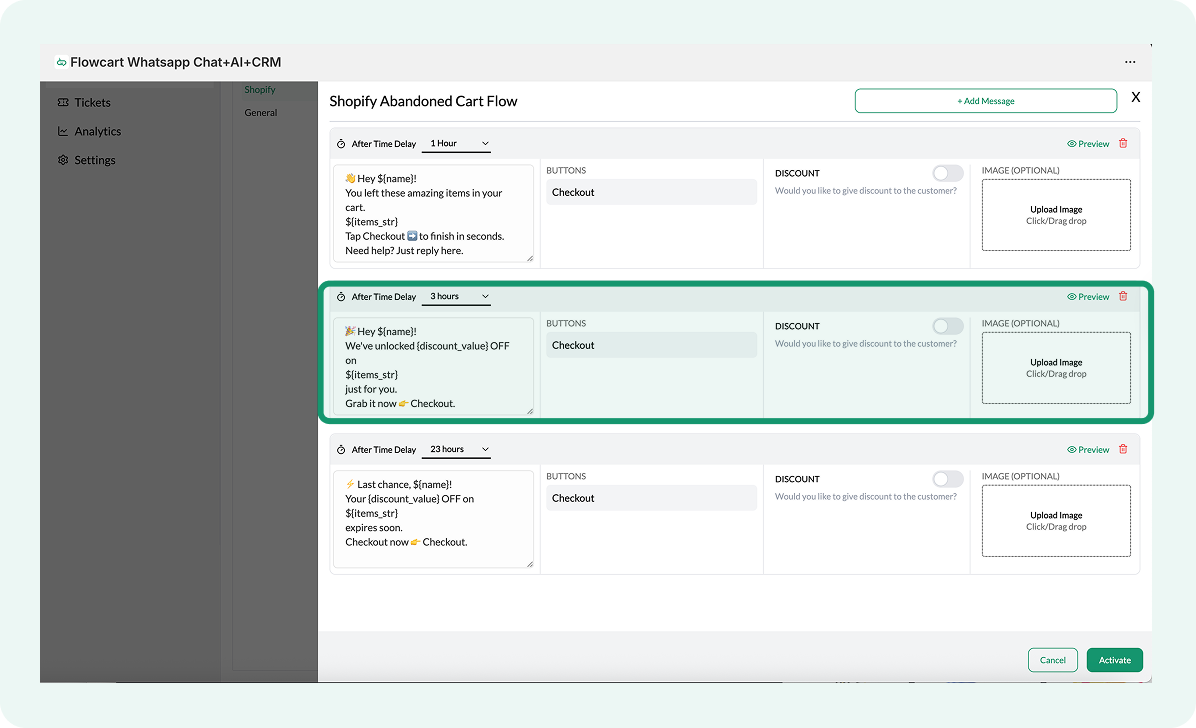
- Click the After Time Delay dropdown at the top of the message card
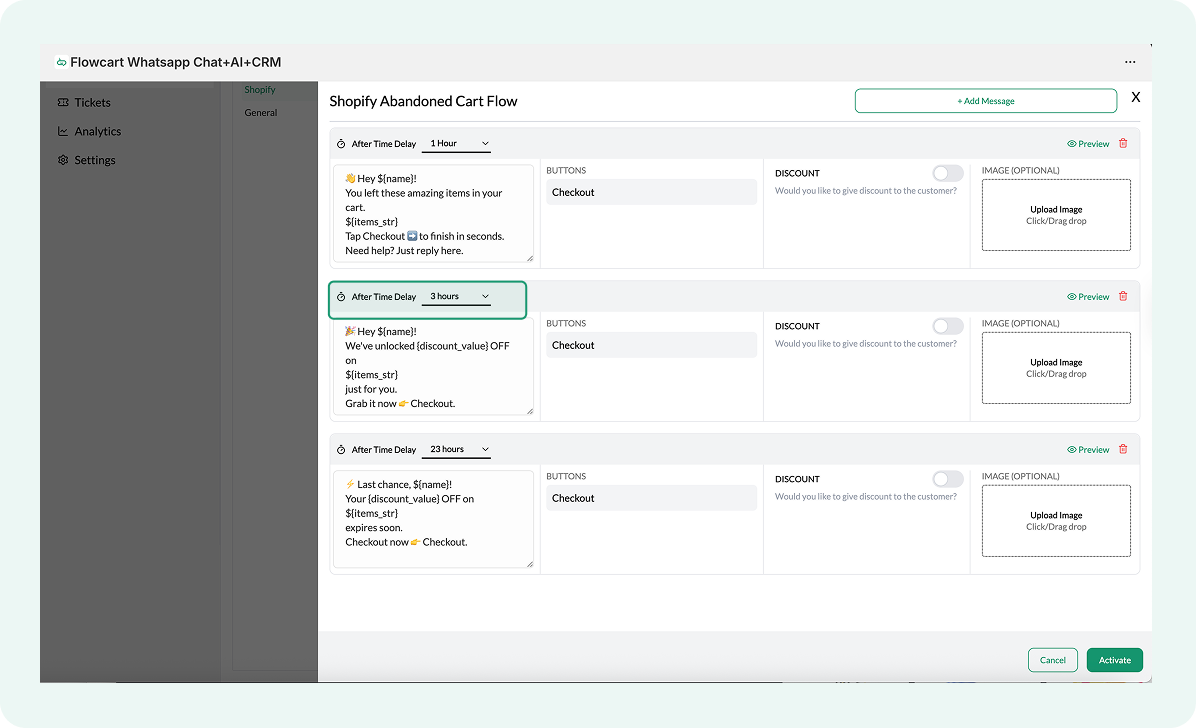
- Select when you want this reminder to be sent after a cart is abandoned (recommended timeline is within 6 hours)
- Click inside the message text box to update the copy
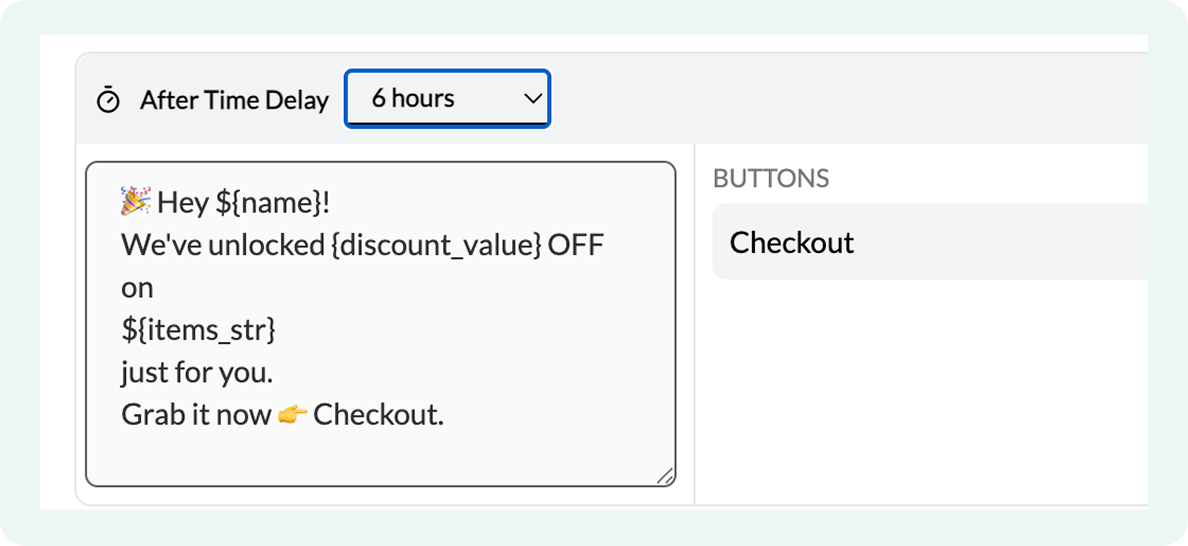
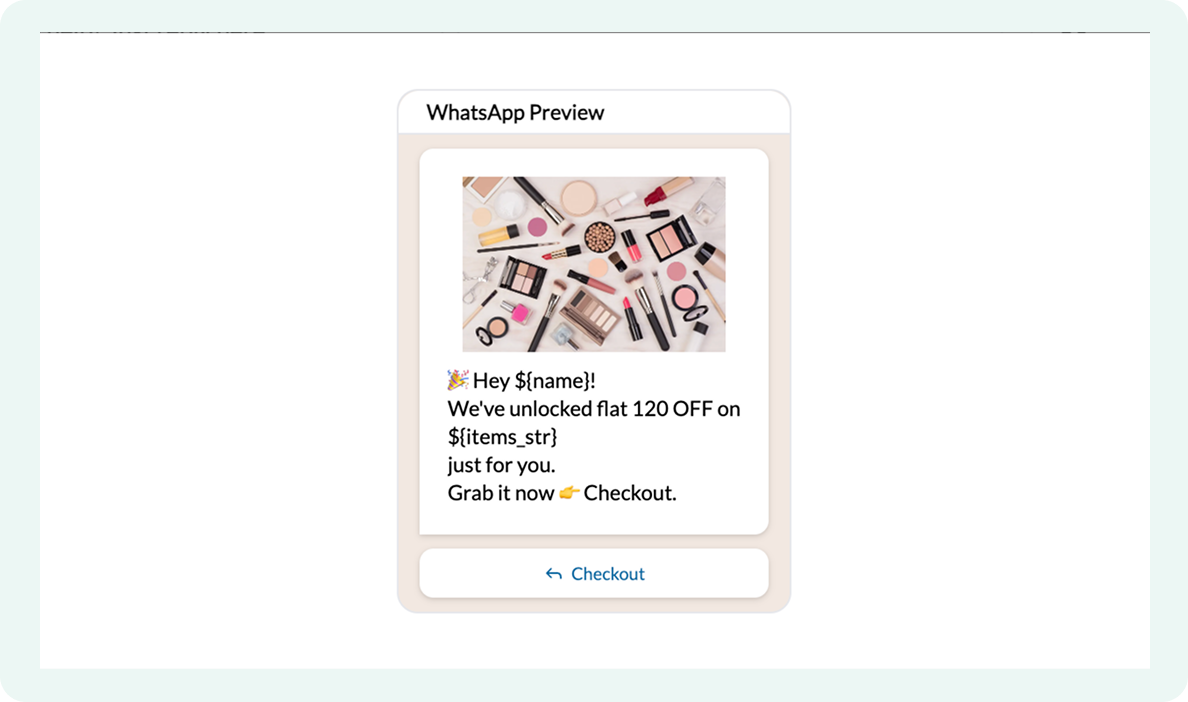
Here’s the preview of the second abandoned cart reminder with a flat discount value of 120:
How to customize the third cart reminder
The third cart reminder is your final follow-up for shoppers who haven’t responded to earlier messages. At this point, the customer is aware of the cart, so this reminder should focus on clarity and closure rather than repeated nudging.
Configuration steps remain the same as the first and second reminders, with the differences outlined below.
- Locate the third abandoned cart reminder flow below the second one
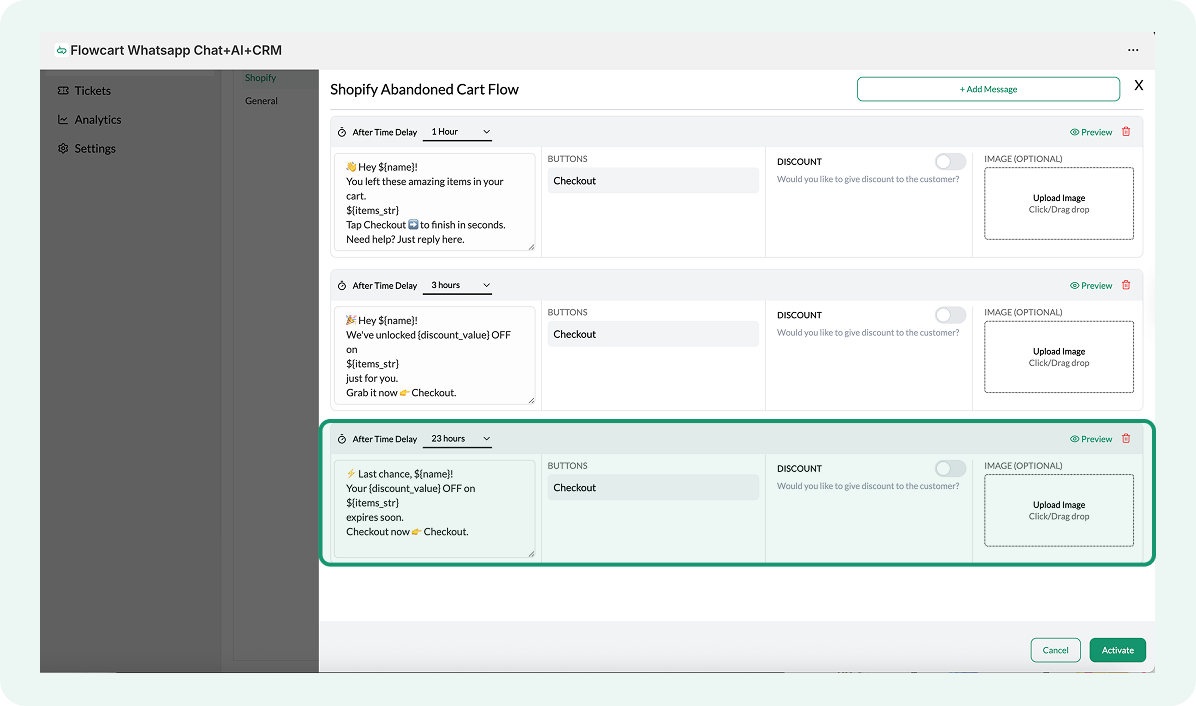
- Click the After Time Delay dropdown at the top of the message card
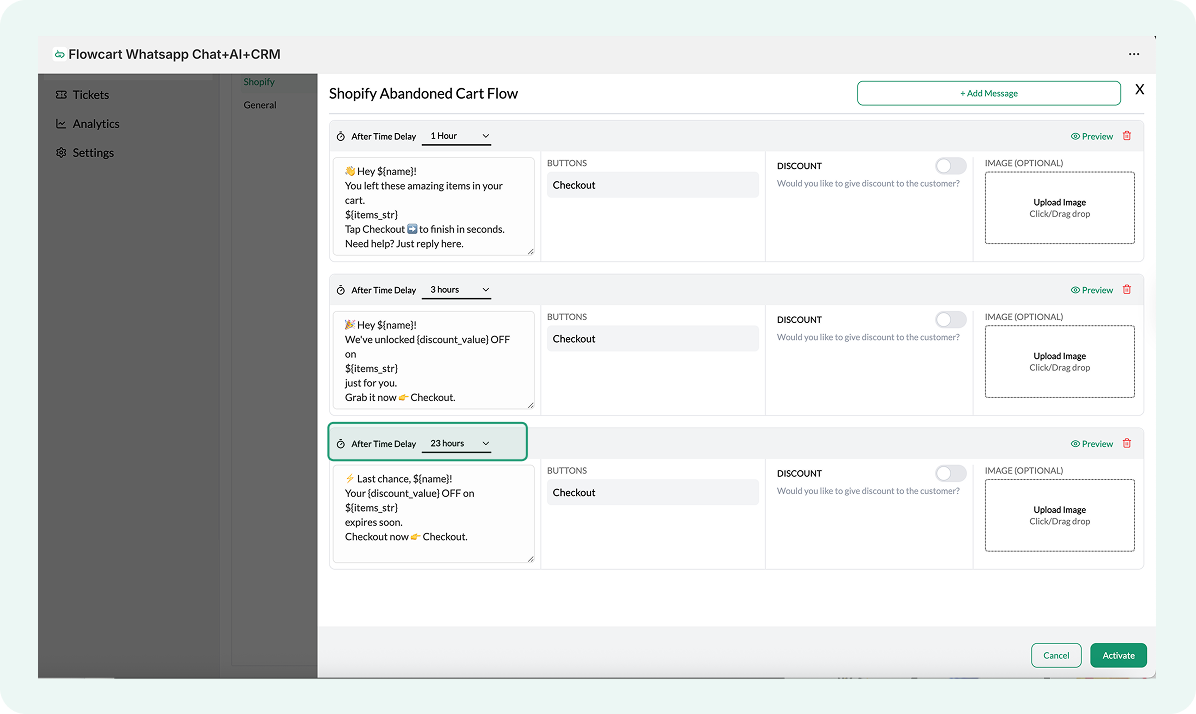
- Select when you want this reminder to be sent after a cart is abandoned (recommended timeline is within 24 hours)
- Click inside the message text box to update the copy
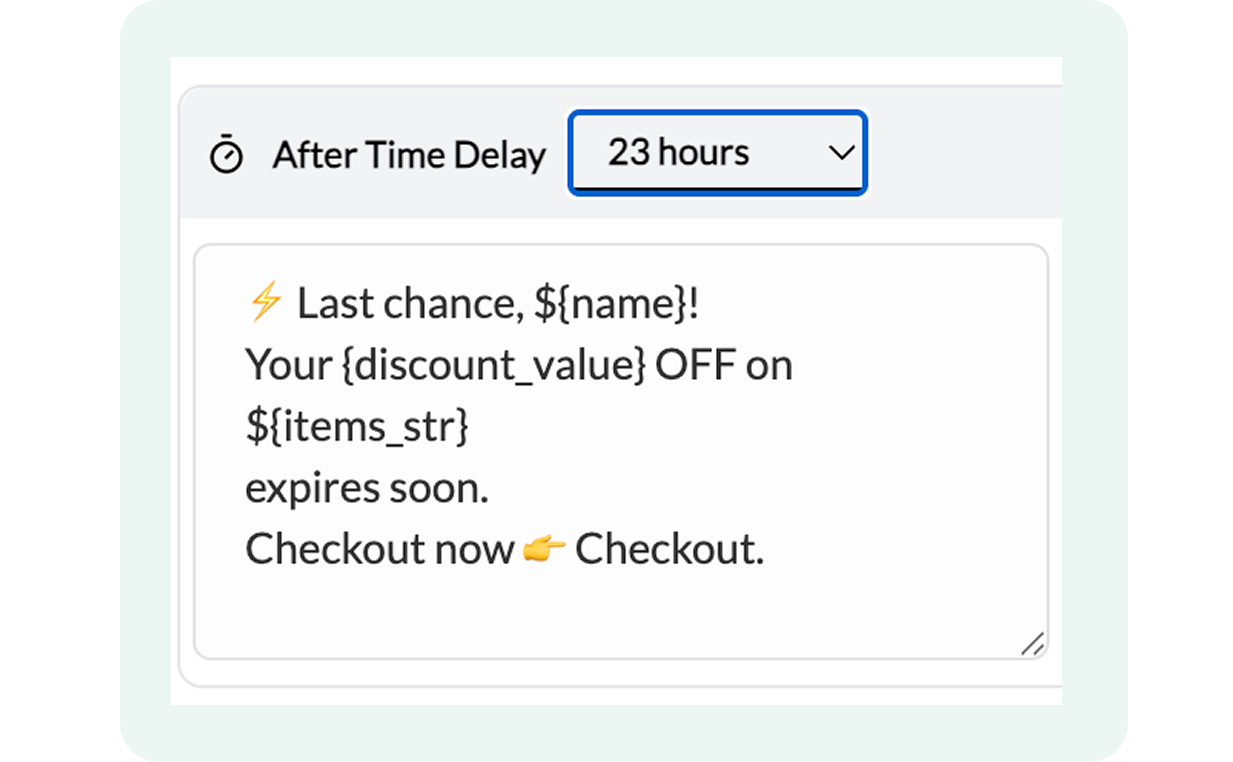
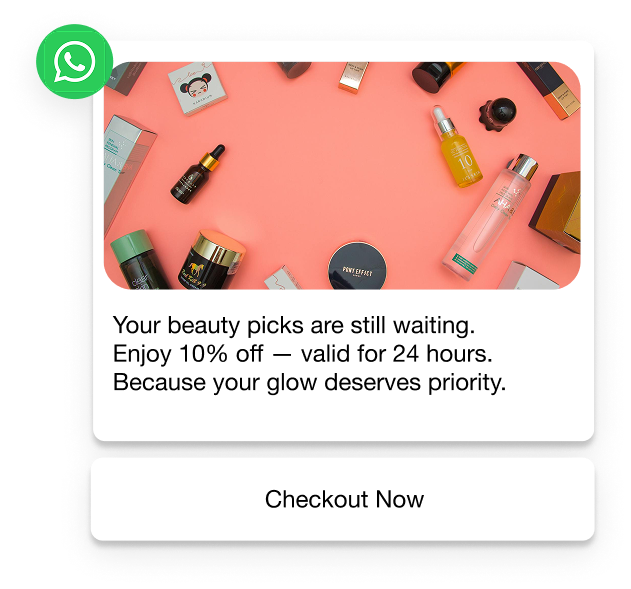
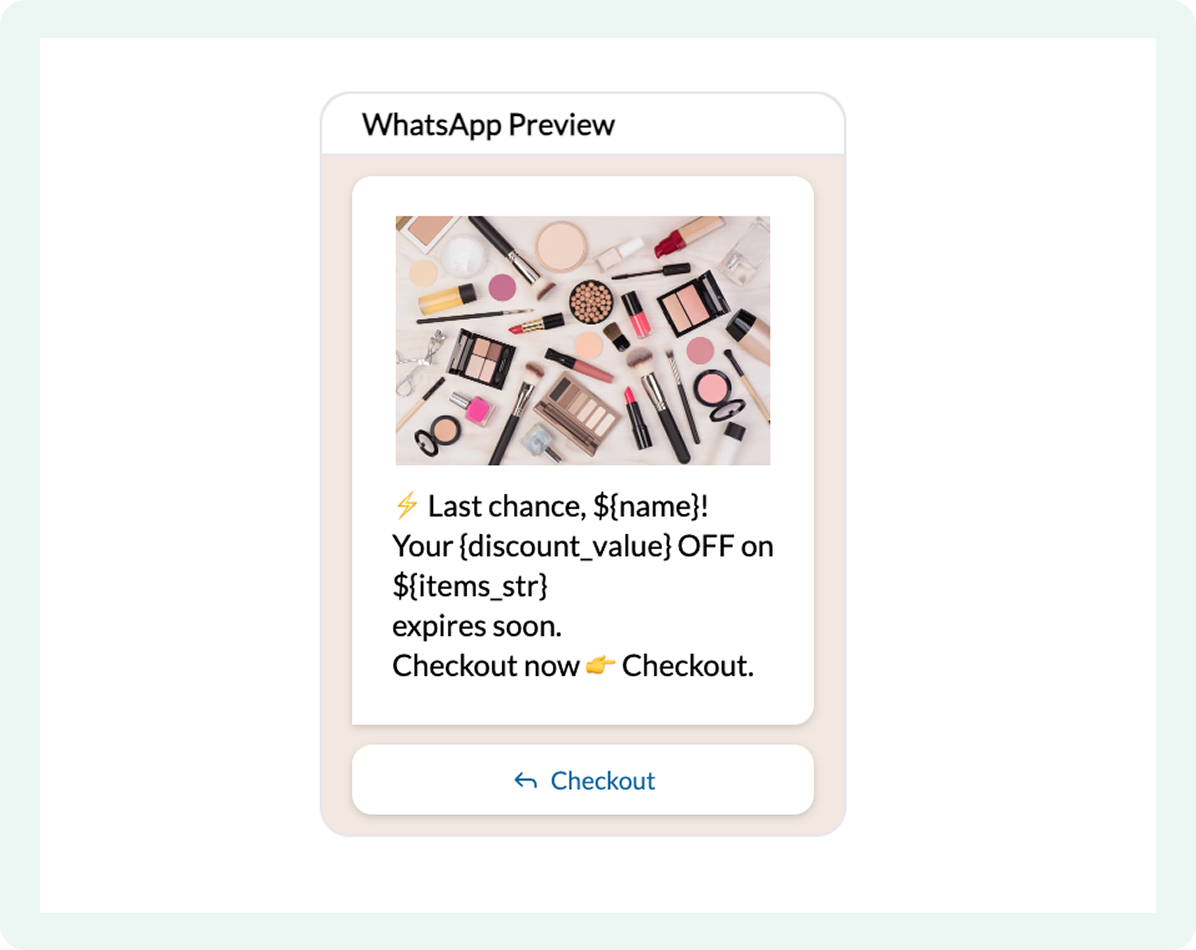
Here’s the preview of the third abandoned cart reminder with a 15% off discount value and a limited timeline:
How to track recovery performance: Clicks, orders, revenue
This section explains where to find tracking data for abandoned cart reminders and how to review clicks, completed orders, and attributed revenue inside the Flowcart Shopify Plugin.
- Go to Analytics and select Abandoned Cart Analytics in the Flowcart Shopify Plugin interface
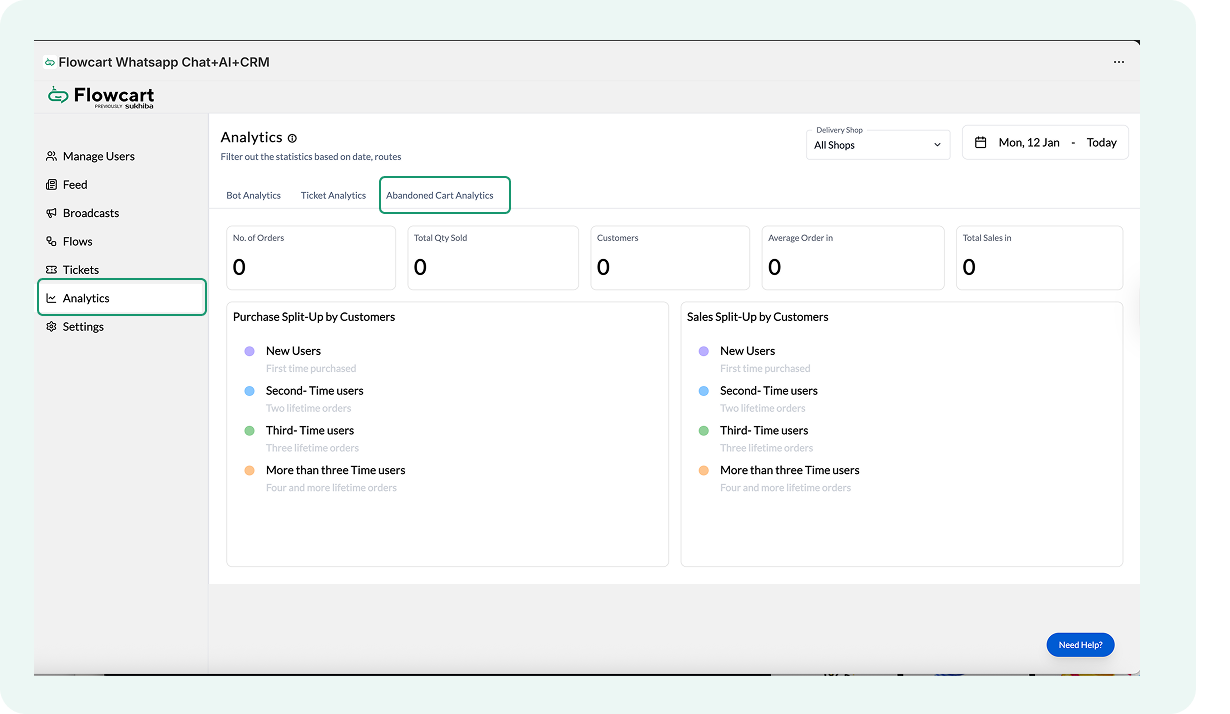
- Configure the dates in the top-left corner to see specific data
How to troubleshoot abandoned cart reminders that aren’t sending?
If WhatsApp abandoned cart reminders stop, review the checks below to identify where the flow may be breaking.
- Start by confirming that the Abandoned Cart flows are active. Each reminder stage runs as a separate flow. If any flow is inactive, that reminder will not send, even if earlier reminders are working.
- Verify that the Flowcart Shopify Plugin captures the customer’s phone number. Abandoned cart reminders rely on the phone number saved with the cart or checkout. If Shopify does not capture a phone number, the Flowcart Shopify Plugin cannot deliver the reminder.
- Check the time delay settings for each reminder. A reminder may still be waiting for the configured delay to pass. Also, review business-hour rules, as the Flowcart Shopify Plugin defers messages scheduled outside allowed hours until the next sending window.
- Confirm that the discount configuration is valid for discount-based reminders. An invalid discount type, value, or checkout URL can prevent the reminder from completing successfully.
- Use the preview and test views to validate message content. Missing variables, buttons, or checkout links can cause reminders to fail or appear incomplete.
If reminders stay undelivered after these checks, review each reminder flow individually to confirm that timing, conditions, and message content align across all stages.
Connect Your Shopify Store to WhatsApp with the Flowcart Plugin
Flowcart is a Shopify plugin that turns WhatsApp into a measurable revenue channel. It helps you capture consented WhatsApp subscribers from your store using smart pop-ups and opt-in widgets, then grow sales with ready-made automations like abandoned cart recovery, reorder reminders, upsells, and win-back journeys.
Customers can complete a one-click checkout directly inside WhatsApp (with a Shopify checkout fallback when needed). Flowcart also supports click-to-WhatsApp ads with clear attribution, so you can see exactly which campaigns and conversations are driving checkouts and revenue
What You'll Need
Before the Shopify store can start recovering lost sales on autopilot, ensure the following foundations are in place:
- Your store must be on a Basic, Shopify, Advanced, or Plus plan.
Please note that the install button will only be visible in the Shopify App Store if you are on one of these eligible tiers.
- A fully functional storefront where products and customer checkouts are currently managed
- Customers with a valid WhatsApp phone number who have opted in to receive messages
Installing the Flowcart Plugin on Shopify
To install the Flowcart plugin on Shopify:
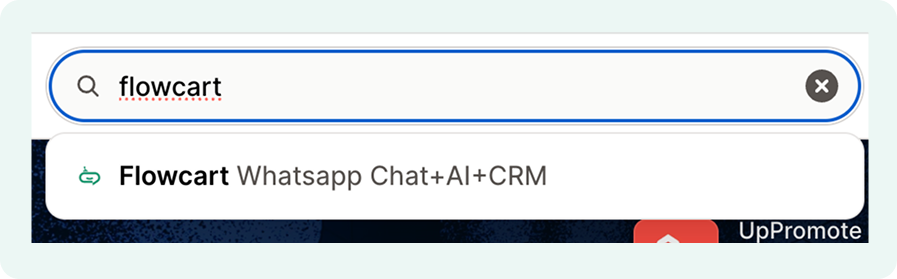
- Open a web browser and navigate to the Shopify app store
- Type Flowcart in the search bar to find the plugin. Click on the Flowcart Whatsapp Chat+AI+CRM plugin from the search results
- Select the Install button to begin the installation process
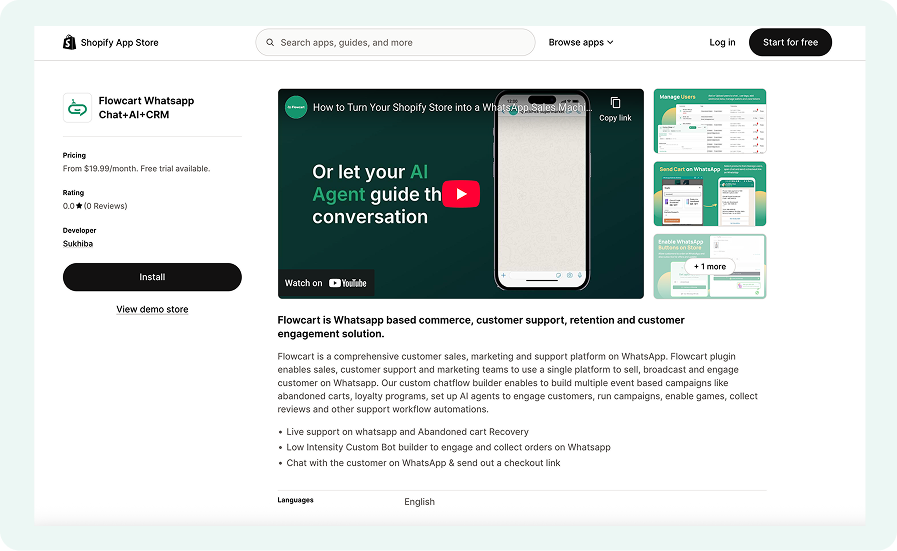
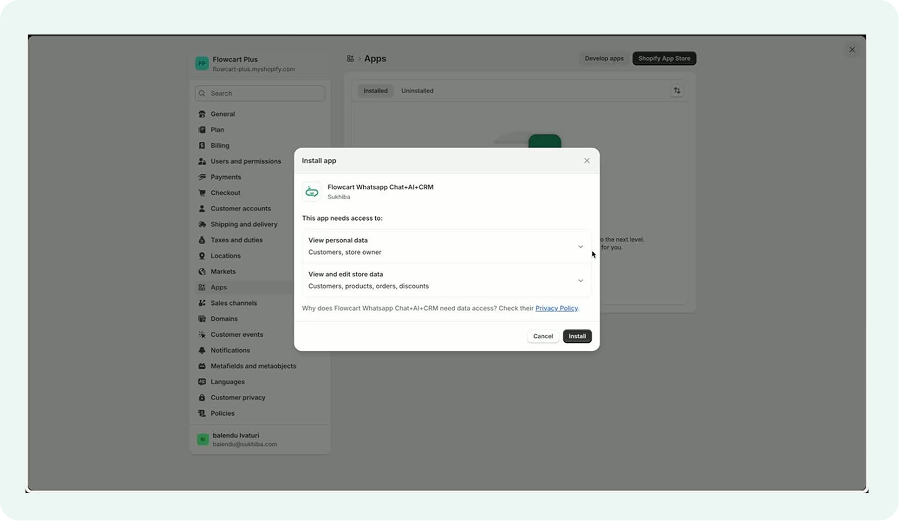
After clicking 'Install', the merchant will be redirected to the installation page.
- Review the permissions that the app requires
- Click on the Install button to proceed
Once the installation is complete, a trial account will be created automatically, and the merchant’s number will be added as an admin.
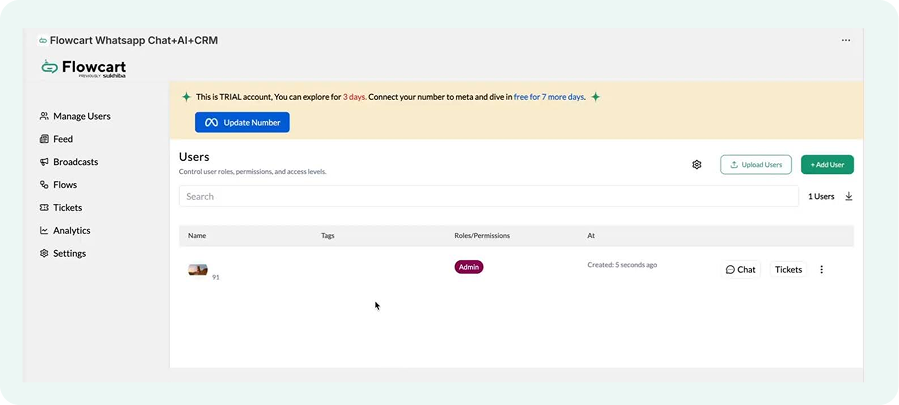
The merchant can explore the features available in the trial account for three days, with an option to extend it to seven days if they connect their number via Meta.
Connecting the merchant’s number
To connect the number:
- Click on Update Number

- Select Proceed to Meta Onboarding
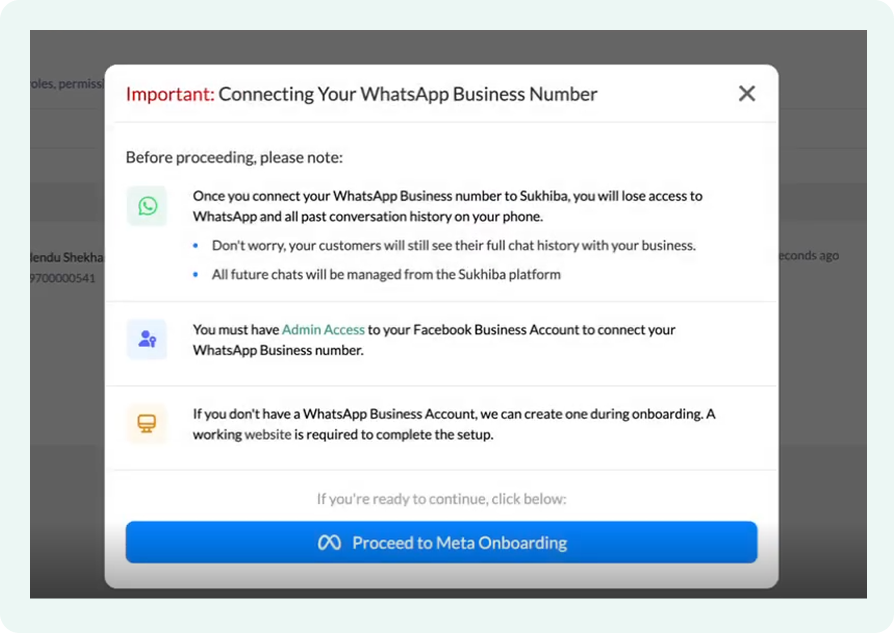
- Log into your Meta account and add your number
- Contact us via WhatsApp for assistance
Best practices to follow
To ensure a smooth integration and avoid technical delays, merchants should keep the following points in mind while setting up the Flowcart plugin.
- Before beginning, the user should confirm they have the necessary administrative roles in Shopify to install and authorize third-party applications. Without these permissions, the installation will be blocked at the authorization stage.
- During installation, the merchant should carefully review the plugin's requested data access. This ensures an understanding of how Flowcart interacts with store data to power the WhatsApp flows.
- It is recommended that merchants explore all Flowcart features immediately after installation. Familiarizing the team with the dashboard during the trial period ensures the store can use the automation tools before the first billing cycle.
- For a seamless onboarding experience, merchants should have their Meta Business Suite and WhatsApp Business Account credentials ready. Having these at hand prevents interruptions during the final stages of the sync.
- If the installation screen hangs, clearing the browser cache, refresh the page, and try again. Sometimes, browser extensions or ad-blockers can interfere with the Shopify admin redirect.
- If the flow is not triggering after installation, the merchant should navigate to the "Apps" section in Shopify to ensure the Flowcart plugin is listed as "Installed" and has not been accidentally deactivated.
If reminders stay undelivered after these checks, review each reminder flow individually to confirm that timing, conditions, and message content align across all stages.